Corpses and Ice is a Main Mission in Nioh 2. This mission is recommended for level 44, has a difficulty level of 5, and features both human and yokai enemies. Corpses and Ice tasks players with finding a way through the battlefield at Anegawa and putting an end to the chaos Magara Naotaka has caused. Please see Missions for other walkthroughs on other missions.

General Info
- Previous: A Way Out
- Next: Bird in a Cage
- Recommended Lvl: 65
- Mission Lvl. Difficulty: 5
- Bosses: Magara Naotaka
Video Walkthrough
[video goes here]
Map
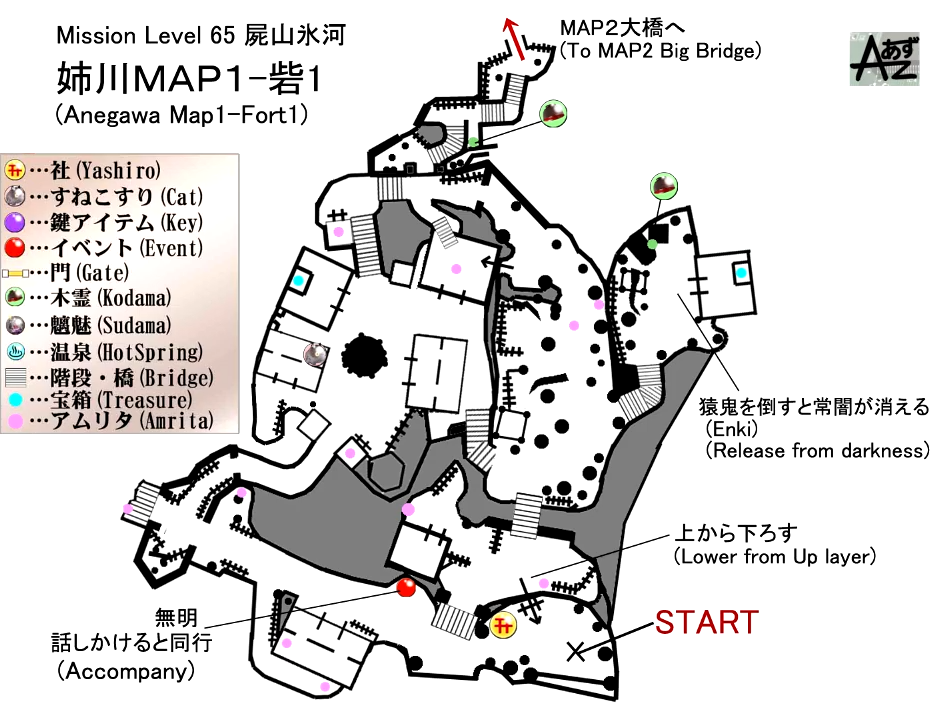
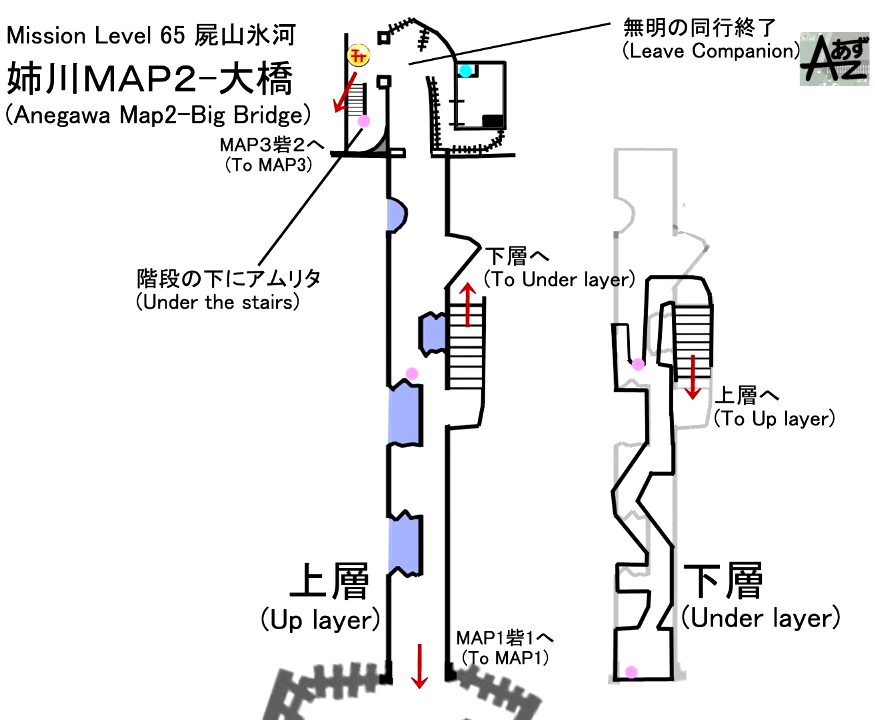
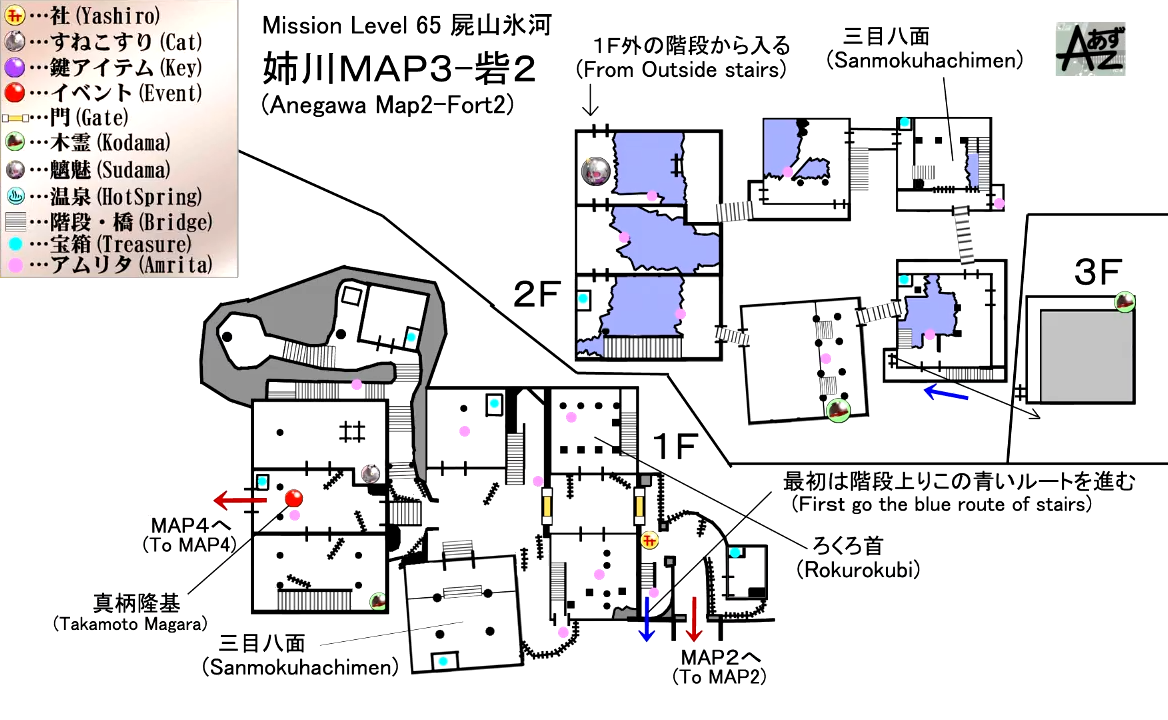
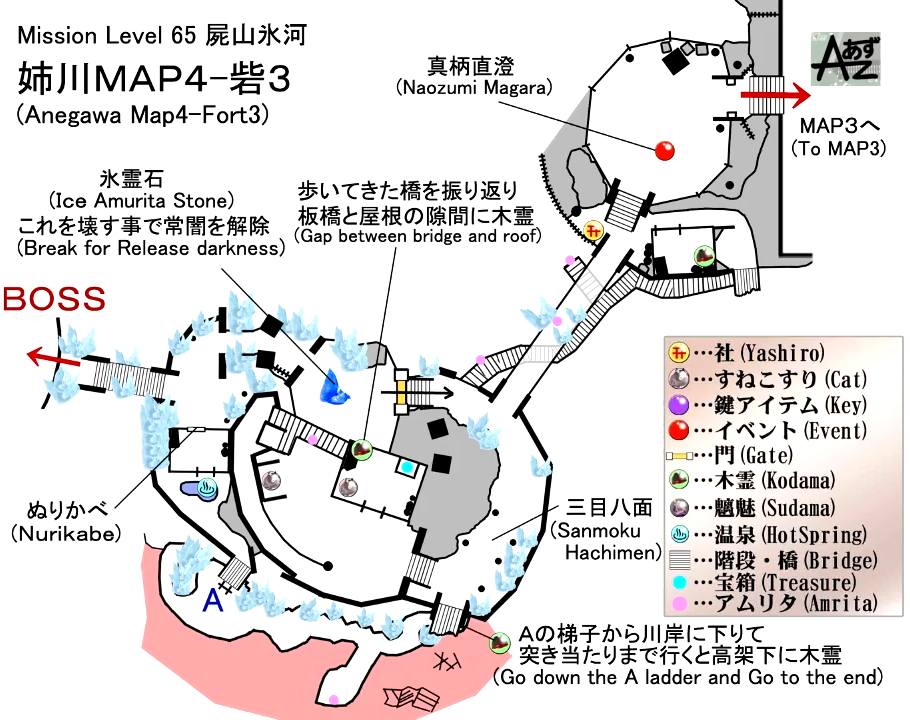
(Credit to あずchannel (Youtube))
Mission Rewards
First Time Completion
- Gesture: Fire
- Taro Tachi (WATER) x1
- Water Omamori x1
- Highest Quality Leather Platelet x3
- 13400 Gold
- 7824 Amrita
Subsequent Completion
- ??
- ?? Gold
- ?? Amrita
NPCs
Bosses
Items
Collectibles
Equipment & Materials
- Elixir
- Stone
- Arrow
- Writing Set
- Spirit Stone
- Oni-bi Core
- Hand Mirror
- Prayer Beads
- Sacred Arrow
- Demon's Horn
- Shrapnel Bomb
- Inspiriting Gem
- Quality Lacquer
- Large Spirit Stone
- Rifle Ammunition
- Gunpowder Bomb
- Lantern Plant Fruit
- Skeletal Warrior's Sacrum
- Roaring Gun Ammunition
- Smithing Text: Demon's Axe
- Highest Quality Tamahagane
- Smithing Text: Double-headed Snake Tonfa
Soul Cores
- Enki Soul Core
- Yoki Soul Core
- Mujina Soul Core
- Toxic Slime Soul Core
- Namahagane Soul Core
- Mitsume Yazura Soul Core
- Warrior Skeleton Soul Core
Key Items
- none
Enemies
- Enki
- Yoki
- Mujina
- Namahage
- Toxic Slime
- Mitsume Yazura
- Warrior Skeleton
- Magara Takamoto
- Archer
- Axe-wielding Soldier
- Spear-wielding Soldier
- Sword-wielding Soldier
Corpses and Ice
Mission Start Text
Lord Nobunga has rallied his troops and is already on his way to Omi. He's determined to put an end to this conflict with the Azai and Asakura, once and for all.
The combined forces of Echizen and Omi are not to be underestimated, but it seems Nobunga has called in the forces of Tokugawa Ieyasu to help match them.
Lord Ieyasu is a daimyo from Mikawa, in the east of Owari, and a trusted friend of Lord Nobunga.
Mission End Text
What a victory! We did it! And you taking out Magara Naotaka really helped swing the battle in our favor. The Tokugawa general Honda Tadakatsu was in awe! But it's pretty clear the Azai wasn't fighting fair - they were using Spirit Stones. I mean, how else could they fight with yokai like that? And that monstrous form Magara Naotaka took...? But how...? Well, maybe now's not the time for this. Lord Nobunga wants to keep this momentum going and make a push on Azai Nagamasa's stronghold, Odani Castle.
Let's go Hiddy! Lady Oichi is bound to be there!
Kodama Locations
- From the starting point, go to the courtyard where you'll encounter some soldiers. Go up the incline and go left. Head down the first set of stairs and check the right side corner where you'll see some wooden boxes. The Kodama is hiding behind it.
- The second Kodama can be found outside the white house that's inside the first dark realm near the starting point. Check and break the wheelbarrow that's on the left side to find the Kodama.
- From the second shrine, go up the stairs and climb the ladder outside the building that's on the left. At the top, follow the balcony and you'll find some wooden boxes at the end. The Kodama is hiding behind it.
- From the second shrine, head inside the center building where you encounter Magara Takamoto. Go inside the room that's on the left and check the cabinet shelf next to some small crates that are under the stairs, you'll find the Kodama at the corner of it.
- From the location of the fourth Kodama, go up the stairs and head outside towards the connected building. There's an unaware soldier there that you can grapple from behind. After killing him, check the right-hand side of the building and you'll find the Kodama at the corner of the small set of stairs.
- The sixth Kodama can be found inside the house that's on the left side of the third shrine. It's hiding behind some crates that's on the left corner.
- For the seventh Kodama, cross the bridge from the third shrine and head up the stairs where you'll find the third dark realm. Work your way around the area where you'll find a path that leads up the rooftops. You'll find the Kodama on the rooftop beside the wooden fences on your left.
- After dealing with the third dark realm, go down the incline where you'll encounter three soldiers guarding the path ahead. In the same area where the soldiers were, there's a Nurikabe wall nearby. Kill it or pacify it with a gesture so that you can enter the room behind it where you'll find the hot spring. Enter the room and go up the path near the hot spring, you'll find a ladder at the end. Climb down to the bottom and go around the area, you'll find the Kodama at the end of it.
Sudama Locations
- The first Sudama can be found on the second floor of the center building near the second shrine where you face Magara Takamoto.
Scampuss Locations
- The first Scampuss can be found inside the second small barn past the broken bridge that's near the starting area.
- At the second shrine, the second Scampuss can be found inside the room that's on the right side of the center building where you face Magara Takamoto.
- The third Scampuss can be found inside the third dark realm across the bridge from the third shrine. Upon entering the dark realm, walk up a bit and you'll see an enclosure on the left where a Gaki is standing. You'll find the Scampuss there as well.
Spa Locations
- It can be found behind a Nurikabe wall just before reaching the boss of this mission. After dealing with the third dark realm, go down the incline where you'll encounter three soldiers guarding the path ahead. In the same area where the soldiers were, there's a Nurikabe wall nearby. Kill it or pacify it with a gesture so that you can enter the room behind it where you'll find the hot spring.
Locks Locations
- Onmyo Mage's Locks can be found inside the chest that's inside a dark realm. The dark realm is near the second shrine, inside a building. You'll have to kill the Mitsume Yazura first so that you can open the chest that's on the second floor of the building.
- From the 2nd shrine, head to the center building where you encounter Magara Takamoto. Go inside the room on the left, climb up the stairs, head outside and walk onto the planks connecting the other buildings. In the end, you'll enter a second building where the floor is broken, walk around the corner to your left and you'll see a small chest beside the entrance. The Ninja's Locks is inside the small chest.
Corpses and Ice Walkthrough
First Shrine

The year is June 1570 and players arrive at Amegawa in Omi Province. You'll see the first shrine at the starting point and a ladder that you can knock down later to open up a shortcut. Head down the path ahead of the shrine and you'll find Mumyo, speak to her and she'll join your party and accompany you for the early sections of the mission. From Mumyo's position, you'll see a small barn to the left where you'll find a sword-wielding soldier. There's a corpse inside that you can loot and behind the barn as well. Once you've searched the area, continue forward and kill the two soldiers standing by the broken bridge. There's another corpse that you can loot as well, just be careful not to fall off - when that's done, continue further and go up the path that's on the right.

When you reach the top, you'll find a watchtower on your right which you can climb to find an item, while on the left side, there's another open barn where you can find the first Scampuss. After checking the barn and the watchtower, head inside the courtyard section where you'll encounter a couple of soldiers one is patrolling on the ground, another one that's wielding a rifle standing on a roof that's just in front of you, an archer inside a watchtower on the left side between the white building and incline, and another inside a white-colored building.

You'll find a large chest inside the white building containing a Mujina, make sure to mimic the same gesture it does to avoid it from being hostile and to obtain loot. After you've cleared the courtyard, continue forward and kill four more soldiers that are on the incline going up. At the top of the incline, there's a plank that you can walk on to get to the roof where you'll find a corpse that you can loot.

Go towards the path on the left, and check the right side corner of the first set of stairs where you'll see some wooden boxes, you'll find the first Kodama hiding behind the boxes. Before you head to the bottom where you'll see a worn-out bridge, you'll want to go back to the courtyard, there's a set of stairs behind the wooden house that's opposite of the white house. You'll enter the first dark realm as soon as you approach the steps.

Before you go to the path on the left, go down the stairs on the right side and you'll exit the dark realm where you'll find the ladder that you can kick down to open up a shortcut leading back to the starting point. There are also two soldiers guarding the nearby house, one wielding a sword, and the other is an axe. There's nothing inside the house and the path ahead is a dead-end, however, there's a body outside that you can loot near the house - go back into the dark realm after clearing the area.
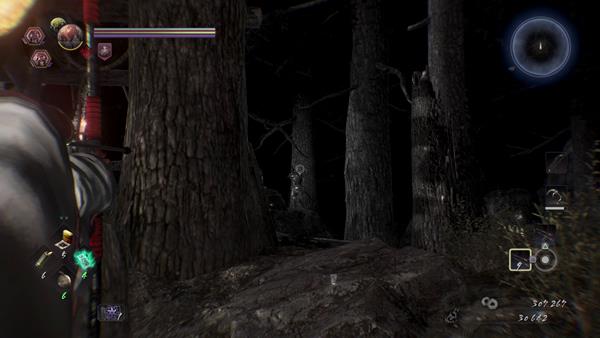
Inside the dark realm, there's a Warrior Skeleton ahead wielding a rifle, standing on a cliff on both sides, left and right. It can see you from afar, so try to shoot it with your ranged weapons before it sees you. Below it, there's also a Yoki that's patrolling the area. You'll want to kill the Warrior Skeleton first then try to draw the Yoki out of the dark realm and kill it. Apart from that, if you walk up a bit, you'll see two Gaki eating a corpse that you can loot containing Prayer Beads. The source of the dark realm is an Enki which is located on the upper right side of the area where you'll find it roaming around another white house - killing it dispels the field and you'll be able to open the chest inside the house.

Outside the same house, you'll see some wheelbarrows on the left side. Break it and you'll find the second Kodama. Once you've cleared the area with the dark realm, go back to where you saw the first Kodama and head towards the worn-out bridge.

Be careful when you cross the bridge since most of the path for you to walk on is broken and there's three Warrior Skeleton yokai that you'll encounter in the middle of the bridge. It's better if you draw them away from the bridge and fight them on proper ground, this way, you can dodge and move around without worrying about falling off the bridge. After dealing with the Warrior Skeleton, there's a path on the right side of the bridge that goes underneath it. There's three Gaki there and two bodies that you can loot, you can try to shoot it from afar to avoid fighting in close-quarters or just have Mumyo kill them. After checking under the bridge, go back up and cross the bridge. By the bridge gate, there's a house on the right side where you'll find a small chest and the second shrine ahead - from here on, Mumyo parts ways and you'll venture in on your own.
Second Shrine

The gate beside the shrine is locked and needs to be opened from the other side. There's only one path ahead which is the stairs on the left, but before you head up, check behind the stairs and you'll find a body that you can loot.

At the top, don't go inside the building for now, but instead, go to the left side and climb up the ladder to reach the upper balcony. Follow it around and you'll find some wooden boxes where the third Kodama is hiding. Also, while you're at the balcony, you can use it to your advantage and scout for any soldiers that you see and try to kill them with your ranged weapons - after finding the Kodama, climb back down and enter the building, make sure you kill the soldier that's inside as fast as you can to stop it from blowing a horn that signals all nearby troops to attack you.

From the same building, you'll want to go straight where you'll enter another the second dark realm. Just by the entrance of the building that has the dark realm, there's a Warrior Skeleton that you can grapple from behind. You'll also find the source of the dark realm which is a Mitsume Yazura. If you're caught in a tight situation, you can run out the way you came from and back to the first building for it to lose track of you. Assuming you've killed the Yazura, go to the 2nd floor and you'll find the chest containing the Onmyo Mage's Locks which you can now open. Next, head to the bottom section of the building where you'll encounter another Warrior Skeleton and a Rokurokubi then go outside, you'll be able to open the gate that's near the second shrine. There's another gate behind you that's locked which you'll need to open from inside the courtyard - for now, retrace your steps and back to the chest where you found the Onmyo Mage's Locks.

From the chest, go out the door and head inside the other building ahead of you. You'll see a soldier that's looting a dead body on a plank. There's also another guy outside the balcony on the left, two more below you which seems to be looking at a dead body, and another guarding the entrance of the building near the two. Make sure you kill the one that's standing by the entrance to stop it from blowing a horn that alerts all nearby soldiers - once you've taken care of all the soldiers, open the large chest that's also inside the house and loot the body that was being looked at by the two soldiers.

After opening the chest, head outside and turn left around the building. There's a set of stairs that you can climb that goes up to the second floor of the same building, you'll want to go back to there and check the path on the right side from the balcony and walk onto the plank where you'll find the second Scampuss inside the room that's on the right side of the center building.

Once you've found the Scampuss, go back to the building, jump down, and head towards the house that's in front of it where you'll see a mist inside. The yokai within it is another Mitsume Yazura, kill it then open the large chest that's also inside the house.

Now, head to the building that's in the center of the courtyard where you'll find Magara Takamoto, the son of the famed warrior, Magara Naotaka. Shoot him on the head to stun him then follow up with a grapple attack. Apart from that, there's also a soldier next to him and another wielding a rifle above him. After you've killed them, open the large chest and loot the body that's in the building.

Go back outside the center building and head towards a narrow path on the right side. You'll find a set of stairs that goes up the 2nd floor of the building and straight ahead, there's another white house where a Yoki is guarding yet another large chest. Outside the white house, there's a well that you can hit to obtain an item.

Next, go outside the white house and head up the stairs where you'll see another soldier looking at the first Sudama. Kill him then approach the friendly yokai to trade with it. After that's done, head inside the next room that's ahead of you where you'll find another soldier sitting and another large chest at the corner, just be careful, because, at the other side of the room, there's another soldier wielding a rifle who can spot easily spot you and another wielding an axe that's on the stairs.

After killing the soldiers, you'll want to jump down and look under the stairs, there's a small cabinet shelf next to some wooden boxes. You'll find the fourth Kodama hiding at the corner of the shelf behind the boxes.

For the fifth Kodama, go back up the stairs and walk out the wooden plank that's connected to another building. You'll see another soldier ahead with its back facing you, kill the soldier and inside the building, check the right side, you'll find the Kodama hiding by the corner of the small set of stairs.

Next, instead of going back, head forward into the other connected building and just around the left side corner by the entrance, you'll see a small chest that contains 1x Ninja's Locks.

Once you've picked up everything and checked all of the building around the courtyard, go back to the center building where Magara Takamoto was encountered and open the large door that will lead you to a small courtyard where one of Naotaka's finest warriors is guarding the path ahead - after killing the enemy, open the gate that he was guarding and you'll find the third shrine.
Third Shrine

At the third shrine, don't cross the bridge yet. Go inside the house that's on your left, and break the boxes that are on the left corner. You'll find the sixth Kodama hiding behind it - proceed to the bridge after guiding the Kodama.

As you cross the bridge covered in ice, you'll encounter a new enemy yokai ahead which is the Namahage, it attacks by swinging its large sword, it can also fling rocks at you when it plunges its sword on the ground then using the force when it pulls it out. Its strong attack is quite slow, so when it flashes red and brings its sword over its head, take your time to counter its attack with a Burst Counter. Also, shoot its head first to break its horns which removes a huge amount of its stamina. Once it's dead, cross the bridge and go around from the right side to find a path leading under the bridge. There's two Warrior Skeleton in the middle and a Yoki at the end - under the bridge, you'll find some corpse here that you can loot.

After grabbing the items, go back and proceed forward where you'll encounter another Mitsume Yazura patrolling the area. Kill it, then go up the stairs where you'll find the third dark realm. For this area, the dark realm is different from the others. Usually, you'll have to find the yokai which appears to be the source and kill it to dispel the field, however, for this dark realm, its power comes from a large blue crystal that you'll need to destroy in order for the dark realm to disappear.

In the dark realm, you'll find a couple of Gaki, some are on the ground, while the others are on the rooftops. What you can do is try to kill the ones that you'll most likely run to and ignore the ones that are quite far from you. To save yourself from taking out the small yokai one at a time, find the crystal that's at the far end of the area and destroy it. Shattering it into pieces not only removes the dark realm, but it also kills all small yokai within the dark realm. Just take note that once you approach the blue crystal, two Oni-bi yokai will spawn from it which can easily be killed with whichever strong ranged weapon you use. Also, make sure that when you start to attack the crystal, don't stop, because if you leave it for a while, it will start to regenerate its HP. As mentioned, the small yokai within the dark realm will be killed once the crystal is destroyed, however, the Namahage within the field will still be alive and you'll most likely need to kill if you want to continue searching the area free of yokai.

Also, near the entrance of the dark realm, there's an enclosure on the left side where a Gaki is. You'll find the third Scampuss there.

Assuming you've already removed the dark realm and cleared all the Yokai, make sure to go back to the entrance and check the house next to it to find a large chest that you can now open. When that's done, go outside and head to where the crystal was. Go right and around where you'll find a slop that's going up which leads to the rooftops. Once you're at the rooftops, go straight and you'll find the seventh Kodama on the rooftop beside the wooden fences on your left - once you've checked and cleared the area, make sure you unlock the gate on the right side first to open a shortcut that leads back to the third shrine, then proceed further to the next section.

Go down the incline and you'll encounter three soldiers guarding the path ahead, one is sitting on the left side, the other is patrolling, while the third soldier is standing by the pillar. Before you head further towards another wooden bridge, in the same area where the three soldiers are, there's a Nurikabe wall nearby. You can kill it so that you can head in the secret room behind it, or pacify it with the right gesture. If you're lucky and you input the right gesture, it will disappear and leave some items behind for you to loot. The secret room that it was guarding contains the one and only spa (hot springs) for this mission - don't use it first, since the area where you fight the boss is nearby, use it when you are ready to fight the boss to gain its temporary HP regen effect.

Go inside the house and pass through the hot springs, there's a path that you can go to where you'll find a ladder at the end. Climb down to the bottom and you'll encounter a Toxic Slime yokai. Use bombs to inflict a huge chunk of damage or potentially killing it with one shot. Go around the area, and at the end of it, you'll find the last Kodama for this mission. There's also a body nearby that you can loot - after finding the last Kodama, go back up and head towards the marked destination where the boss awaits.
Boss Battle: Magara Naotaka

Once you drop down to the marked destination, a cutscene will trigger before facing the boss for this mission, Magara Naotaka. To learn more about his attacks, click here to jump to his page or check the video below - successfully killing this boss completes this main mission and you can also obtain Smithing Text: Double-headed Snake Tonfa apart from other random items.
Video
Map
[map goes here]
Trivia & Notes:
Trivia and notes go here

Destroying the blue crystal in the dark realm actually killed everything including the Namahage, and not just the small yokai.
0
+10
-1