Eternal Rivals is a Main Mission in Nioh 2. This mission is recommended for level 124, has a difficulty level of 2, and features both human and yokai enemies. Eternal Rivals tasks players with saving Yoshitsune from the forces of Fujiwara. Please see Missions for other walkthroughs on other missions.

General Info
- Previous: A Song To Calm the Storm (DLC)
- Next: n/a
- Recommended Lvl: 124
- Mission Lvl. Difficulty: 2
- Bosses: Minamoto no Yoshitsune
Video Walkthrough
[video goes here]
Map
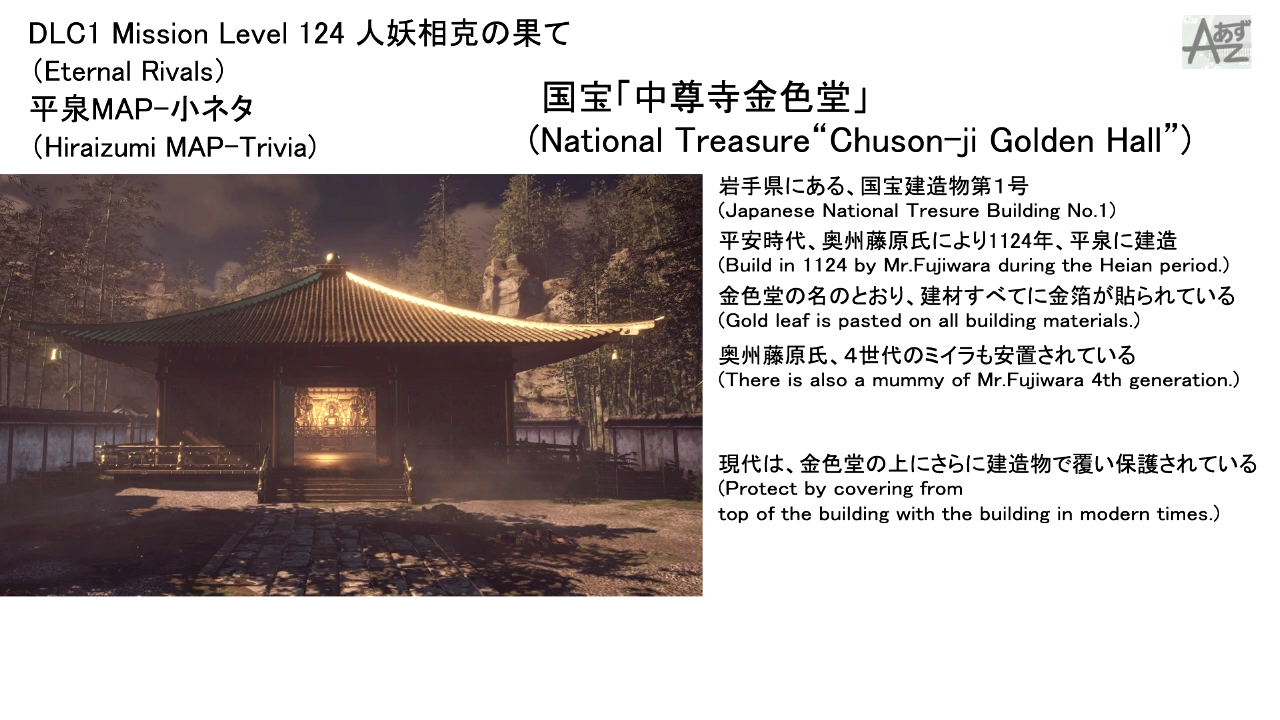
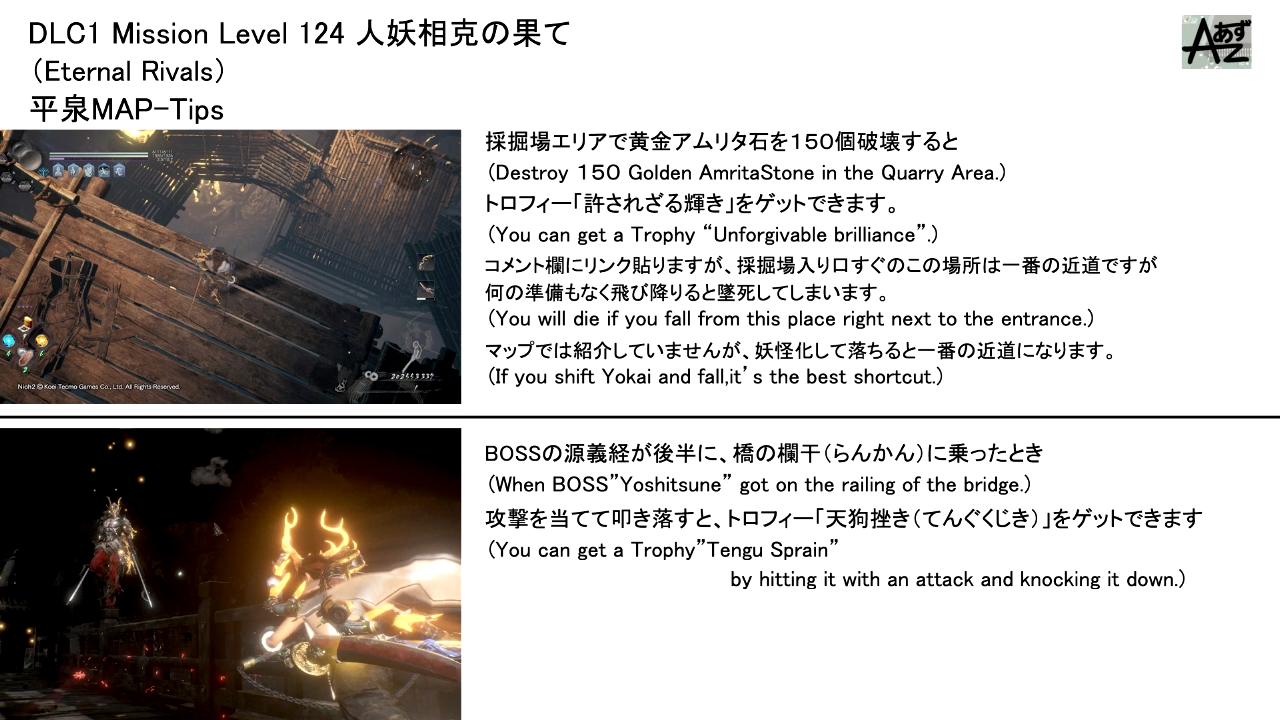
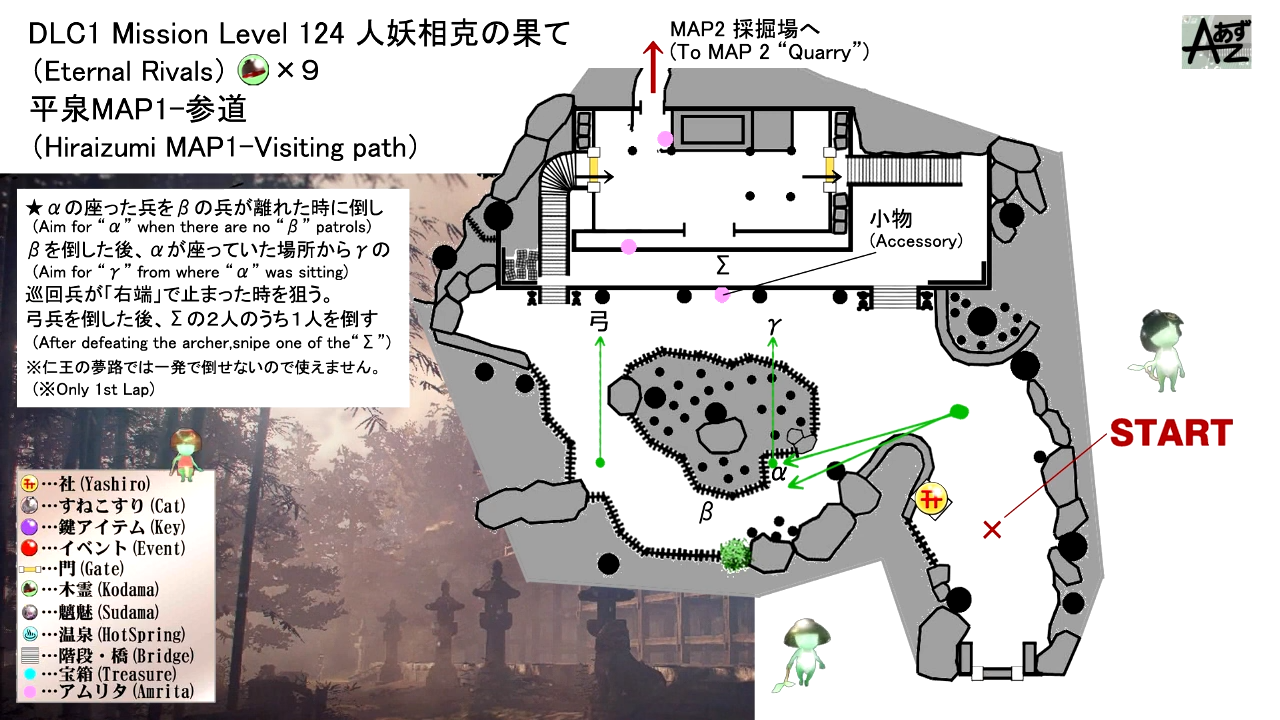
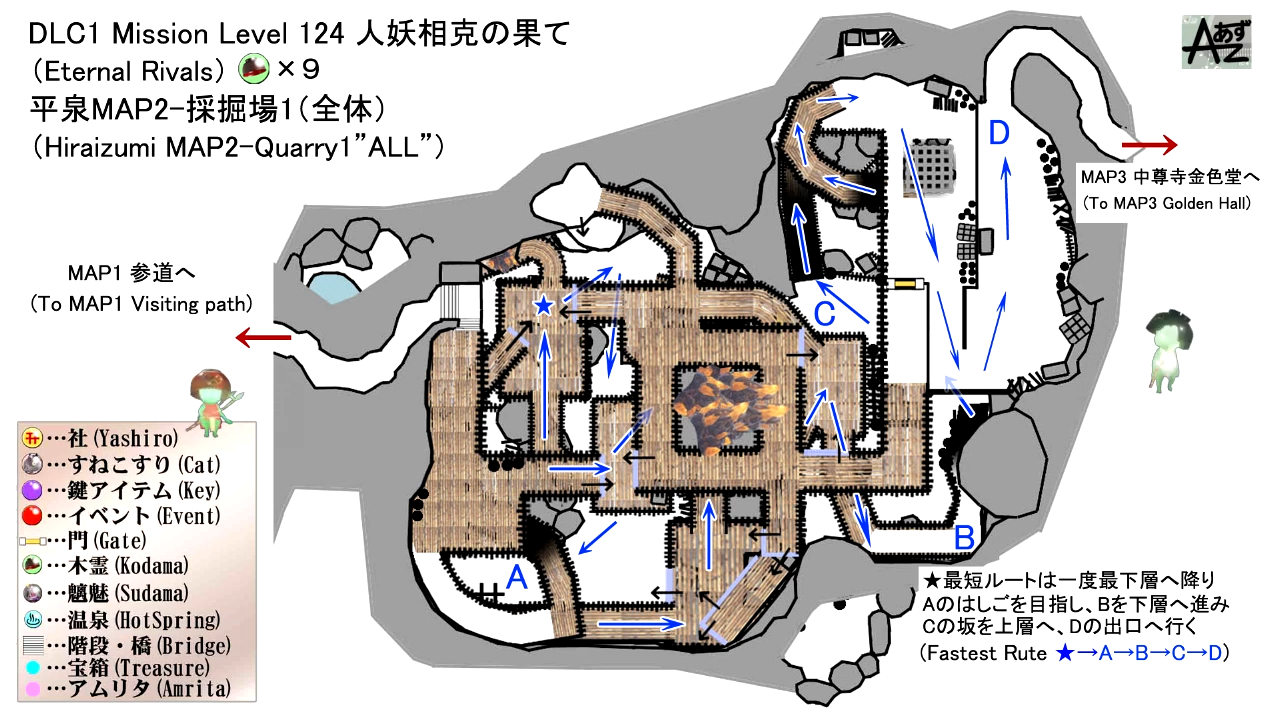
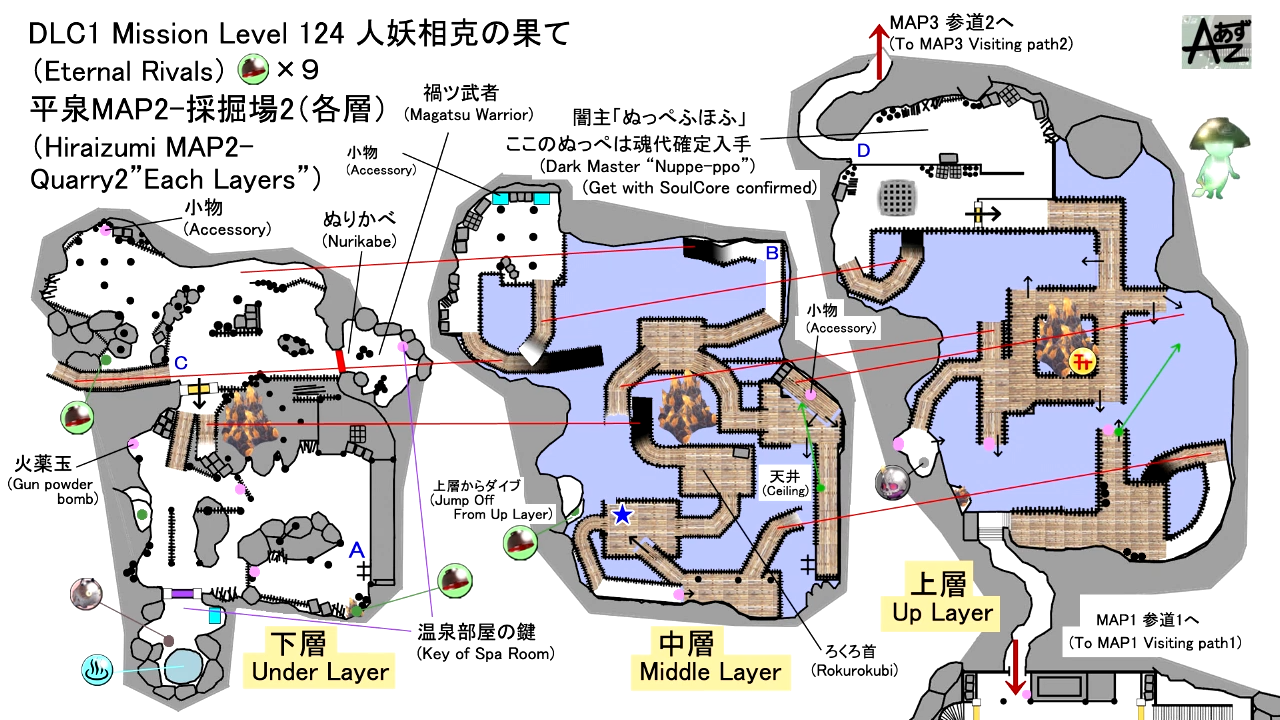
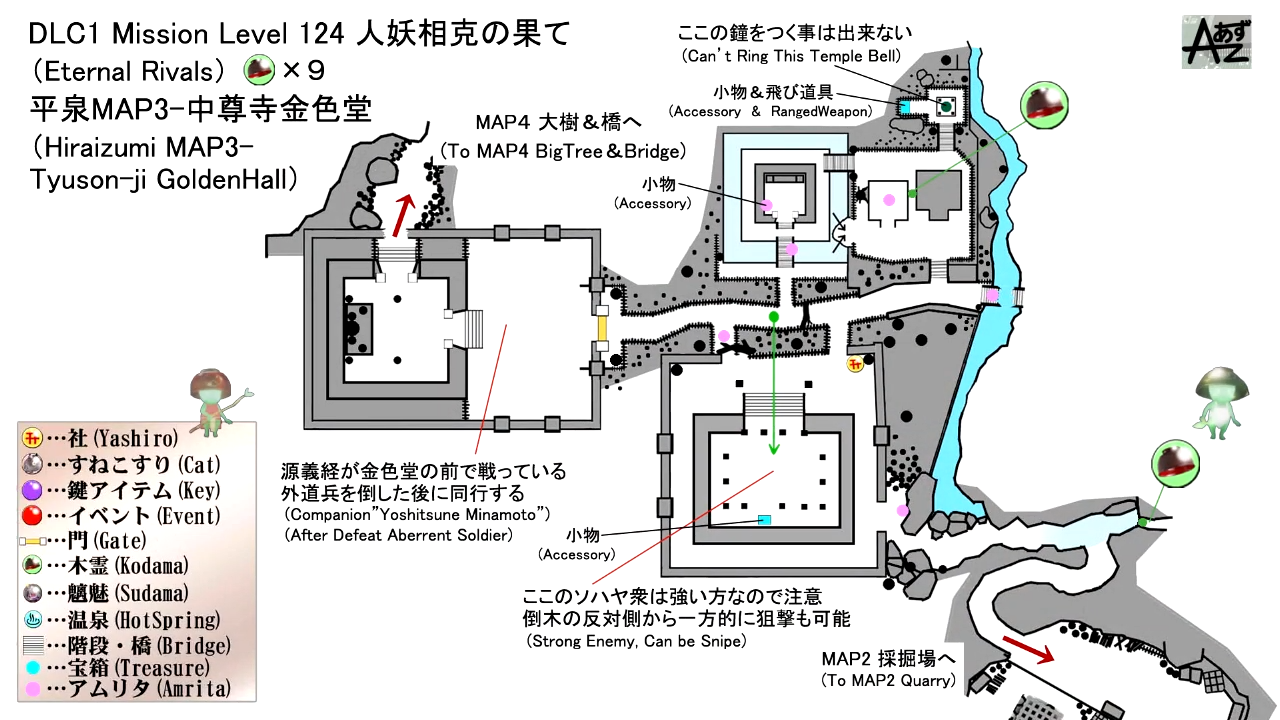
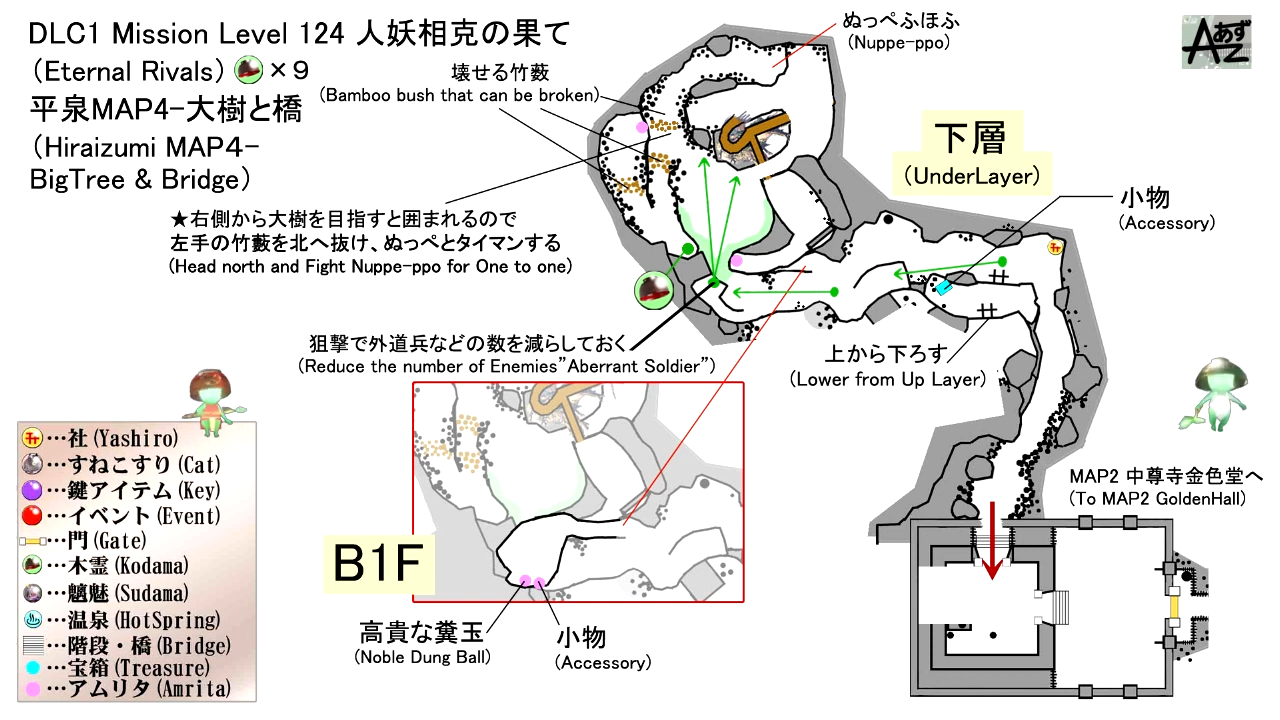
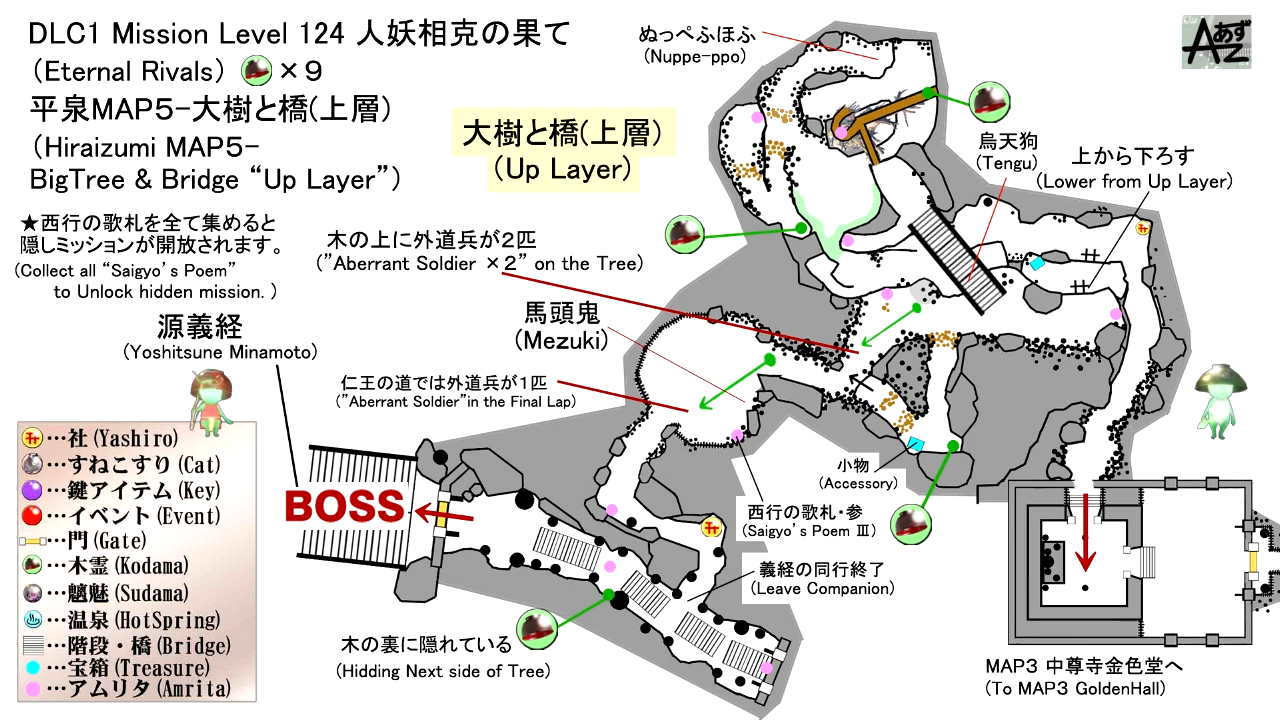
(Credit to あずchannel (Youtube))
Mission Rewards
First Time Completion
- Samurai's Locks x1
- Semiore Flute
- Seto Taisho Soul Core
- Summoner's Candle x1
- 34000 Gold
- 100776 Amrita
Subsequent Completion
- ??
- 34000 Gold
- 100776 Amrita
NPCs
Bosses
Items
Collectibles
Equipment & Materials
- Arrow
- Magatama
- Hand Mirror
- Sacred Water
- Yokai Incense
- Water Omamori
- Shrapnel Bomb
- Nuppeppo Liver
- Shoulder Strap
- Lumicite Shard
- Noble Dung Ball
- Red Spider Lily
- Lumicite Crystal
- Small Spirit Stone
- Lumicite Fragment
- Aberrant Soldier Stone
- Nene Slayer
- Ningen Mukotsu
- Hosho Sadayoshi
- Little Crow & Quickdraw
- Weathered Bone & Bleached Twig
- Brawler Armor
- Moon Charm Armor
- Soahaya Garb Armor
- Love-Crested Armor
- Tiger of Higo Armor
- Great Hachiryo Armor
- Blessed Sleeve Armor
- Shinto Priest's Hunting Armor
Soul Cores
Guardian Spirit
Key Items
- Hot Spring Chamber Key
Enemies
- Mezuki
- Kiryoki
- Dweller
- Nurikabe
- Nuppeppo
- Namahage
- Rokurokubi
- Ippon-Datara
- Karasu Tengu
- Samurai Guards
- Aberrant Soldier
Eternal Rivals
Mission Start Text
"Perhaps Hakutaku has informed you already, but we face a most urgent situation! While being pursued by the forces of the Fujiwara, Yoshitsune seems to have vanished. Furthermore, it seems that Chuson Temple, the place where he was heading, is completely surrounded by the Fujiwara. Hmm... As things stand, we won't be able to enter from the front. But if the rumors are to be believed, there is another way to get to the temple. Now we really must get going. There is not a moment to lose!"
Mission End Text
"It's that old shrine again. So I have returned to my own time. But that was no illusion, no dream. The sound of that flute still sounds in my ears. Where next? The fragment of memory Yoshitsune shared with me was guiding me, I know it. And so a new journey begins..."
Kodama Locations
- For the first Kodama, head inside the cave and go down one level of the scaffolding. When you reach one level down, turn right, drop down another level below, turn right, and continue going down until you reach the bottom level where the Nuppeppo is. At the bottom, look for the ladder, you'll find the Kodama next to it.
- Climb up the ladder go straight, turn left, head up one level, turn left again to reach the third level, and then turn right towards the inclined path until you reach the top of a cliff where there's also a Sudama. Walk to the left side of the bamboo bridge and drop down onto the platform below, you'll see another platform that you can jump down onto where you'll find the second Kodama.
- For the third Kodama, from the second Kodama shrine inside the cave, go west and then head down the path on the right side. From here, keep going straight until you reach the opposite side of the bottom area of the cave. This is where you'll encounter the dark realm. Keep going straight under the scaffolding, then check the left side of it, you'll find the Kodama at the corner.
- Head to the top of the scaffolding that's engulfed with the Dark Realm and kill the Nuppeppo which is the source and exit the cave. By the exit, turn right and you'll find the fourth Kodama.
- Proceed to the inclined path leading to the backside of a temple where you'll find the third Kodama shrine. From here, head inside the garden section of the temple and head north where you'll see a small shrine and a house. You'll find the Kodama in between the two structures
- Next, head west towards your objective where you'll find Minamoto no Yoshitsune. Exit the temple on the east side and head towards the fourth Kodama shrine within the bamboo forest. Continue through the area and as you climb the first inclined path, go right, straight, then left. Head up another inclined path, and you'll find the Kodama standing at the edge of the rocks.
- Go back down the inclined path where the sixth Kodama was and check the east side where you'll see flowers on the ground that leads to a large tree. Go around that tree and you'll find a bridge that leads to the top of it where you'll find the seventh Kodama.
- Continue going straight from the large tree, cross the wooden bridge, turn right, make an immediate left, cut through the bamboo, and you'll find the eight Kodama on the left side of a dead-end where you'll also find a large chest.
- As for the last Kodama, when you reach the last Kodama shrine, before opening the door that leads to the main objective, you'll find the Kodama behind a tree on the left side.
Sudama Locations
- At the bottom section of the cave where you encountered the Nuppeppo, climb up the ladder go straight, turn left, head up one level, turn left again to reach the third level, and then turn right towards the inclined path until you reach the top of a cliff. You'll find the Sudama there.
- When you reach the fourth Kodama shrine within the bamboo forest. Just push through the area until you reach a field of purple chrysanthemums and a Mezuki yokai. On the left side of the flowers, you'll find the Sudama hiding.
Scampuss Locations
- The scampuss can be found resting near the spa (hot spring) at the bottom section of the cave. You'll need the Hot Spring Chamber Key to unlock the hot spring room.
Spa Locations
- When you reach the bottom section of the cave where you'll see a scaffolding that's engulfed with the dark realm, check the west side and you'll find a Nurikabe yokai wall. You'll find the Hot Spring Chamber Key inside the small cave behind the yokai. Next, unlock the gate next to the scaffolding and then go straight and use the key to open the other gate that leads to the spa (hot spring).
Locks Locations
- none
Eternal Rivals Walkthrough
First Shrine
[img]
The year is June 1189 and players arrive at Hiraizumi in Mutsu Province. You'll find yourself at the first shrine by the starting point. Head straight towards the garden and you'll encounter a samurai resting on the left side. There are about 5 guards here patrolling the garden section of the temple, once you've killed all of the guards, head up the stairs and open the door to enter the temple where you'll encounter a ronin on the other end of the door - kill the ronin and head out the balcony on the right side to loot a body that's hanging, also don't forget to unlock the other door to unlock a shortcut near the starting point.
[img]
After clearing the area, inside the room, go through the hole to enter a cave that leads to the Golden Hall. Ahead of the scaffolding, you'll encounter two guards. You'll also find another body you can loot that's at the edge of the scaffolding on the left side where the soldiers were. Next, head down the wooden bridge where you'll come across another solder and a Dweller. Continue going down until you reach one level below the scaffolding where you'll see a resting ronin. Keep heading down until you reach the midsection where a yokai mist is blocking your path.
[img]
The yokai within the mist is a Rokurokubi, you need to kill it in order to pass. Aim for its head to temporarily stun it or to land a critical hit. After killing the Rokurokubi, continue going down the bamboo bridge until you reach the bottom part of the cave where you'll encounter 2x Aberrant Soldier, a Dweller, a new yokai enemy, the Nuppeppo. You'll want to try and kill the Abberant Soldier and Dweller yokai first before facing the slime-like creature. Once you've defeated the creature, climb up the nearby ladder, and work your way back up to the center section where you'll find the second Kodama shrine. Go back down one level and check the east section of the scaffolding to find another path leading towards the Ippon-Datara and a section of the cave that's engulfed with the dark realm.
First Dark Realm
[img]
Before entering the dark realm, make sure to unlock the gate to open a shortcut leading to the second Kodama shrine. When you're ready, walk up a bit near the entrance of the realm and shoot the Aberrant Soldier with your bow and arrow. This will catch their attention, allowing you to draw them out of the field one at a time. This also removes their buffs when they're inside the dark realm, there are three of them here. Go back outside, and head up the scaffolding that's near the gate you previously unlocked, you'll find a Kiryoki yokai at the second level of the scaffolding.
[img]
Next, go up one level and you'll find the source of the dark realm which is the new yokai enemy, the Nuppeppo that is accompanied by an Aberrant Soldier. Kill the soldier first before shifting your attention towards the Nuppeppo. Killing the large yokai will dispel the dark realm and you'll be able to open the large chest that's located one level down the scaffolding where the Kiryoki yokai was encountered. After you open the chests, go back up and exit through the tunnel to reach the outskirts of the Golden Hall Temple - from here, head up the inclined path where you'll encounter two large Bakegani, go through the broken wall and you'll find the third Kodama shrine on the right.
Third Kodama Shrine
[img]
From the Kodama shrine, check the monk's shrine next to it and you'll encounter a ronin inside. Defeat him and open the large chest he was guarding. After clearing the monk's shrine, head down towards the garden section where you'll need to work your way around to reach the objective that's on the west side. There are multiple yokai enemies guarding the houses and small shrines such as the Yoki, Bakegani, and Rokurokubi - don't forget to check each house and shrines to find loot.
[img]
Eventually, when you reach the marked objective, you'll find Minamoto no Yoshitsune who's fighting two yokai enemies. He'll automatically join the party once you open the door and find him by the shrine with a statue of Buddha. Help him defeat the x2 Aberrant Soldier and continue forward through the garden section. Along the way, a yokai mist is blocking the path, and you'll have to draw out and defeat the Kiryoki yokai within it to get through - continue forward after defeating the yokai and you'll find the fourth Kodama shrine.
Fourth Kodama Shrine
[img]
Next to the shrine, there's a ladder that you can climb where you'll find a small chest at the top. Climb back down after grabbing the items from the chest and as you head up the inclined path, you'll notice on the right side there's also a path leading down to a cave that's guarded by two large Bakegani yokai and two bodies that you can loot. After clearing the cave, go back outside and continue going up where you'll encounter another Kiryoki and Aberrant Soldier.
[img]
Upon reaching a large open field, you'll come across x2 Namahage. Make sure to shoot its horn to land a critical hit and to weaken the yokai, making it easier for you to kill. Continue forward through the bamboo forest section and you'll see a large tree trunk. Go around it and you'll find a bamboo bridge that leads to the top of the tree. You'll encounter another Namahage and Aberrant Soldier here. After killing the yokai, approach the wooden bridge that's blocked by a yokai mist, draw out the Karasu Tengu within the mist and defeat it in order to get through.
[img]
As you cross the bridge, go left and kick the ladder down to open a shortcut that leads back to the fourth Kodama shrine. Next, go east from the bridge and just about halfway, slice through the bamboo trees on the left side and you'll find a large chest and a Kodama. The path here is pretty much linear where you'll reach a field of purple chrysanthemums and a Mezuki yokai - kill the horse-like yokai, loot the body on the left side of the flowers to find Saigyo's Poem II, and then proceed forward through the linear path where you'll find the fifth Kodama shrine, the path from the shrine is again, linear where you'll find the main objective of this main mission.
Boss Battle: Minamoto no Yoshitsune
[img]
For this boss battle, you'll fight against Minamoto no Yoshitsune who has fused himself and harnessed the power of the yokai blade, the Ame-no-Murakumo Tsurugi. Once the battle starts, be ready to block, he'll start off by shooting out a couple of projectiles at you. If you see a myriad of swords that appear behind him and fly up in the air, be ready to dodge to your sides to avoid the rain of swords that land in a straight line towards your position. This boss is one of the most agile bosses you'll encounter, so you need to keep moving, be ready to dodge a lot,and make sure you counter his burst attacks so that you interrupt him and attack him a couple of times before he recovers.
[img]
Yoshitsune is even more deadly when he conjures the dark realm, allowing him to shoot a cluster of swords at you which quickly depletes your stamina bar. Be patient when he's attacking and if he tries to execute a combo strike, you can dodge to your side to avoid it and then rush towards his back to attack him - defeating him will complete this main mission and you'll obtain a few rewards, The Art of Combat: Sacred Bird Cry, and a new Guardian Spirit, Ho.
Video
[video goes here]
Map
[map goes here]
Trivia & Notes:
Trivia and notes go here
