Pervading Waters is a Main Mission in Nioh 2. This mission is recommended for level 74, has a difficulty level of 4, and features both human and yokai enemies. Pervading Waters tasks players to fight off the Saika mercenaries invading Ishiyama Hoganji. Please see Missions for other walkthroughs on other missions.

General Info
- Previous: Bird in a Cage
- Next: The Frenzied Blaze
- Recommended Lvl: 74
- Mission Lvl. Difficulty: 4
- Bosses: Gyuki, Saika Magoichi
Video Walkthrough
[video goes here]
Map
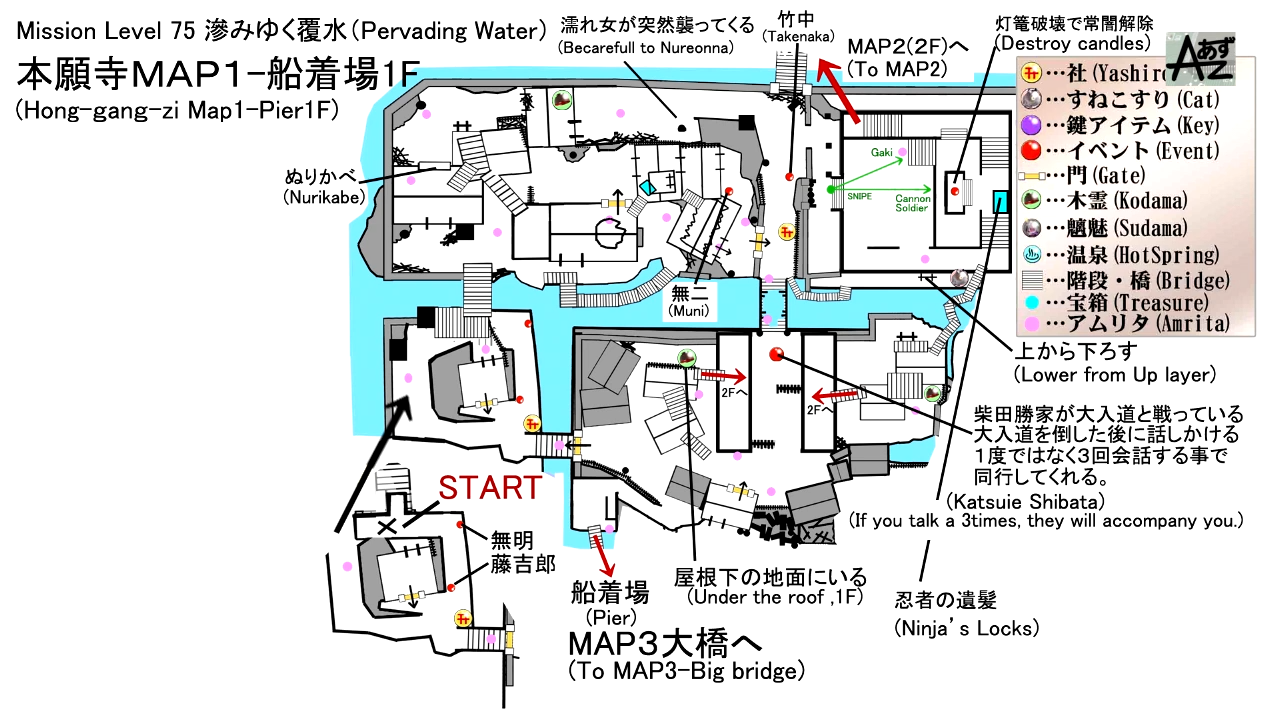
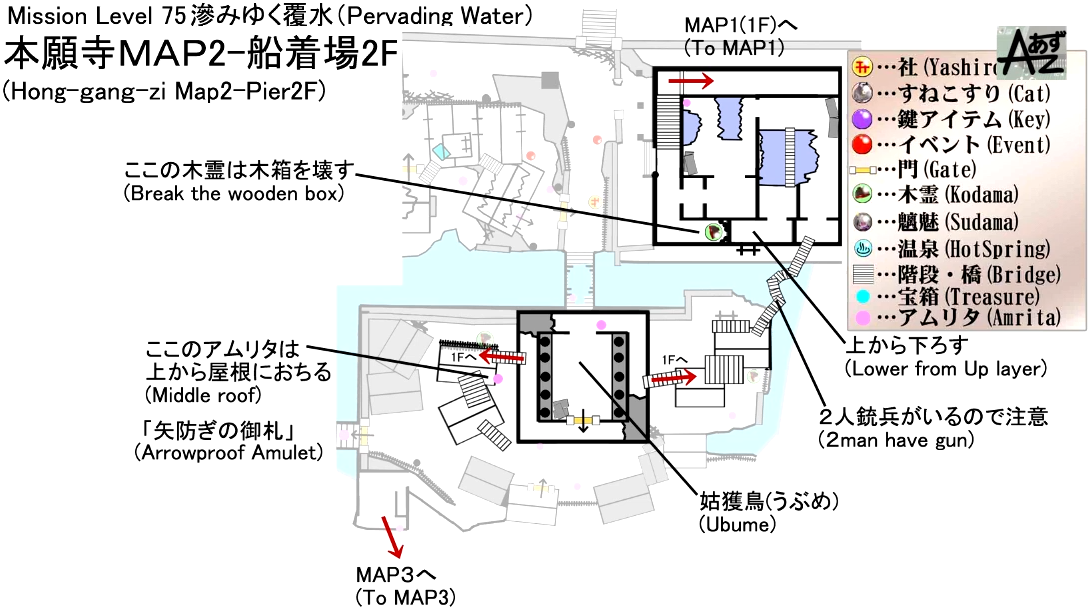
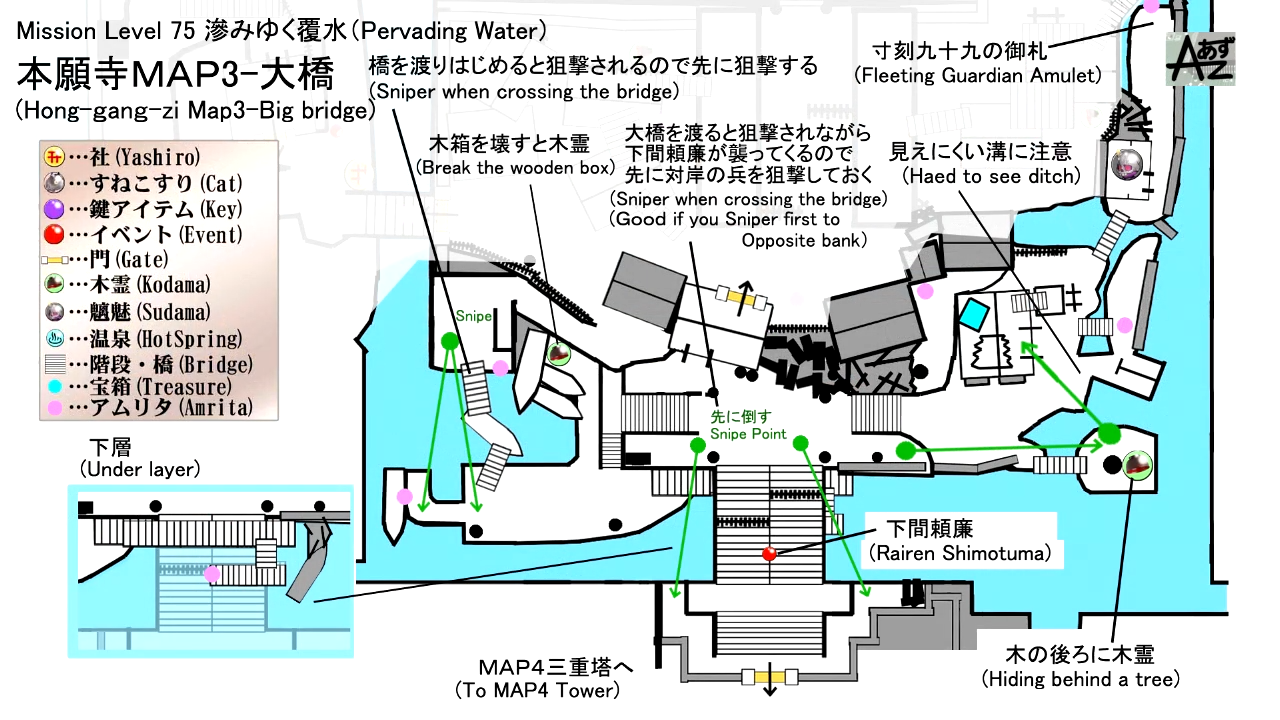
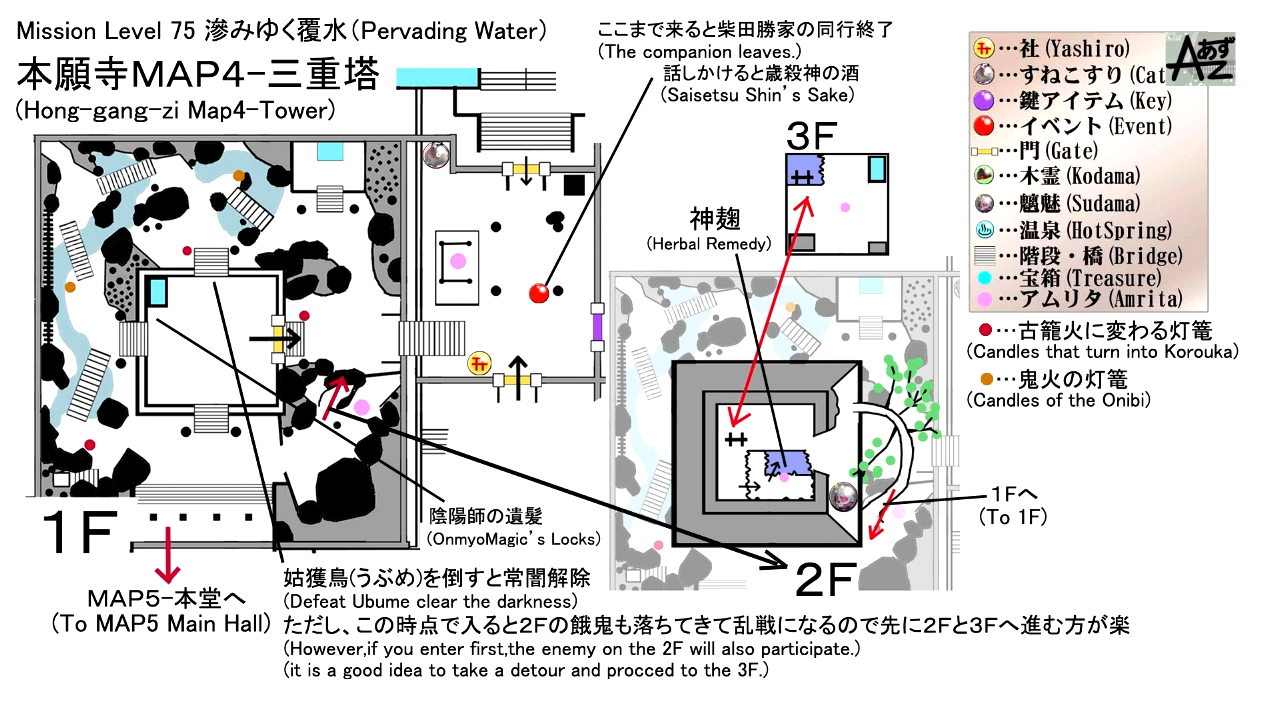
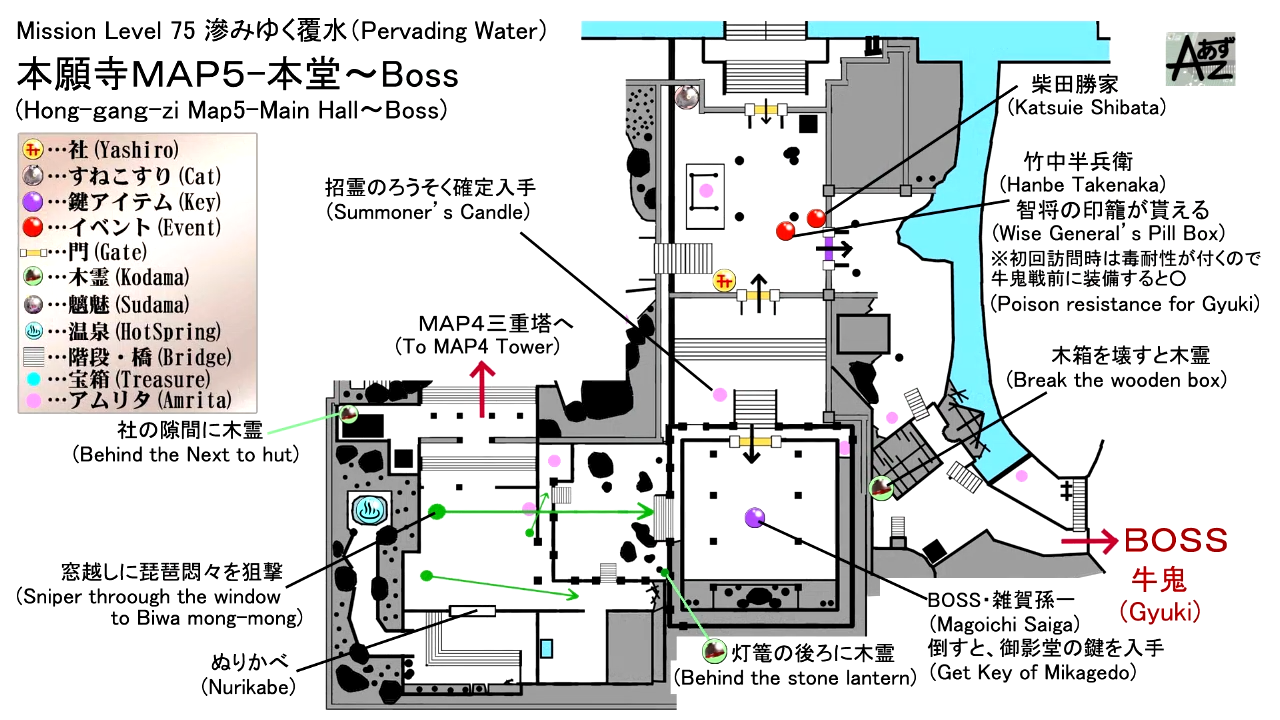
(Credit to あずchannel (Youtube))
Mission Rewards
First Time Completion
- Ravenwing Rifle x1
- Yatagarasu Cuirass x1
- Yatagarasu Headband x1
- Yatagarasu Waistguard x1
- 16600 Gold
- 11912 Amrita
Subsequent Completion
- ??
- ?? Gold
- ?? Amrita
NPCs
- Mumyo
- Tokichiro
- Shibata Katsuie
- Wounded General
Bosses
Items
Collectibles
Equipment & Materials
- Random Weapons
- Random Armor Pieces
- Fan
- Elixir
- Stone
- Sticky Pot
- Whetstone
- Spirit Stone
- Iron Platelet
- Prayer Beads
- Sacred Arrow
- Travel Amulet
- Shrapnel Bomb
- Signpost Amulet
- Small Spirit Stone
- Large Spirit Stone
- Rifle Ammunition
- Nurikabe Fragment
- Saisetsu-Shin's Sake
- Quality Leather Cord
- Hand Cannon Ammuniton
- Guardian Spirit: Hyobishin
Soul Cores
Key Items
Enemies
- Gaki
- Tesso
- Oni-bi
- Ubume
- Koroka
- Onyudo
- Nurikabe
- Nure-Onna
- Toxic Slime
- One-eyed Imp
- Warrior Skeleton
- Shinobi
- Gunman
- Spear-wielding Soldier
Pervading Waters
Mission Start Text
Lord Nobunga has really set his sights on Ishiyama Hoganji in Osaka. It seems he's bringing in forces from all over to capture it. He's got it in for the lords of the east and the west who have joined forced sd holed up there. Lord Katsuie and the others have the complex under siege, but it doesn't look like they're in the mood to surrender. If the rumors are true, the enemy have enlisted the help of the veteran mercenaries, the Saika. If the complex can't be taken by sheer military force, I have a feeling it won't be long before they call us in. C'mon, let's head to Osaka.
The Saike will be no match for you, partner!
Mission End Text
That really was quite something. Most impressive! So it seems the Oda forces were victorious once more, and there were spoils of war. A trove of Spirit Stones was found in the depths of the temple.
Ah, of course! I almost forgot. Tokichiro asked me to pass on a message. He said he's going to stay behind the guard the Spirit Stones, and that you should head west to join the Hideyoshi army.
Hmm. It's curious. Does he really have nothing to say about Hanbei's death?
Kodama Locations
- From the second shrine, go left and head towards the flooded path. You'll find the Kodama inside the house at the end of the path.
- From the second shrine, go up the second floor of the large building and check the corner of the balcony. The second Kodama is hiding behind the small boxes.
- Cross the walkway from the large building near the second shrine to get to the rooftops. On the other side, jump down onto where the Nure-Onna and Gaki are and check the left corner of the small building. You'll find the third Kodama by the fence.
- The fourth Kodama can be found behind the house that's near the large building where you first encounter the Ubume yokai. Simply head to the balcony, walk onto the planks towards the rooftop of the house and jump down. Check behind the house and you'll find the Kodama.
- Near the shortcut of the starting point. Go down the slope towards the shack where you'll encounter two soldiers. Kill the enemies then go towards the stack of boats on the left side. You'll find the fifth Kodama hiding behind some crates at the corner.
- The sixth Kodama is found on the west section of the bridge that leads to the courtyard of the pagoda. Head to the west section where you'll encounter a Tesso. Go straight and walk onto the narrow wooden path. You'll find the sixth Kodama behind the tree.
- For the seventh Kodama. From the third shrine, head to the garden that's on the right. There's a temple by the garden and on the right side of it, there's a small shrine. You'll find the Kodama standing next to the small shrine.
- The eight Kodama can be found behind a stone lantern on the right near the walkway leading to the entrance of the pagoda where you fight Saika Magoichi.
- The ninth Kodama is located before reaching the true boss. You must defeat Saika Magoichi first to obtain a key that unlocks the gate near the third shrine. Once you've unlocked it, simply head straight past the Koroka and Gaki, and from the destroyed building, turn right and you check the corner where you'll find some crates. The Kodama is behind it.
Sudama Locations
- The first Sudama can be found in the west section near the bridge where you encounter Shibata Katsuie. It's inside a broken house on the far left side.
- The second Sudama is just past the third shrine in the Courtyard Pagoda. Head towards the building hosting a Dark Realm. Walk around the building and climb a tree to gain access to the rooftop. The Sudama is to your left.
Scampuss Locations
- For the first Scampuss, from the second shrine, go right towards the broken bridge and walk onto the planks and debris below. You'll find yourself on the outer east side of the large building where you'll see a One-eyed Imp walking. Just go straight and you'll find some crates under the wooden walkway above you, the Scampuss is behind it.
- The second Scampuss can be found on the right side behind some crates. Just turn right from the gate of the pagoda after fighting the spear-wielding shinobi.
Locks Locations
- Dispel the dark realm in the large building near the second shrine. The Ninja's Locks can be found inside the large chest behind the glowing lamp that you destroyed.
- Onmyo Mage's Locks can be looted inside a large chest that's inside a building in the middle of the garden. It's near the third shrine. You'll need to kill the Ubume first to dispel the dark realm and so that you can open the chest.
Spa Locations
- Found near the third shrine. Go to the temple near the garden and destroy the white wall to find the inner section of the temple. Just ahead of the room, there's a Nurikabe wall, you won't miss it. The Spa is inside the secret room behind the yokai.
Pervading Waters Walkthrough
Starting Point
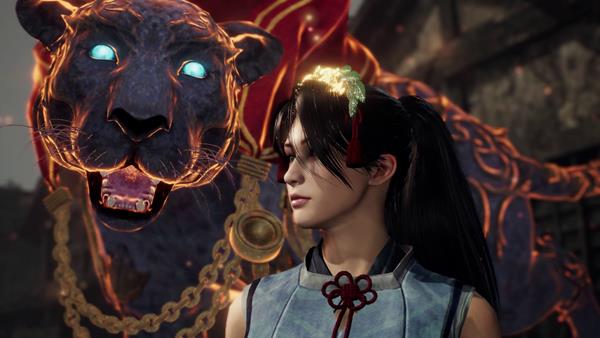
A cutscene starts when you begin the mission. Before it ends, you'll be possessed and obtain the Guardian Spirit: Hyobishin. The year is November 1578 and players arrive at Ishiyama Honganji in the Settsu Province. At the starting point, you'll see Mumyo, Tokichiro, and the first shrine. Speak to them to learn more about what lies ahead, then use the shrine if you need to before you head forward.

NOTE: DO NOT FALL INTO AREAS THAT ARE FLOODED UNLESS THERE'S A WALKWAY THAT YOU CAN WALK ON SINCE FALLING INTO THE WATER IS AN INSTA-DEATH.
From the shrine, head to the bridge first and loot the corpse. The door ahead is locked at the moment, so go down the path on the right. Just around the corner, you'll encounter two three human enemies wielding dual pistols. You'll want to be mindful exploring this area since these guys aren't your average archers or rifle-wielding soldier, their sights are better than the normal soldier allowing them to see you from afar, they can switch between their firearm and melee weapon, and, they are quite agile. You'll want to ready your bow or rifle, peek at the corner, and shoot them on the head. After killing the first three soldiers, head to the house on the right where you'll encounter one more soldier, kill him, then open the door that leads to a shortcut.

Now, go back outside and head towards the bridge on the left where you'll see three soldiers ahead. There's two on the ground, and the other on the walkway above. You'll want to shoot the guy on the walkway first to stop it from blowing its horn that alerts all nearby soldiers. After killing the soldiers, loot the body that's in the middle, then head inside the house on the left to find another body that you can loot..

In the same house, there's a Nurikabe yokai wall. Fight it or if you're lucky, pacify it with the right gesture to get a free pass. Behind it is the backside of the house where you'll find another corpse that you can loot to find an item and a memory.

After you've looted the body, there's a ladder nearby. Climb to the rooftop and go straight where you'll find another Gunman, grapple him from behind, then climb the ladder that goes down to another building. Thre's two more Gunman in the house and a small chest that you can open.

As you head forward, there's one more soldier around the corner and you'll see a female shinobi enemy ahead that is a bit strong than a regular human enemy. It wields a Kusarigama, a blaster, and can use ninjutsu tools against you. Take your time when fighting her and land your attacks after she unleashes a combo with her melee weapon, she drops a Bedrock Blaster and other random items when she is killed - once that's done kill the archer ahead that's resting by the tree and continue forward where you'll find the second shrine.
The Second Shrine

From the shrine, you'll want to go left first where you'll see a friendly NPC that seems wounded. Speak to him and he'll tell you more about what lies ahead. After speaking to the general, go left and down the flooded path that leads to the first Kodama. As you walk onto the water, you'll want to look at the left corner and you'll see the head of a Nure-Onna sticking out, kill it, then continue forward and into the house where you'll find the Kodama. After grabbing the Kodama, go back to the second shrine and go to the right side where you'll see a wooden path. You'll see a One-eyed Imp that's walking next to the large building. Kill it, go straight, then check under the wooden walkway where you'll see some small crates that you can break and the Scampuss behind it. After petting the Scampuss, go back to the shrine and head into the large building filled with the Dark Realm.

Inside this building, there is a lot of Yokai roaming on each floor. By the entrance, you'll see a Mitsume Yazura ahead, a Gaki on the left and an archer Warrior Skeleton standing on the middle platform ahead. Shoot the Warrior Skeleton first, kill the Gaki, then the Yazura. Now, this Dark Realm is similar to the one you encountered in the main mission: Corpses and Ice. From where the Warrior Skeleton was, you'll see a glowing lamp, you'll need to destroy it to dispel the dark realm. Just be careful since it will start to spawn two lightning element Oni-bi once you attack it or get close to it, once you've destroyed the lamp, check behind where the lamp was and you'll find a large chest containing 1x Ninja's Locks - after that's done, you'll want to clear the floor first of roaming Yokai, such as a Nure-Onna, another Warrior Skeleton, and a One-eyed Imp.

Next, go up the stairs that are on the left and head to the balcony of the second floor. Before you go inside, check the right side of the balcony and you'll see some wooden boxes. Break it and you'll find the second Kodama.

After grabbing the Kodama, head inside and you'll find a Gaki on the left and a Tesso that's walking back and forth. Kill both yokai then loot the corpse that's at the corner before going in the next room where you'll encounter another Warrior Skeleton - before you head to the wooden walkway from the balcony on the left, make sure to kick the ladder down that's on the right to open up a shortcut.
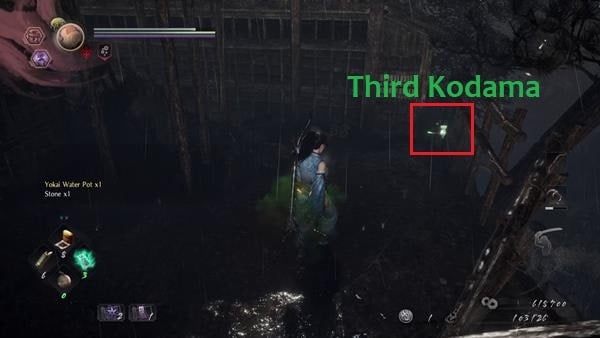
Before heading to the wooden walkway where you'll reach the rooftops, you'll want to ready your bow or rifle and shoot the two soldiers ahead. Instead of going to the other large building, you'll want to jump down onto the ground where you'll encounter another Nure-Onna and a few Gaki. After killing the group of Yokai, go around the corner of the small building on the left, you'll find the third Kodama next to the fence - after grabbing the Kodama, climb the nearby ladder back to the rooftop and go inside the building ahead.

Inside, there's an Ubume and you'll hear her humming. Before you head inside, loot the corpse that's by the entrance. Be careful when you face this yokai, it may seem like it won't attack you and just shout at you at first, but after a short while, it will reveal its true form like a harpy and start to attack you with fast swings and it will continue to let out a loud cry that can stun you for a short while.

After killing it, open the door ahead to reach the opposite side of the balcony. Go forward and walk onto the planks that lead to the rooftop of a house. Just by the wooden plank, jump down the small roof below you to loot the corpse that's on it. Next, jump down to the ground and go around to the backside of the house, you'll find the fourth Kodama there - once you've guided the Kodama back to the shrine, go straight and check the east side where you'll find a locked door that you can open which leads back to the starting point/the first shrine. From the unlocked gate, don't go down the slope that's on the right, but instead, go straight through the houses where you'll find Shibata Katsuie fighting off two Warrior Skeleton and an Onyudo. After killing the Yokai, speak to him. If ever you chose to assist him during the sub mission: The Shiftling’s Wise Judgement he will join forces with you as a companion, if you chose to help Hachisuka Koroku instead, he won't help you and you'll explore the area ahead on your own - make sure to loot the body that's on the broken bridge before you head back to the slope leading to the next area that's near the shortcut of the starting point.

At the end of the path, you'll see a shack and some boats ahead. You'll want to ready your bow or rifle and shoot the soldiers ahead before you continue further. Once you've killed the enemies, walk onto the boat and planks and go left towards the stacked boats. Go around the corner and break the boxes to find the fifth Kodama. After you've found the Kodama, head up the incline towards the next section and you'll find a hut on the left, there's a door inside that you can unlock that opens up a shortcut leading to where Koroku is.

The path you'll need to take is straight, across the bridge, but before you go any further, you'll want to search the west section first where you'll find another Tesso that's patrolling the area. There's also a house that has Gaki hanging on the roof and a large chest inside it. After killing the Tesso and before heading inside the house on the left, there's a small walkway on the right side where you'll find the sixth Kodama behind a tree. Apart from that, there's also a Toxic Slime and another Gaki on the left side.
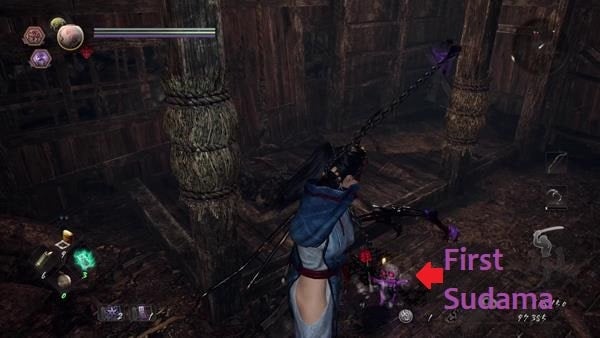
If you go further on the left side, you'll see another house where you'll encounter a Warrior Skeleton. Inside the house, you'll find a Sudama. After trading with the Sudama, there's a body that you can loot at the end of the path near the river, grab the item then go back to the bridge. Of course, heading to the next section won't be easy. On the bridge, there will be a strong spear-wielding shinobi. Before you aggro the guy, you'll want to ready your rifle or bow and shoot the soldiers that are positioned on the cliff that's on both sides. This way you can fight the shinobi without worrying about dodging the shots of the two soldiers - after defeating the shinobi, open the gate and you'll find the third shrine in the courtyard section of the pagoda.
Courtyard Pagoda: Third Shrine

The third shrine can be found ahead, but before you go to it, just by the gate, turn right and check the corner, you'll see some wooden crates, and behind it is the second Scampuss. - after petting it, go up the path on the right near the shrine.
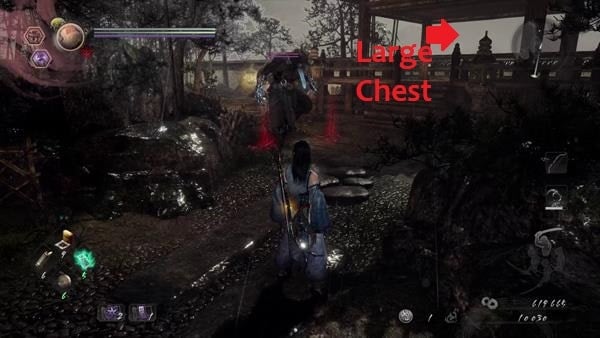
At the top, is another area filled with the Dark Realm. Just ahead of you, there's a Koroka in its stone lamp form. Shoot it with your ranged weapon to stun it and follow-up with a strong attack. On the right side, you'll encounter an Onyudo. After killing it, you'll see a podium on the right side where you'll find a large chest. Continue going straight from the right side and you'll encounter a glowing lamp that spawns an inferno Oni-bi.

Don't go inside the dark realm yet that's on the left, but instead, go towards the small bridge on the right where you'll see a One-eyed Imp and a Warrior Skeleton wielding a rifle. After killing the two Yokai, cross the bridge and go left where you'll see another glowing lamp on the other side of the second small bridge. At the far end, there's also a Tesso - basically what you are trying to do is clearing out the Yokai around the garden before you head inside the building where you'll find the source of the dark realm which is an Ubume. At the end of the way around the building there is a corpse to loot and also you can walk on the tree, which will lead you to the top of the building. Immediately left, a Sudama can be seen walking around on the roof. There is yokai - Tesso. Climb the ladder for some loot, after that drop a bit - there is two Gaki and from there you can drop to the Ubume from above. Since you've cleared out the Yokai around the garden, her loud cry won't just stun you but it won't be able to call out nearby reinforcements, make sure to unlock the door inside the building and open the large chest as well containing 1x Onmyo Mage's Locks.

After killing the Ubume, there's a temple nearby by the garden. Head towards the temple and check the right side where you'll find a small shrine. The seventh Kodama can be found just next to it on the right - go inside the nearby temple and hit the white walls in front to find the inner section of the temple.

Don't go out from the left side first, but check the wall that's straight ahead and you'll see another Nurikabe yokai. Kill it or pacify it with a gesture to get a free pass. Behind it is a secret room where you'll find the Spa (Hot Spring). There are more Yokai here such as Tesso, One-Eyed Imp and more Warrior Skeleton - there's also another room where you'll find a small chest inside.
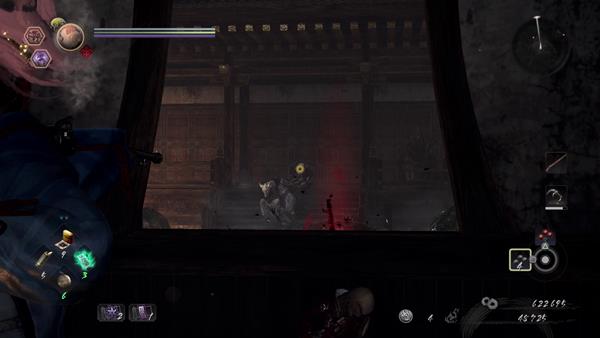
Once you've found the hot spring, go back to the previous room and face the window. Ready your bow or rifle and shoot the Biwa-Boku-boku that's across to stop it from summoning a bloody revenant. You can also shoot any other Yokai that you can shoot from the window.

After you've cleared the outer section of all the yokai, before you head up the walkway of the pagoda, check behind the stone lantern on the right where you'll find the eight Kodama hiding behind it. Once you've grabbed the Kodama, go up the walkway and go around the pagoda from the left side, you'll see a soldier that's patrolling the area. Before you head inside the pagoda. unlock the gate first to open a shortcut that leads back to the third shrine - it's also a good idea to rest at the shrine and make further preparations before you fight the boss inside the pagoda.
Boss Battle: Saika Magoichi

The boss you'll face inside the pagoda is Saika Magoichi. For those who played the first Nioh game, Saika Magoichi also appeared as a boss in Nioh. With the protection of his Guardian Spirit, he has the ability to fly around the arena to try and pummel you or shoot out projectiles. If ever he does shoot out projectiles, you can stand behind a pillar to avoid getting hit. Whenever he does fly, he'll have a small opening when he lands back on the ground, allowing you to land a couple of attacks.

If he doesn't use his Guardian Spirit, this guy is quite agile since he'll keep running around and try to shoot you with his rifle. Also, if you're up-close he can attack you with both his sword and rifle at the same time. So it's suggested that you try to fight this battle with either a friend of yours or a revenant NPC, this way, one of you can use magic and ninjutsu to poke him from afar, while the other tries to fight him in close-quarters. When he reaches about 30-40% of his health, he will start to conjure multiple fireballs around the area that chases you. When this happens, focus on running away from it until it's all gone before shifting your attention to him. To learn more about this boss, you can click here or check the video guide that is linked below.

After you defeat him, speak to him twice, and he'll give you a Founder's Hall Gate Key. Once you've obtained the key, go back to the nearby shrine and use the key to open the door that's on the left side where you'll find the wounded general and Shibata Katsuie. Make sure you also speak to the general to obtain a Wise General's Pill Box before heading to the path where you'll hear a loud roaring sound.
Founder's Hall

From the gate, the path here is pretty much straightforward. Before going down the path, you'll first encounter a Koroka disguised as a stone lantern that's on the left. Kill it, then go down the slope where you'll come across a Gaki eating a corpse that you can loot. From where the Gaki was, cross the path via the debris and go around the corner of the destroyed house on the right. You'll find the last Kodama hiding behind some crates - after grabbing the last Kodama, and if you're ready, proceed to the marked destination where you'll face the true boss.
True Boss: Gyuki
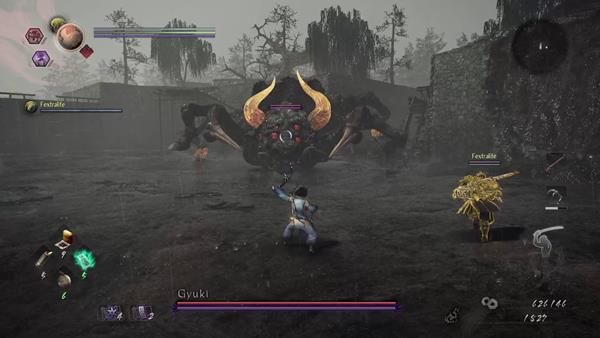
When you jump down to the marked location, a cutscene will trigger. The battle against the Gyuki will follow after. The Gyuki, by far is the largest boss you'll encounter out of the previous ones. Do not get overwhelmed with its size because despite it being large, it moves very slow and you can easily counter its strong attacks. Just watch out when it conjures the dark realm. It will gain wings to fly but it's still a bit slow and it will start to stomp its feet on the ground that causes a shockwave upon the impact. You can click here to learn more about this boss or check the video guide below. Successfully killing it completes this mission and drops random items and gear, as well as its soul core, Gyuki Soul Core. After looting the items, approach Mumyo and speak to her to leave the area - a cutscene will then follow revealing a twist of events.
Video
Map
[map goes here]
Trivia & Notes:
Trivia and notes go here
 Anonymous
This level is the absolute worst for playing co op. It's a two hour long slog with a long and rad boss followed by a total garbage boss. Why they didn't make persistent shortcuts boggles my mind.

 Anonymous
Once you know what to do, Gyuki is easy AF. Saika, on the other hand, can ***** right the hell off.


Whomever designed this boss needs to die in a fie
1
+10
-1