Ruin Draws Near is a Main Mission in Nioh 2. This mission is recommended for level 72, has a difficulty level of 4, and features both human and yokai enemies. Ruin Draws Near tasks players with helping Shibata Katsuie and rescuing Oichi from the castle. Please see Missions for other walkthroughs on other missions.

General Info
- Previous: The Sun Sets on Mount Tenno
- Next: The Two Faces of Hospitality
- Recommended Lvl: 88
- Mission Lvl. Difficulty: 1
- Bosses: Maeda Toshiie, Shibata Katsuie
Video Walkthrough
[video goes here]
Map
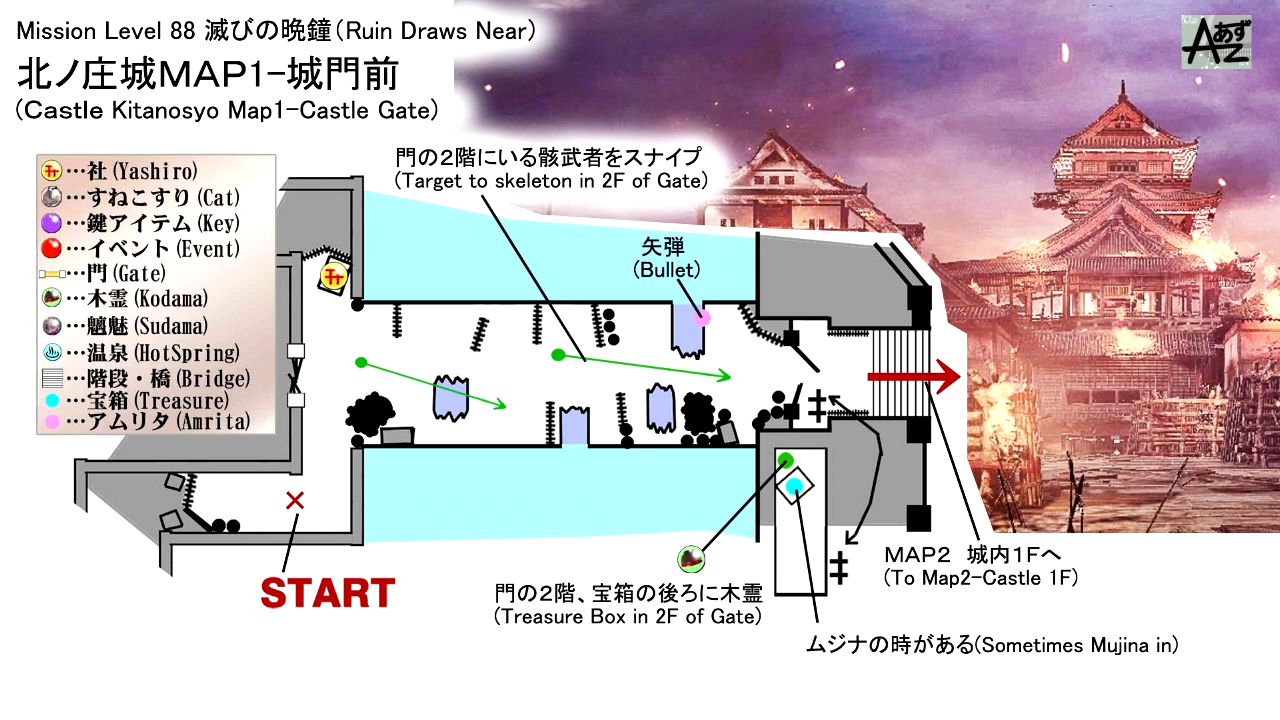
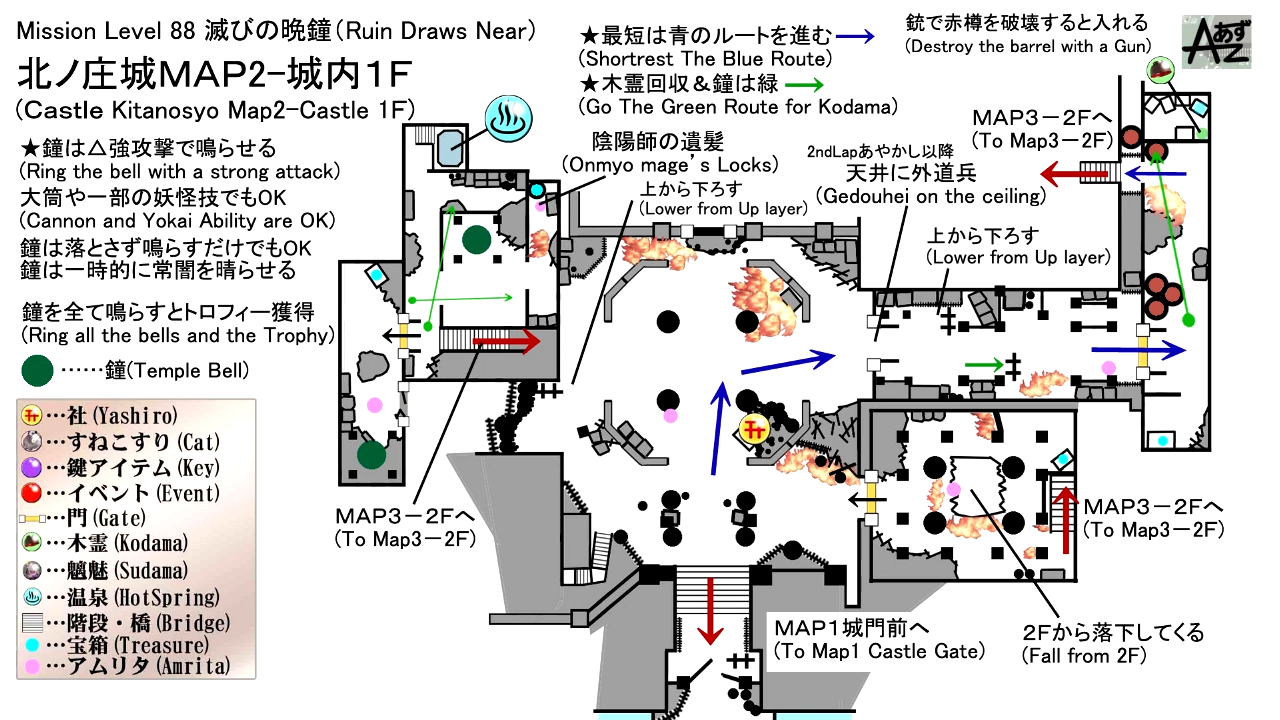
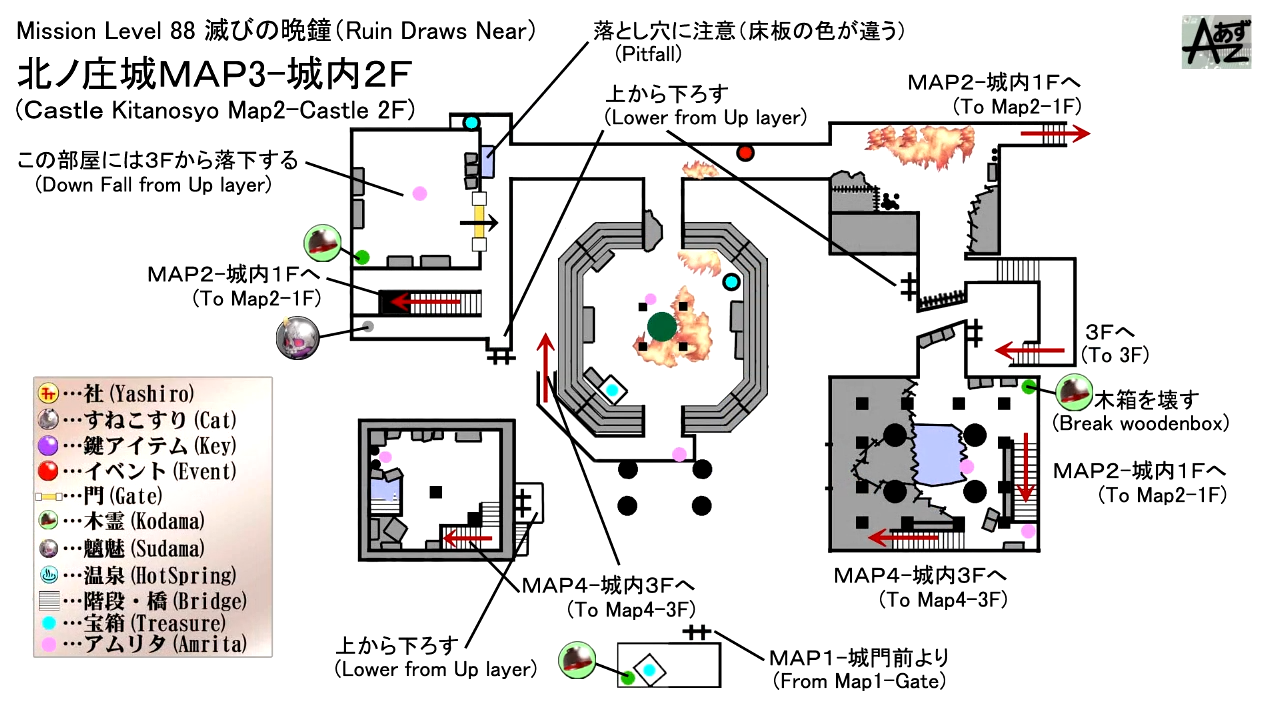
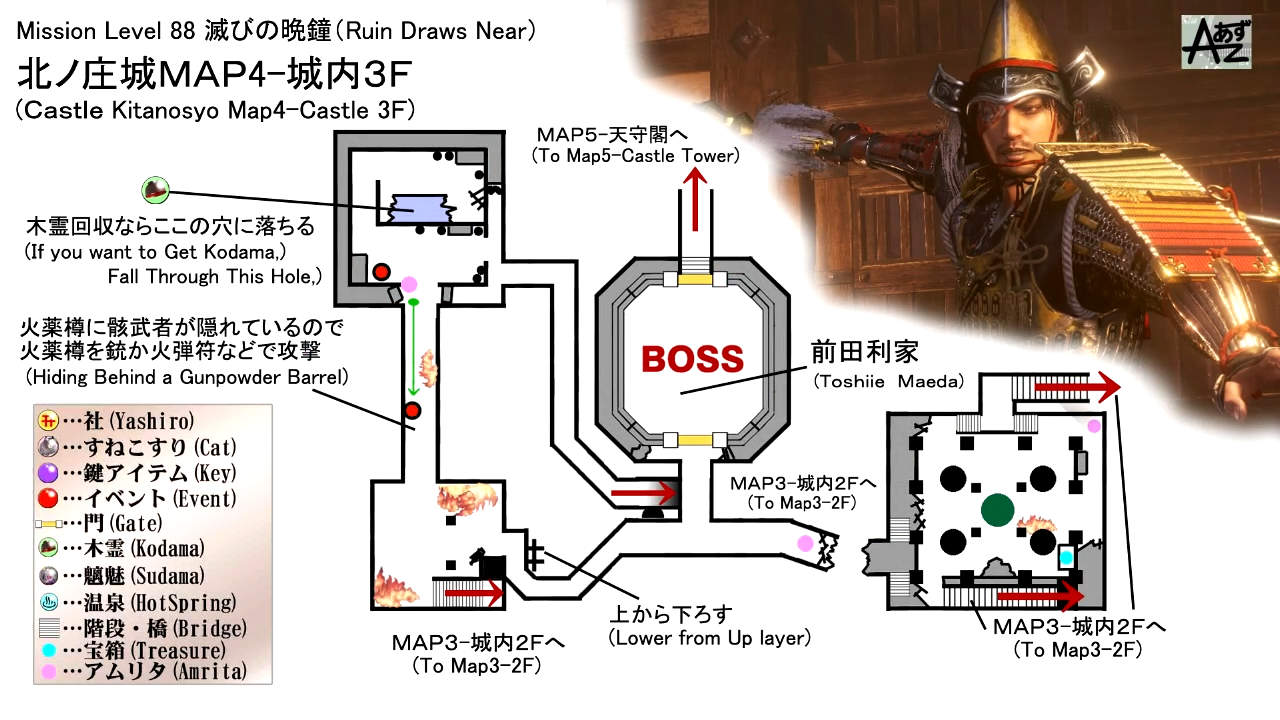
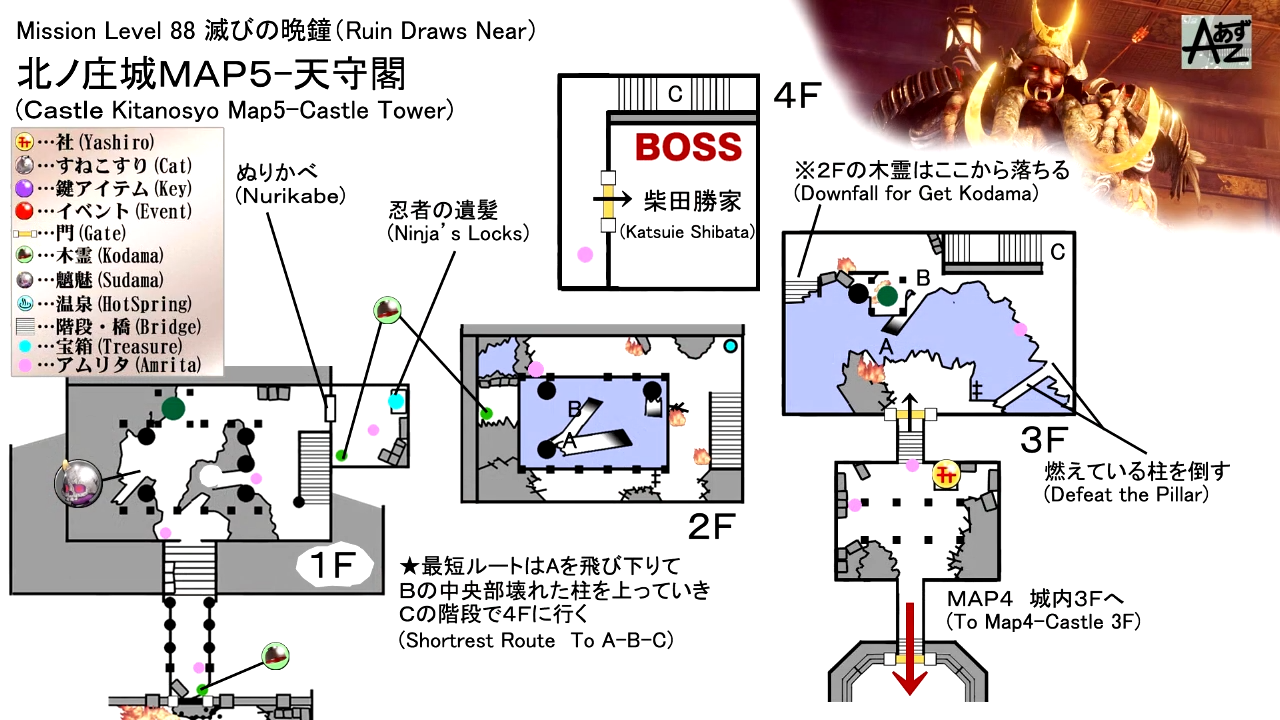
(Credit to あずchannel (Youtube))
Mission Rewards
First Time Completion
- Samurai's Locks x1
- Urn Splitter Hatchtes x1
- Oni Shibata's Cuirass x1
- Oni Shibata's Helmet x1
- 21200 Gold
- 22032 Amrita
Subsequent Completion
- Oni Shibata's Waistguard x1
- Oni Shiabata's Gauntlets x1
- Oni Shibata's Greaves x1
- 21200 Gold
- 22032 Amrita
NPCs
- none
Bosses
Items
Collectibles
Equipment & Materials
- Random Weapons
- Random Armor Pieces for:
- Kingo's Armor
- Irregular Armor
- Platemail Armor
- Firestarter Armor
- Oni Shibata's Armor
- Wandering Shrine Maiden's Armor
- Random Items and Materials:
- Stone
- Elixir
- Dung Ball
- Magatama
- Whetstone
- Sacred Ash
- Spirit Stone
- Shinobi Box
- Water Dragon
- Water Amulet
- Demon's Horn
- Quality Lacquer
- Daion-Jin's Sake
- Large Spirit Stone
- Gunpowder Bomb
- Rifle Ammunition
- Highest Quality Wood
- Guardian Spirit: Inosasao
- Hand Cannon Ammunition
- High-Quality Leather Platelet
Soul Cores
- Yoki Soul Core
- Tesso Soul Core
- Mujina Soul Core
- Onyudo Soul Core
- Ippon-Datara Soul Core
- Warrior Skeleton Soul Core
Key Items
Enemies
- Yoki
- Tesso
- Oni-bi
- Mujina
- Onyudo
- Wheelmonk
- Ippon-Datara
- Aberrant Soldier
- Warrior Skeleton
- Axe-wielding Soldier
- Sword-wielding Soldier
- Cannon-wielding Soldier
Ruin Draws Near
Mission Start Text
It seems after Lord Nobunaga's passing, and Oichi marrying Lord Katsuie, she came here to Kitanosho Castle.
By the look of things though, things didn't end well here for the Shibata army.
It must be tough for samurai to have to kill their former friends in the line of duty.
Anyway, we must hurry, before it's too late. I'll keep the aratama in the castle town busy.
Mission End Text
What happened to Katsuie and Oichi is most... unfortunate. But simply mourning them won't get us any closer to striking back at Tokichiro.
The most sound strategy would be withdrawing from here for now and trying to link up with the Tokugawa forces.
And fear not, I will accompany you. What we really need to do is forge ahead. Looking back won't get us anywhere.
Kodama Locations
- First Shrine: The first Kodama can be found behind the chest on the watchtower of the main gate of the castle. When you pass the gate, climb the nearby ladder on the right side
- Second Shrine: From the second shrine, check the east section. Climb up the ladder, head inside the room, go left, and check the corner where you'll find small crates of arrows in it. The second Kodama is behind the crates.
- Second Shrine: Head inside the building on the east side from the second shrine where you'll encounter an Onyudo and Warrior Skeleton on the left side. At the end of the room that's also on the left, you'll see a cracked wall next to the door, you can destroy it by shooting it down with a cannon type long-range weapon or throw a bomb at it. The third Kodama in the room behind the wall.
- For the fourth Kodama, go up at the top of the ramp from the second Dark Realm near the east building from the second shrine. You'll find a house where you'll encounter a Tesso and Aberrant Soldier inside. Kill the yokai, head through the corridor inside the house where you'll see a hole on the wooden floor of the room. Jump down and check the crates with arrows in it, you'll find the Kodama behind it.
- Third Shrine: The fifth Kodama can be found outside the castle. Exit the castle from the bottom section where you encounter the Ippon-Datara. You'll find it by the dead-end standing on a sack near a corpse that you can loot.
- Third Shrine: The sixth Kodama can be found inside a secret room behind a Nurikabe yokai wall. The fake wall can be found under the stairs of the castle at the bottom section. From the third shrine, head inside the castle, climb down the ladder and head down the stairs. Check underneath it, and approach the wall that's on the left corner.
- Third Shrine: Also at the bottom section, head up to the top floor by using the broken pillars that are in the middle of the room. Once you reach the top, go left and jump down from the broken stairs. You'll find the seventh Kodama there.
Sudama Locations
- The first Sudama can be found in the area of the second shrine. Head to the weapons room where the fourth Kodama is found. To find the room, go up at the top of the ramp from the second Dark Realm near the east building from the second shrine. You'll find a house where you'll encounter a Tesso and Aberrant Soldier inside. Kill the yokai, head through the corridor inside the house where you'll see a hole on the wooden floor of the room. Open the door of the weapons room and go at the right side of the walkway, you'll find the Sudama at the corner end of the walkway.
- The second Sudama can be found at the bottom section of the building engulfed with the dark realm from the third shrine. You'll find it walking on a pile of debris near the large bell.
Scampuss Locations
- none
Locks Locations
- Samurai's Locks is obtained as a reward for completing this mission.
- Ninja's Locks is looted from a large chest that can be found inside a secret room behind a Nurikabe yokai wall. The fake wall can be found under the stairs of the castle at the bottom section. From the third shrine, head inside the castle, climb down the ladder and head down the stairs. Check underneath it, and approach the wall that's on the left corner.
- Onmyo Mage's Locks can be looted off a corpse. To find it, find the weapons room where you found the fourth Kodama. When you open the door, go left from the walkway and douse yourself with the bucket of water that's at the corner. Walk up a bit to trigger the trap floor to open, causing you to fall into the room below you. The water will protect you from the flames you land on. Immediately look behind you and dash towards the corpse.
Spa Locations
- 2nd Shrine area: The Spa can be found inside a room where you encounter a bell that's being guarded by a cannon-wielding soldier and an Aberrant Soldier. The room with the spa is behind the yokai enemy.
Ruin Draws Near Walkthrough
Castle Entrance: First Shrine

The year is April 1583, and players arrive at Kitanosho Castle in the Echizen Province. The first shrine for this mission is just up ahead near the bridge. There are three Warrior Skeleton yokai on the bridge by the wooden barricade wall one on the right, the other on the left, and the last one is on the other side of the bridge patrolling. Be careful not to fall down the hole on the bridge, it's an insta-kill if you fall down the river. Cross the bridge and kill the Yoki within the mist that's blocking the entrance gate of the castle grounds - also before you approach the mist blocking the entrance gate, there's another archer Warrior Skeleton on the watchtower above the gate, you can kill it with your ranged weapon

After killing the Yoki, head through the gate and climb up the nearby ladder beside it. You'll reach the watchtower where you'll find the first Kodama behind the open chest. After grabbing the Kodama, go back down, head up the stairs and you'll find the second shrine inside the building ahead.
Castle Grounds: Second Shrine

In the building where the second shrine is, there is a corpse nearby that you can loot. After using the shrine and looting the corpse, head east where you'll see a Yoki looking at a dead body that you can loot and a door that you can open near it. Ignore the Yoki first and climb up the ladder on the right side and head inside the room at the top.

Before you head inside, you'll see from afar that there's another rifle-wielding Warrior Skeleton across that's aiming at the door. Ready your ranged weapon first and shoot it down. After killing the yokai, go inside and turn left. Check the corner of the room and you'll find some small crates of arrows, behind it is the second Kodama.

Once you've found the second Kodama, head back down, kill the Yoki and open the door in front of it where you'll find a room that has a Tesso on the right side and an Onyudo and Warrior Skeleton on the left. If you've cleared the yokai inside the room, open the small chest on the right side where the Tesso was and then go left and head up the stairs, you'll find a ladder that you can kick down outside the balcony that's through the left door. From the balcony, keep going up the stairs until you reach the open rooftop area of the building that's engulfed with the dark realm.

Inside the Dark Realm, you'll see a Yoki on the left side searching through the small bookshelf and two Warrior Skeleton in the middle, one archer on the right side and a large one wielding an axe that's patrolling in the middle. The large one is the source of the dark realm which you'll want to kill to dispel the field. To your advantage, you can bait each one of them out of the dark realm and kill them one by one, just don't draw the large Warrior Skeleton out too far because it will teleport back inside the dark realm.

After killing all the Yokai in the area and removing the dark realm, you'll notice that there's a bell in the middle. If you want to obtain the Peal of Ten Thousand Bells trophy, you must ring all 6 bells for this mission by continuously striking it with your melee weapon. If it's hit properly, a white aura will appear around it for a brief moment. And hitting it again will cause the bell to fall down to the ground. This bell is the first one out of the six - after ringing the bell, make sure to search the area to find corpses that you can loot, as well as a large chest that you can now open. After clearing the rooftop area, go down the stairs to the room where you found the second Kodama and jump down to the lower floor from the hole on the floor. At the bottom, you'll encounter another Warrior Skeleton and a Wheelmonk yokai within the mist that's blocking the door - after killing it, unlock the door which leads back to a shortcut to the second shrine.

Go back to the east section of the building and inside the room where you encountered the Onyudo. If you walk straight, you'll see a cracked wall near the door. If you have a cannon type long-range weapon with you and enough bullets, you can destroy the wall by shooting at it or throw a bomb at it. Behind the wall, you'll find the third Kodama and a large chest inside the room.

Once you've found it, go up the room and head straight towards the balcony corridor. You'll encounter the second realm and the second bell on the left side. The yokai within the Dark realm is another archer Warrior Skeleton, an Ippon-Datara, and another Wheelmonk which holds the source of the dark realm. Clear the yokai, and search the area to find corpses that you can loot and another large chest nearby that you can open - after clearing the area, go out the balcony from the east side and head up towards a small building where you'll encounter a Tesso next to a corpse that you can loot and an Aberrant Soldier.

Inside the house, there's a corridor on the right side where the Aberrant Soldier was standing. Inside the room, you'll find a hole on the wooden floor, jump down and you'll find a weapons room. Check the corner where you'll find some crates of arrows and an archery target practice, behind it, is the fourth Kodama.

Next, open the door and you'll find the path ahead is the walkway leading to the second dark realm. Don't go left because there's a trap floor that triggers when you step on it twice where you'll land on some flames in the room below. There's an axe-wielding soldier on the right side searching a corpse that you can loot and another patrolling the area ahead. Kill both soldiers and then kick the ladder down to open up a path that leads back to the second shrine. You'll also find a Sudama on the right side.

After that's done, go back and dash onto the trap floor. There's a large bucket at the corner which you can destroy to douse yourself with the water in it. This will protect you from getting burned by the flames. Walk on the trap floor and you'll fall onto the room below, immediately turn around and you'll see a corpse that you can loot which contains the Onmyo Mage's Locks. After grabbing the locks, dash through the flames to the other end of the corridor and you'll encounter a cannon-wielding soldier by the entrance of the room on the right. Inside the room, you'll find another bell, and on the right side of it is an Aberrant Soldier. There's a small room behind the Aberrant Soldier where you'll find the Spa (Hot Spring) for this mission.

After using the hot spring, go straight and open the door on the right where you'll enter another room that is engulfed with the Dark Realm. As soon as you open the door, you'll see a rifle-wielding Warrior Skeleton on the right side, it won't notice you if you're standing by the gate, so shoot it down while it's unaware. On the left side, there's a sword-wielding Warrior Skeleton, an Oni-bi, and a Koroka that's guarding another large bell. Killing the Koroka dispels the dark realm. Next, destroy the bell and open the large chest containing a Mujina yokai that's inside the same room. Make sure you mimic the same gesture it does to avoid fighting it and to obtain some loot - after clearing the room, head up the stairs to the walkway, go back to the middle room where the second dark realm was and head to the top east section towards the house that has the Tesso and Aberrant Soldier in it.

Go straight to the walkway where the Tesso was and you'll see a large bucket by the path. There's a Warrior Skeleton hiding behind it, so shoot the barrel first from afar then the Warrior Skeleton to avoid getting ambushed. Inside the room across of you, there's a ladder outside the walkway balcony on the left side that you can kick down to open up another shortcut leading to the second shrine. On the first floor, however, there's a corpse that you can loot that's being guarded by two soldiers. Go down first before heading out the walkway balcony. After grabbing the item from the corpse, you'll want to rest at the second shrine before going back towards the walkway balcony. There's an Aberrant Soldier that's walking back and forth - kill the yokai and when you're ready, open the door that leads to the marked area where you'll fight a boss.
Boss Battle: Maeda Toshiie

When you enter the room, a short cutscene will trigger before the battle starts. Here, you'll fight the first boss for this mission which is Maeda Toshiie. This human boss wields a spear and has quick reflexes that allow him to strike fast and move around the area quickly. You'll want to keep moving and going around him while maintaining a safe distance when you fight him. Do not try to catch his attacks by blocking since it can instantly consume most of your stamina.

Luckily, it seems he's a bit worn out from fighting earlier so he doesn't have that much health and most of his attacks takes out a large chunk of his stamina, allowing you to pressure him until his stamina bar is empty, making him vulnerable for grapple attacks or combos. Another thing, since he is a human, using the Kusarigama for this battle will be very helpful. If you have the Chain Pull skill, you can pull him in which knocks him off-balance allowing you to land a few strikes. Just watch out for your stamina if you exploit this tactic. To learn more about this boss, you can click here or you can check our video guide below. You'll acquire the Kitanosho Keep Key once you've defeated him which unlocks the door ahead - if you approach him and do the "Nicely Done" gesture, he will give you a herbal remedy, surprised you're letting him live.
Kitanosho Castle: Third Shrine

Upon arriving at the third shrine, make sure to search the area first to grab some items from the corpses and by destroying the breakable objects before opening the door ahead that leads to another dark realm. Inside, you'll find that most of the floor is broken and you'll need to work your way around to reach the other side. So first, climb down the ladder near the entrance where you'll see a Wheelmonk patrolling the corridors. At the most bottom section, there's an Onyudo, three Aberrant Soldier, and an Ippon-Datara which the source of the dark realm. You'll want to clear the Yokai first that's at the bottom and kill the Ippon-Datara to dispel the field.

Also, at the bottom section of the building, near the bell, you'll see some debris that you can walk on where you'll find the second Sudama.

There's also a door at the bottom section that leads outside. You'll find the fifth Kodama by the dead-end, standing on a sack near a corpse that you can loot

Next, go back inside and go underneath the stairs. You'll find a Nurikabe wall at the corner that's on the left. Behind it is a room where you'll find a chest containing 1x Ninja's Locks and the sixth Kodama.

Now go back and walk on the fallen pillars in the middle of the room to reach the top floor. You'll find yourself on the other side of the top section where you originally entered. Turn left and jump down from the broken stairs, you'll find the seventh and last Kodama below next to the debris. After collecting all three Kodamas, go back down and walk on the pillars again and kill the Koroka and Aberrant Soldier, the stairs that are on the left side leads to the main boss of this mission, but before you head up, you'll want to kick down the nearby pillar first to open up a path that leads back to the third shrine - when you're ready, proceed further and open the door where the boss awaits in the room.
Boss Battle: Shibata Katsuie

When you enter the room, a short cutscene will trigger before the battle starts. Here you'll face Shibata Katsuie who has been corrupted and turned into a Yokai. This boss wields hatchets and uses fire-based attacks, so you'll want to prepare onmyo magic that buffs your resistance against fire and items that can remove its negative effects. Most of the time he will run and charge towards you or your allies, and since the area isn't quite large, he'll always hit a wall. If ever he does charge in, dodge either way to avoid getting hit, and when he hits the wall, prepare to dodge the second time because he'll bounce off the wall and charge in again before swinging his hatchets.

Since he is a yokai, about half of the battle, he will conjure the dark realm which empowers his attacks. He'll be able to imbue his weapons with fire and throw it which rotates around him for a short while. You'll also want to watch out for his burst attack and try to counter it before he slams his weapons on the ground. Doing so, you'll stop him from creating a fire AoE attack that remains on the ground for a short while and burns anyone that is caught within the flames. To learn more about this boss, click here or check our video guide for this boss that is linked below - successfully defeating him will complete this mission.

After an emotional cutscene, players will also be possessed and obtain his Guardian Spirit: Inosasao.
Video
Map
[map goes here]
Trivia & Notes:
Trivia and notes go here
 Anonymous
It would help by listing the Map Location of these missions.

 Anonymous
After the Boss Battle: Maeda Toshiie, I used the "Nicely Done" emote and he said something about letting him live, wanting to help and gave me a herbal remedy.

 Anonymous
Does anything actually happen when you ring the bell? I'm pretty sure there's some reference at the start of this mission that mentions the bell driving darkness away (or driving something away at least)


Idiots who run this garbage site I swear. Look folks, it's located in the TWILIGHT MAP. Honestly how hard is it to include that in this utterly trash page.
0
+11
-1