The Mausoleum of Evil is a Main Mission in Nioh 2. This mission is recommended for level 100, has a difficulty level of 5, and features yokai enemies. The Mausoleum of Evil tasks players with searching through Byodo-In to find a way to restore Sohayamaru. Please see Missions for other walkthroughs on other missions.

General Info
- Previous: The High-spirited Demon
- Next: The Golden Castle
- Recommended Lvl: 100
- Mission Lvl. Difficulty: 5
- Bosses: Shuten Doji
Video Walkthrough
[video goes here]
Map
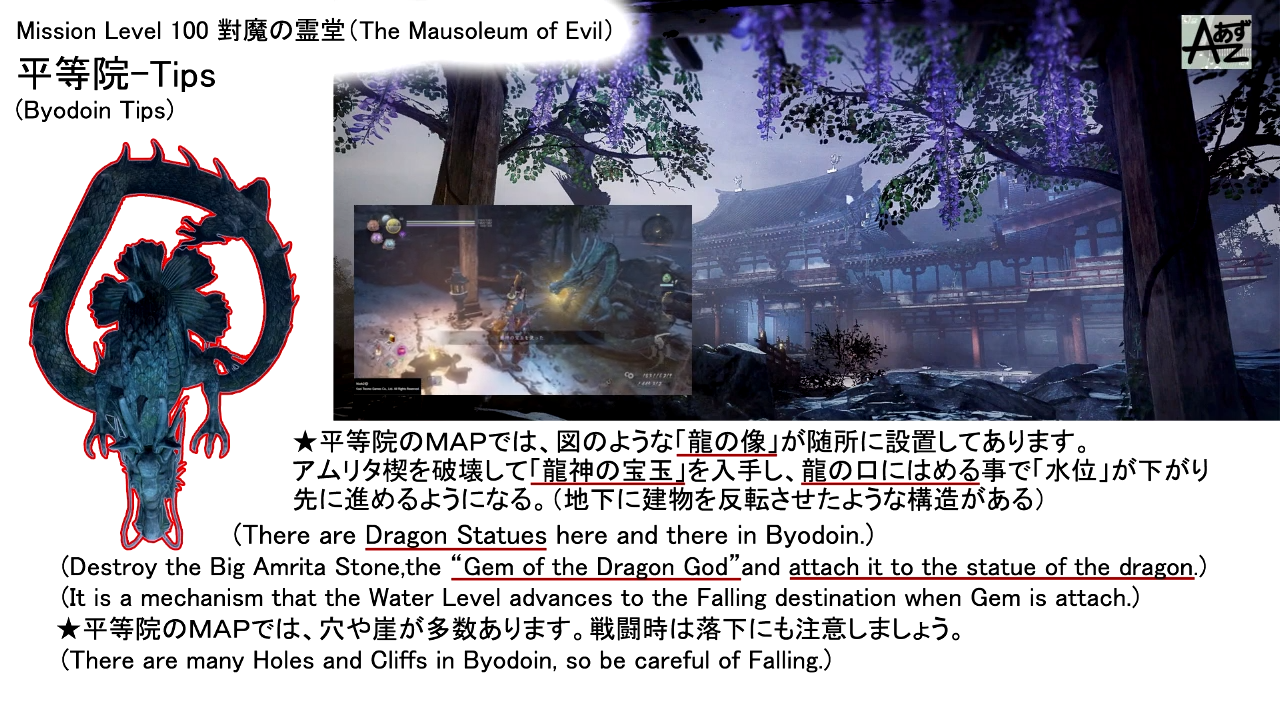
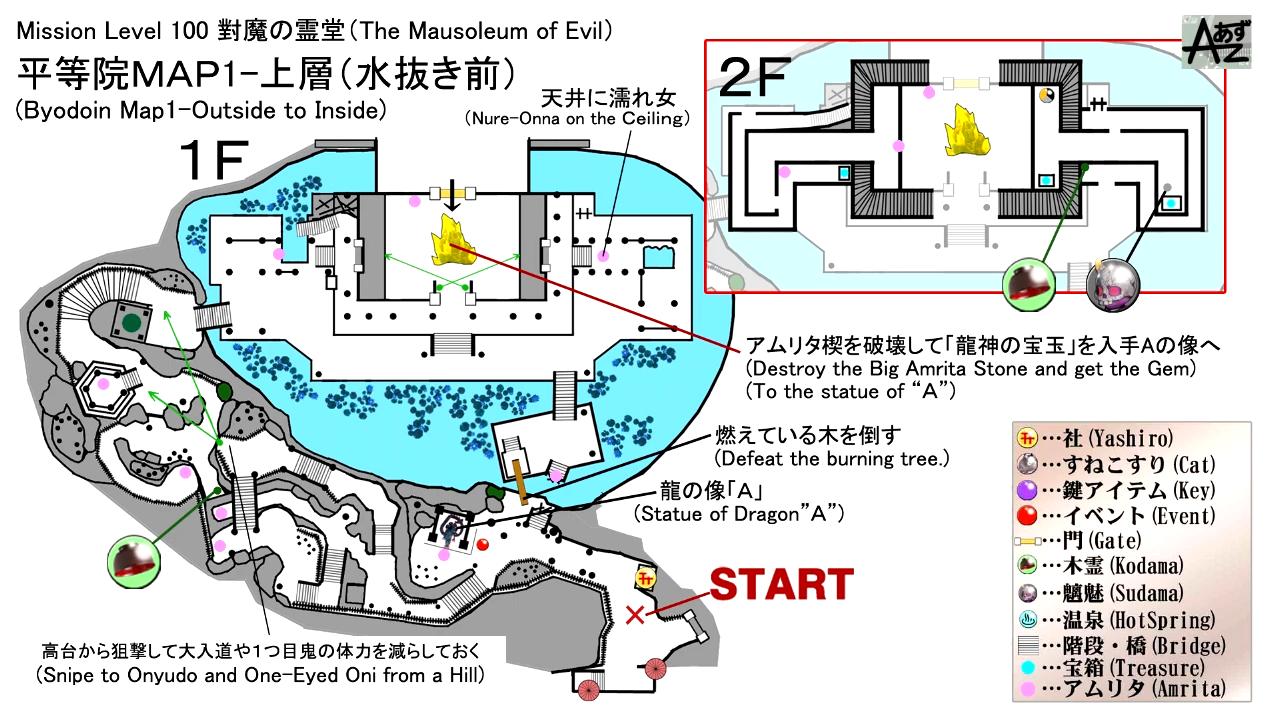
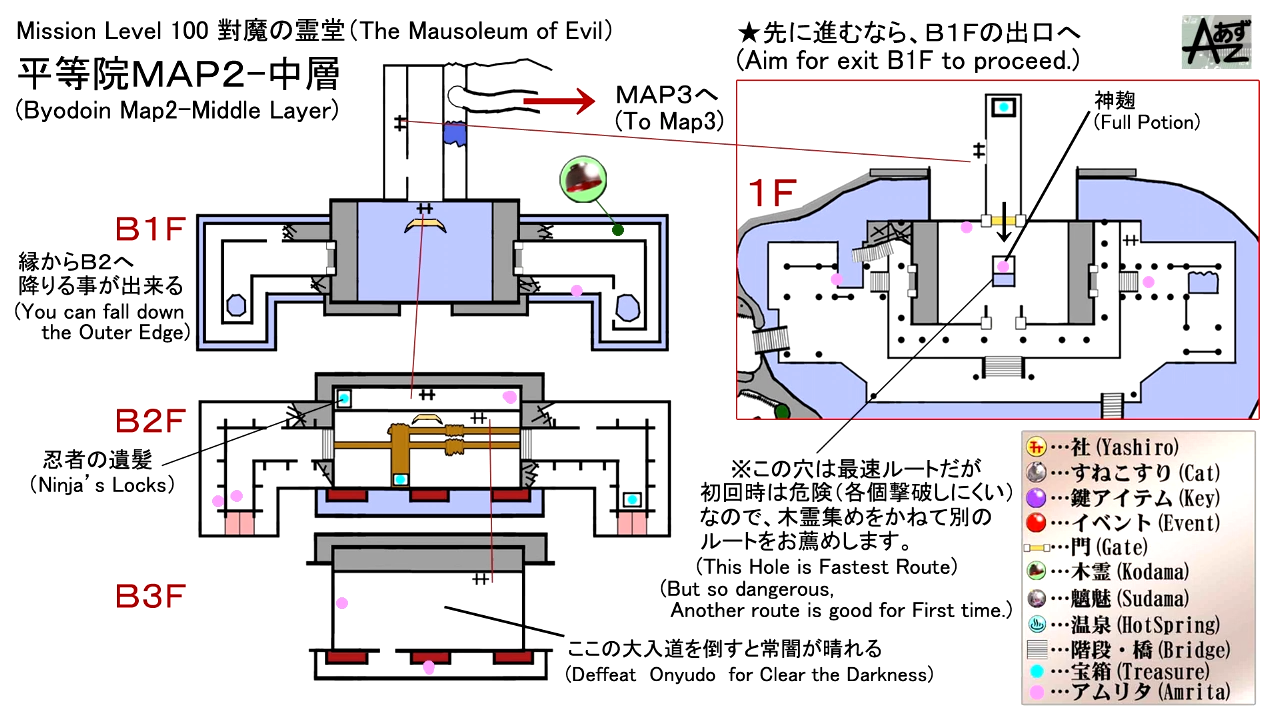
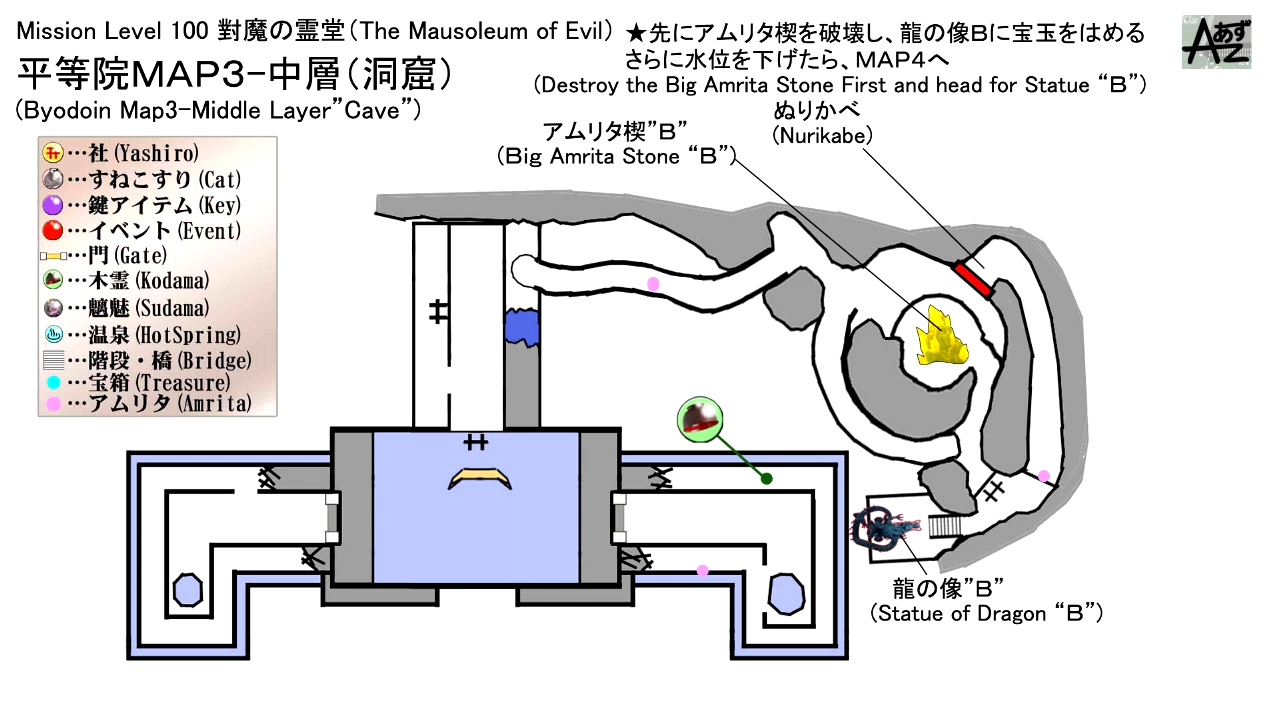
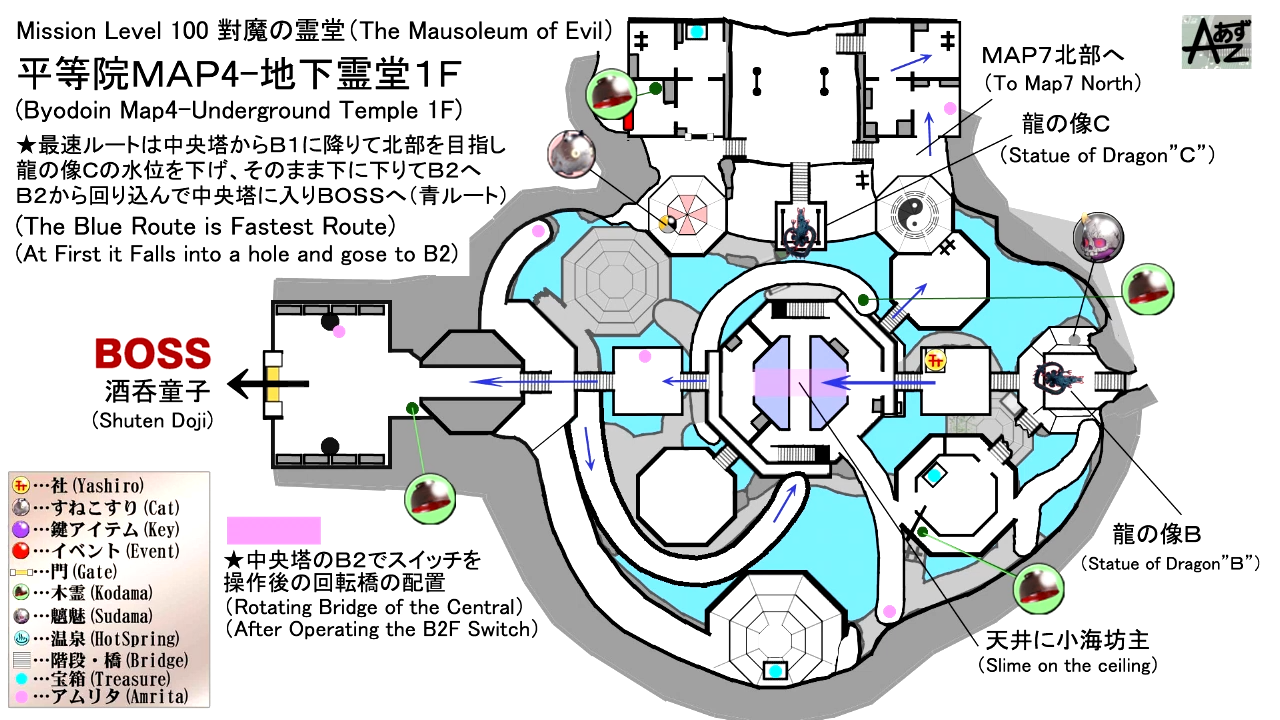
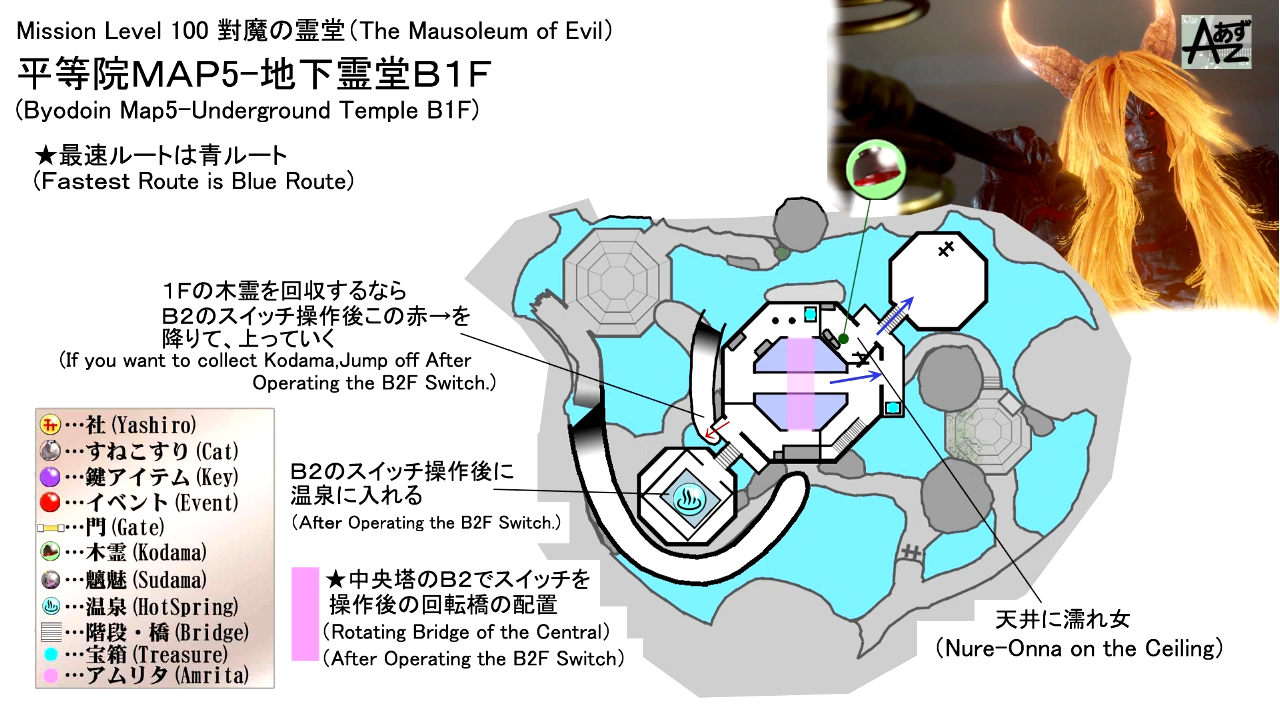
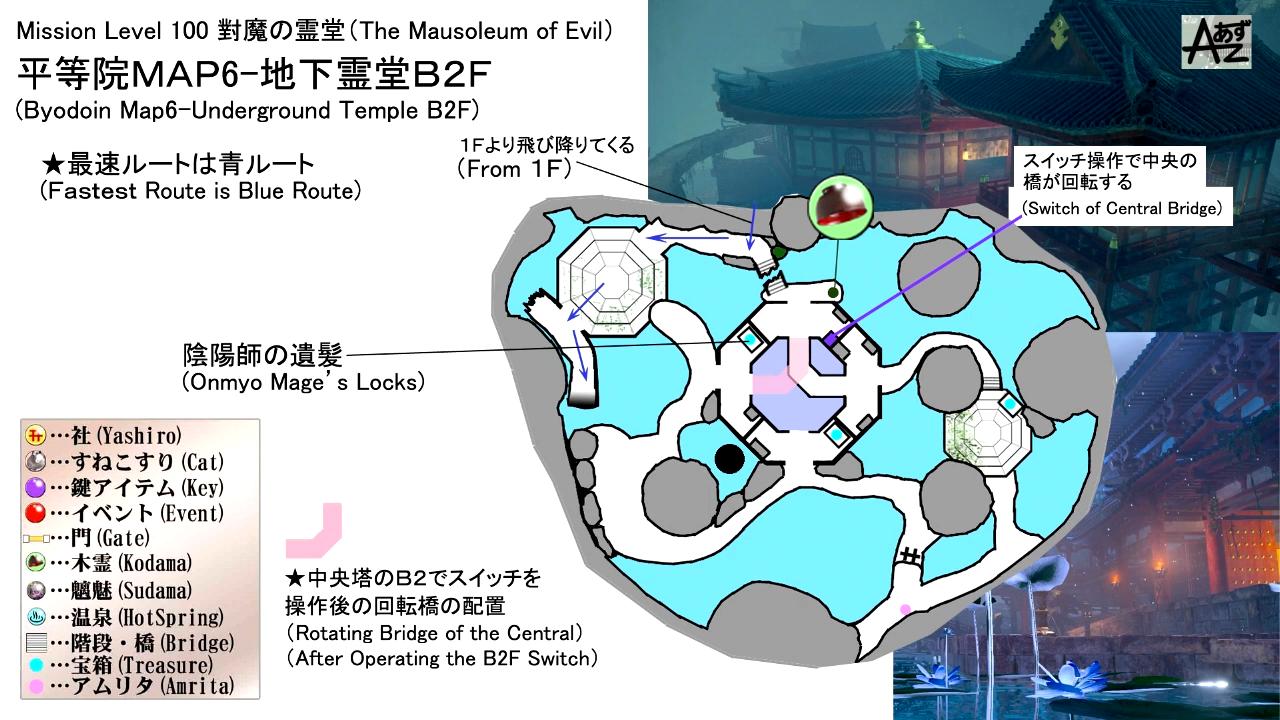
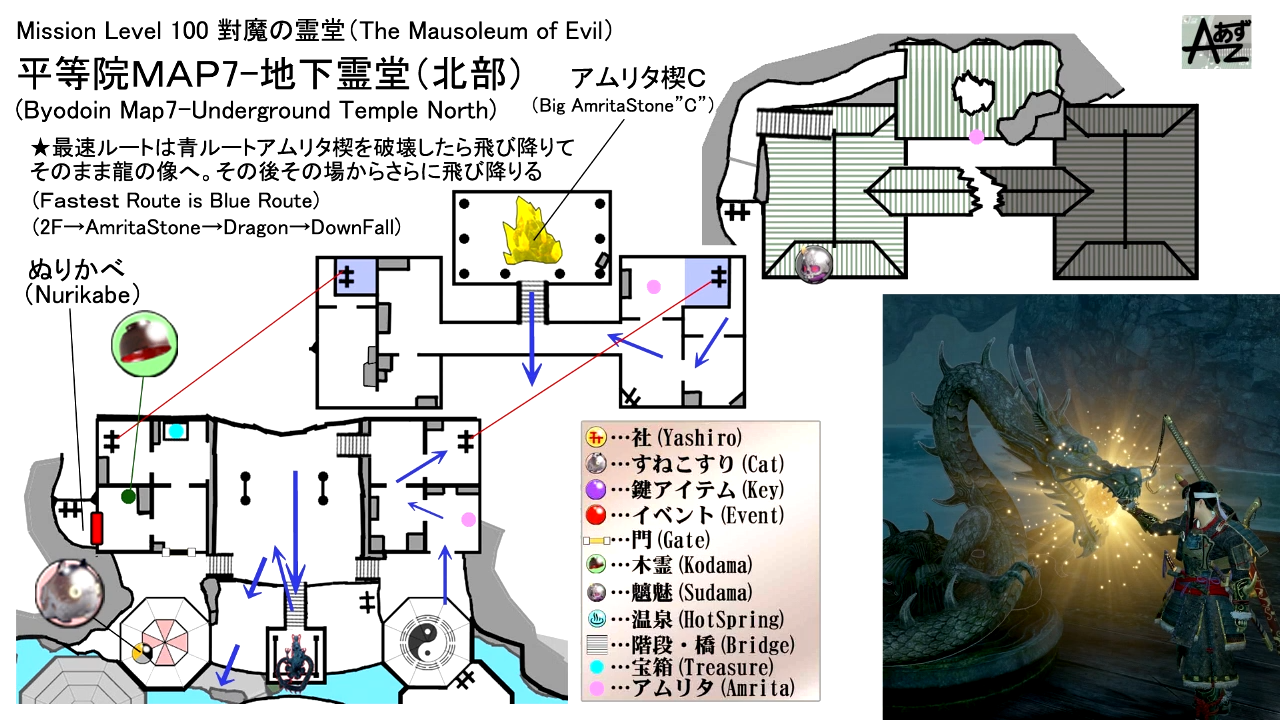
(Credit to あずchannel (Youtube))
Mission Rewards
First Time Completion
- Dojikiri Yasutsuna x1
- Genmei Onmyo Mage's Hat x1
- Two Leaves x1
- 25800 Gold
- 40816 Amrita
Subsequent Completion
- ??
- 25800 Gold
- 40816 Amrita
NPCs
Bosses
Items
Collectibles
Equipment & Materials
- Random Weapons
- Random Armor Pieces for:
- Mataza Armor
- Oni Shibata Armor
- Samurai General Armor
- Yoshiie's Birthright Armor
- Warrior of the West Armor
- Random Items:
- Stone
- Elixir
- Wood
- Arrow
- Magatama
- Whetstone
- Sacred Ash
- Spirit Stone
- Divine Rice
- Leather Cord
- Sacred Brush
- Mutated Skin
- Sacred Arrow
- Visitor Amulet
- Hyottoko Mask
- Lumicite Shard
- Shrapnel Bomb
- Daion-Jin's Sake
- Large Spirit Stone
- Small Spirit Stone
- Lantern Plant Fruit
- Summoner's Candle
- Saisetsu-Shin's Sake
- Aberrant Spirit Stone
- Snowclops Loincloth
- Clay Bell of Beckoning
Soul Cores
Key Items
Enemies
- Ubume
- Dweller
- Namahage
- Snowclops
- Nure-Onna
- Karasu Tengu
- One-eyed Oni
- Aberrant Soldier
- Lesser Umi-bozu
The Mausoleum of Evil
Mission Start Text
They say it is not only Otakemaru who sleeps within Byodio-In. many other foul spirits that have brought calamity to these lands can be found there. I feel terrible sending my child alone into such a place, but all I can do is beg that you take care of yourself.
With luck, there should be a clue in there that will bring you closer to restoring the power of Sohayamaru. Hanebi and I will await your return.
Mission End Text
What we saw in that mural down there was the blade passed down through the Sohaya for generations, the sword that can slay any yokai. I'm sure of it.
In order to restore that blade, it seems that we will need that dagger of yours, this sword guard of mine, and a whole heap of Spirit Stones.
Tokichiro has already taken Kanto and draws ever closer to bringing the entire nation under his rule. We can't afford to waste a second.
Kodama Locations
- First Shrine: From the first shrine, head up the stairs until you reach the top where you'll see a wooden bridge and an Aberrant Soldier. Jump down the edge on the right and turn left, you'll see the first Kodama standing by the corner.
- First Shrine: Found outside the balcony on the east side of the temple. Climb up the ladder that's outside the temple on the east and just go to the end of the balcony. You'll find the second Kodama there.
- First Shrine: The third Kodama can be found on the outer walkway of a balcony. You must drain the water first that's surrounding the temple. After placing the jewel inside the mouth of the dragon statue, check the east side of the temple and you'll see a hole that you can jump from to reach the balcony below. Just go around the hole that's on the floor of the balcony and walk onto the outer walkway of it, you'll find the Kodama standing on the walkway.
- Second Shrine: Head out the door on the left where you'll encounter another Dweller and loot the corpse behind it. Next, head inside the nearby building where you'll see a yokai mist. The yokai within it is an Ubume. After killing the Ubume, make sure to open the chest that's nearby and head outside the balcony of the same building, you'll find the fourth Kodama there
- Second Shrine: Go down the stairs from the room near the second shrine, then jump down into the room below where you'll encounter a Dweller and a small chest that you can loot. From there, you'll want to cross the bridge that's in the middle and head inside the room ahead, shoot down the Nure-Onna that's hanging on the ceiling on the left side of the room. In the same room, you'll find the fifth Kodama.
- Second Shrine: From where the third large crystal was, you'll see another building on the opposite side from where you came from. Head inside and jump down to the room below where you'll encounter a Nure-Onna. Kill it, go around the room, and check the corner on the right side, you'll find the sixth Kodama.
- Second Shrine: Head to the tower where the second dark realm is. After killing the Namahage, go outside towards the nearby door where you'll see a broken bridge. You'll find the seventh Kodama just by the corner on the right. After grabbing the Kodama, go back inside the room and pull the lever that's inside. this will cause the bridges within the tower to rotate.
- Second Shrine: You must pull the lever first to rotate the bridge. After pulling it, head back to the top section of the tower that leads to the hot spring. From the hot spring, walk to the left side of the balcony and head up the rooted path. You'll find the eighth Kodama at the end of the path. Once you've grabbed the Kodama, jump off the path from the side and at this point you'll want to rest at the second shrine first before you proceed to the marked location where you'll find the last Kodama before reaching the boss.
- Second Shrine: The ninth Kodama can be found at the left side corner of the entrance that leads to the boss.
Sudama Locations
- First Shrine: Climb up the ladder that's outside the temple on the east side. From the balcony, go through the door on the right and turn left. You'll find the Sudama next to an open chest.
- Near the second shrine. Drain the water by placing the second jewel in the mouth of the second dragon statue. Once the water drops, jump down and go around the platform on the right, you'll find the second Sudama there.
- The Nurikabe wall can be found in the same room where the sixth Kodama is. Behind the yokai wall, there's a ladder that you can climb that goes up to the rooftops of the buildings. Check the right side of the rooftops and you'll find the third Sudama. After trading with it, jump back down and place the jewel in the dragon's mouth to proceed to the next section.
Scampuss Locations
- On the second floor looking down at the first large crystal you can destroy to get the Dragon God Jewel; a short distance from and the same floor as the second Kodama and first Sudama.
- Near the third dragon statue, there's a platform on the right side where you'll see an Ubume. The Scampuss is beside the yokai.
Spa Locations
- 2nd shrine The lever must be pulled to rotate the bridges. Once that's done, go to the top, head inside the tower, go around the side and jump out from one of the doors to land on the middle bridge. From here, you'll want to go left and you'll find the Spa (Hot Spring) for this mission.
Locks Locations
- First Shrine: Ninja's Locks can be found inside a large chest that's within the first dark realm. The water surrounding the temple must drop first so that you can reach the lower section of the temple. You'll find the Dragon God Jewel from destroying the large yellow crystal, place the jewel inside the mouth of the dragon statue near Mumyo, and then jump down the hole where the large crystal was. You'll enter the first dark realm and you'll need to kill the Snowclops in it. After you dispel the dark realm, climb up the ladder and open the large chest that's near it.
- Second Shrine: Onmyo Mage's Locks can be found inside a large chest that's within the second dark realm. The chest can be found inside the tower where the second dark realm is.
The Mausoleum of Evil Walkthrough
First Shrine

The year is January 1590, and players arrive at Byodo-In in Yamashiro Province. You'll see the first shrine at the starting point. From the shrine, go straight and you'll see Mumyo. Speak to her to learn more about this mission. Behind her, there's a body that you can loot, and a dragon statue that requires a specific item that needs to be placed inside its mouth. So for now, ignore it, and head up the stairs where you'll first encounter a Dweller. There's a dead-end on the left side of the next set of stairs where you'll find a body that you can loot and another Dweller. After grabbing the item, head up the stairs and you'll encounter an Aberrant Soldier by the bridge, and across it is an Ubume and another body you can loot.

From where the Aberrant Soldier was, jump down the edge on the right and check the left side, you'll find the first Kodama standing by the corner. From the Kodama's location, continue going down and you'll encounter a One-eyed Oni. After killing the oni, cross the bridge and you'll come across another Aberrant Soldier patrolling on the square platform. By the entrance of the temple, there will be a Karasu Tengu guarding the entrance and another Aberrant Soldier standing at the other bridge ahead of you.

After killing the Aberrant Soldier and Karasu Tengu, don't go inside the temple first, but instead, cross the second bridge ahead and you'll see a body that you can loot on the left side by the broken bridge and a tree on the right that you can kick down to open up a shortcut leading back to the first shrine. After kicking the tree down, go back to the temple grounds and shoot the Nure-Onna that's hanging on the frames of the temple above, there's also another Aberrant Soldier that's walking nearby, and a Dweller that will climb from the hole on the ground.

After clearing the area, climb up the ladder, and go through the door on the right. Go left and you'll see the first Sudama by an open chest.

Next, go back outside the balcony, and just follow the path where you'll encounter another Dweller. You'll find the second Kodama at the end of the path.

Once you've guided the Kodama back to the shrine, go back inside the temple, shoot the Dweller that's across, kill the Aberrant Soldier below you, and destroy the large yellow crystal to obtain spirit stones and also the Dragon God Jewel, be careful and don't walk straight after you destroy the crystal or else you'll fall down from the hole - before you head back to the dragon statue near Mumyo, you'll want to head outside the temple and go up the incline that's on the west side of the temple. Go around the balcony, loot the body and open the small chest at the end of the balcony, and go through the door on the left where you'll encounter a Nure-Onna. Behind it is another body you can loot that's at the edge - after clearing the temple, head outside and go back to the dragon statue near Mumyo.

Place the Dragon God Jewel in its mouth and the water surrounding the area will start drop, allowing you to explore the bottom area of the temple. Don't go inside the room where the large crystal was, but instead, check outside the temple, on the east, and you'll see that there's a hole that you can now jump from to reach the balcony that's below.

There's a Lesser Umi-bozu below that you need to kill first. Now don't move around too much from where you dropped, because there's another hole nearby that goes down to the corridor below you where the first dark realm is. So try not to accidentally fall in. After you kill the Umi-bozu, walk around the other hole to reach the outer section of the balcony, simply go around it and you'll find the third Kodama. Next, go back to balcony was and jump down the hole and into the corridor where you'll enter the Dark Realm. From here, run towards the wooden beam and you'll see a Dweller nearby, make sure you kill it to stop it from throwing bombs at you. Now, remember that you need to return on the beams after you dispel the dark realm so that you can open the large chest that's on it.

The source of the dark realm is a Snowclops that's below you, so you can execute a drop attack to catch it off guard and to take out a decent chunk of amount from its health. After killing it, loot the skeleton nearby to grab an item and climb up the nearby ladder. You'll find a large chest that you can now open at the corner which contains 1x Ninja's Locks along with other items. Instead of climbing up the second ladder, you can try to dash onto the wooden beams so that you can open the other large chest that's on it. From the wooden beams, go to the west corridor where you'll encounter an Ubume that's walking back and forth. Don't go out the roof of the temple from the door on the left side yet, but first, check the end of the corridor, you'll find another large chest that you can open.

After opening the chest, go through the door and outside on the roof of the temple. You'll encounter another Dweller one on the roof, and another that's hanging above you. After killing it, keep going straight, and at the end jump down the other roof below you and work your way around it through the narrow path and go through the door which will take you back inside the temple where you fought the Snowclops. Next, climb up both ladders, exit the door on the left, and climb another ladder that's on the rooftop where you'll find another chest inside a corridor and a yokai mist that's blocking a door behind it.

The Yokai within the mist is a Karasu Tengu which you'll need to kill to open the large door behind it which opens up a shortcut that goes back to the first shrine.

Now, you'll want to climb back down the ladder, head back to the corridor area and go outside through the hole on the wall that's at the end of the corridor on the right side. You'll see a path that goes down and another Dweller feeding on a corpse that you can loot ahead. At the end of the path, you'll encounter another Lesser Umi-bozu. Kill it and before you go up the incline on the right, kill the Aberrant Soldier that's at a dead-end on the left side.

From where the Aberrant Soldier was, approach the wall on the left side and you'll find that it's a Nurikabe yokai wall. Kill it or if you're lucky, pacify it with the correct gesture to get a free pass. Try to use the "Confused" gesture, see if it works. Behind it, is a path that goes down where you'll find another Lesser Umi-bozu, a body that you can loot that's at the edge, and the second dragon statue. Since you don't have the gem yet, climb up the nearby ladder and you'll find the second large crystal that's guarded by a Nure-Onna. Kill the yokai then destroy the crystal to obtain spirit stones and the second Dragon God Jewel. Now, climb back down the ladder and place the jewel in the mouth of the dragon statue to continue draining the water.

Jump down from the dragon statue, and before going inside the room ahead, go around the platform on the right and you'll find the second Sudama - after trading with the Sudama, continue forward and you'll find the second shrine for this mission.
Second Shrine

Now the area ahead of the second shrine will be a bit of a maze. Head down the steps and kill Aberrant Soldier on the right and the Namahage on the left side of the room. Head out the door on the left where you'll encounter another Dweller and loot the corpse behind it. Next, head inside the nearby building where you'll see a yokai mist. The yokai within it is an Ubume.

After killing the Ubume, make sure to open the chest that's nearby and head outside the balcony of the same building, you'll find the fourth Kodama there. Once you've grabbed the Kodama, go back to the building near the second shrine, and make your way down the stairs on the right side, then jump down into the room below where you'll encounter a Dweller and a small chest that you can loot.

From there, you'll want to cross the bridge that's in the middle and head inside the room ahead, shoot down the Nure-Onna that's hanging on the ceiling on the left side of the room. In the same room, you'll find the fifth Kodama.

Now, cross the next bridge that leads to a large platform where you'll encounter more Dweller yokai. Climb up the ladder, then head inside the building ahead of you where you'll come across an Aberrant Soldier.

Head inside the building, climb up the ladder that's inside and you'll find yourself at the top where you'll see another large crystal that is being guarded by a Snowclops. You need to kill the Snowclops and destroy the large crystal to obtain more spirit stones and the third Dragon God Jewel that you can use at the third Dragon Statue that's nearby to drain the water.

After grabbing the jewel, you'll see another building on the opposite side from where you came from. Head inside and jump down to the room below where you'll encounter a Nure-Onna. Kill it, go around the room, and check the corner on the right side, you'll find the sixth Kodama.

Don't go out of the room where the sixth Kodama is, but instead, approach the wall that's on the left side, and you'll find the second Nurikabe wall for this mission. Kill it or if you're lucky, pacify it with the correct gesture to get a free pass. Try to use the "Nice" gesture, see if it works.

Behind the yokai wall, there's a ladder that you can climb that goes up to the rooftops of the buildings. Check the right side of the rooftops and you'll find the third Sudama. After trading with it, jump back down and place the jewel in the dragon's mouth to proceed to the next section.

Now, jump down, and go to the right side, you'll see another large platform that's blocked by a yokai mist. The yokai within it is a Karasu Tengu. Once you've killed the Tengu, continue going up, but instead of going to the building where the marker is pointing at, head down the cliff that's on the left side where you'll find another Snowclops next to a chest.

From where the Snowclops was, you'll see another platform nearby that you can go down to. Keep looking down and you'll see a walkway that leads to the second Dark Realm of this mission. Now, go right and you'll encounter a Kappa. As you head past it, you'll be on another platform where you'll see a chest and come across more Yokai such as an Aberrant Soldier, Nure-Onna, and a Dweller. After killing the yokai, continue further and you'll find yourself in a tower where you'll find the source of the dark realm, the Namahage that's in the middle. Kill it so you can dispel the dark realm.
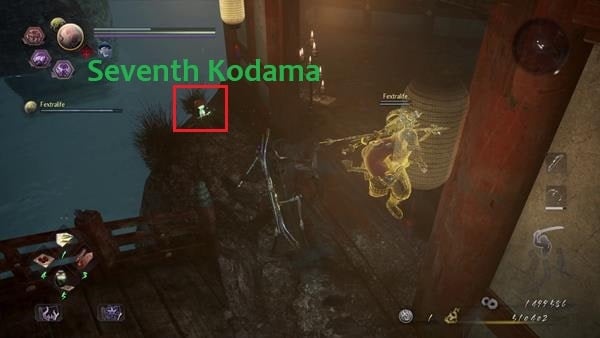
After killing the Namahage, go outside towards the nearby door where you'll see a broken bridge. You'll find the seventh Kodama just by the corner on the right. After grabbing the Kodama, go back inside the room and pull the lever that's inside. this will cause the bridges within the tower to rotate.

Since you just destroyed the dark realm, make sure to check the tower to find large chests that you can open which contains 1x Onmyo Mage's Locks. After clearing the section, you'll need to head back up to the top of the tower via the path that's surrounded by roots.

Once you're at the top, head inside the tower, go around the side and jump out from one of the doors to land on the middle bridge. From here, you'll want to go left and you'll find the Spa (Hot Spring) for this mission.
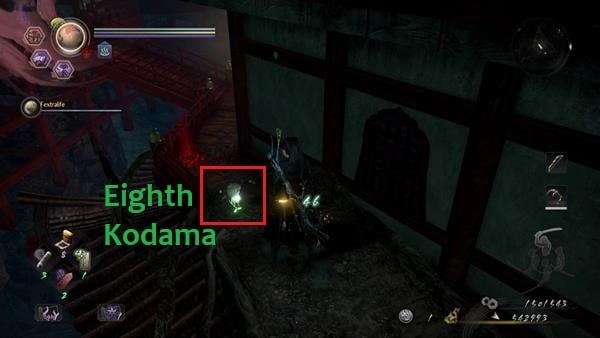
From the hot spring, walk to the left side of the balcony and head up the rooted path. You'll find the eighth Kodama at the end of the path. Once you've grabbed the Kodama, jump off the path from the side and at this point you'll want to rest at the second shrine first before you proceed to the marked location where you'll find the last Kodama before reaching the boss.

The ninth Kodama can be found on the left side of the entrance of the room that leads to the boss - if you're prepared, open the door ahead where the boss awaits.
Boss Battle: Shuten Doji

The boss for this mission is Shuten Doji. This boss wields a sword and uses fire-based attacks. His movements are a bit slow which will be easy for you to observe and track his moves and attacks, however, you want to make sure you don't get hit because his attacks inflict a lot of damage. Apart from that, in the course of the battle, he will keep drinking which causes him to stumble and act like a drunkard. When this happens, he'll be vulnerable to attacks and open for a free grapple.

Whenever he unleashes a burst attack where a red glow appears, you'll want to make sure you exploit this and burst counter it to stop him from either grabbing you which deals a huge amount of damage or to counter his projectile attack where he'll spray out a stream of fire from his mouth. Once he conjures the dark realm, his attacks will be empowered and he'll gain another attack where he whips his hair in a circular motion. When he does this, you'll want to run further away from him to avoid getting hit by the flames that appear around him. To learn more about this boss, click here - successfully defeating this boss completes this mission and you'll also obtain his soul core, Shuten Doji Soul Core.
Video
[video goes here]
Map
[map goes here]
Trivia & Notes:
Trivia and notes go here

I was playing this stage with a friend, and we both picked up the dragon god jewel and have found that 1, you cannot hold more than 1 dragon jewel at a time, and 2, when you use a dragon jewel on a statue it doesn’t consume all of your jewels. We wanted to look around so we broke all the crystals and got all the jewels but if you wanted to you could bring a friend and only break 2 crystals for the whole mission. Nothing much else to say I just thought it was a weird bug.
4
+10
-1