Cherry Blossom Viewing in Daigo is a Main Mission in Nioh 2. This mission is recommended for level 112, has a difficulty level of 4, and features both human and yokai enemies. Cherry Blossom Viewing in Daigo tasks players with chasing Tokichiro and to put an end to his rule over the nation. Please see Missions for other walkthroughs on other missions.

General Info
- Previous: The Golden Castle
- Next: Sealed Fate
- Recommended Lvl: 112
- Bosses: Tokichiro, Kashin Koji
Video Walkthrough
[video goes here]
Map
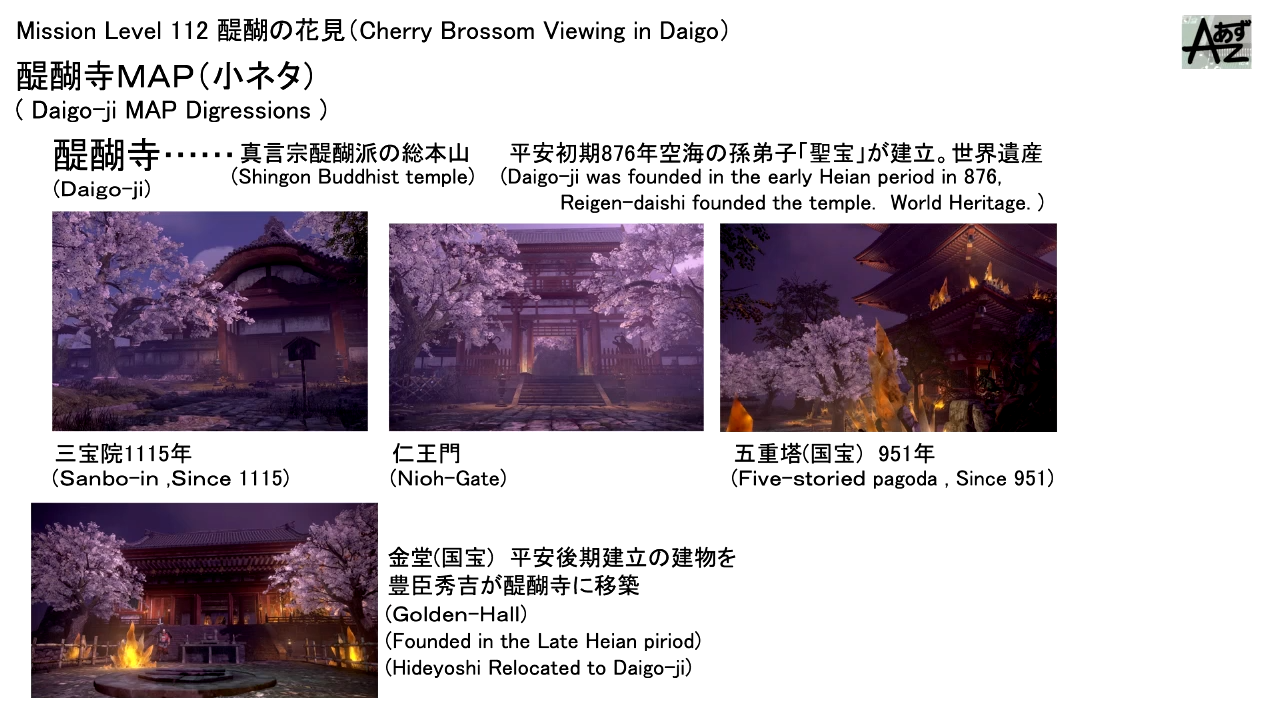
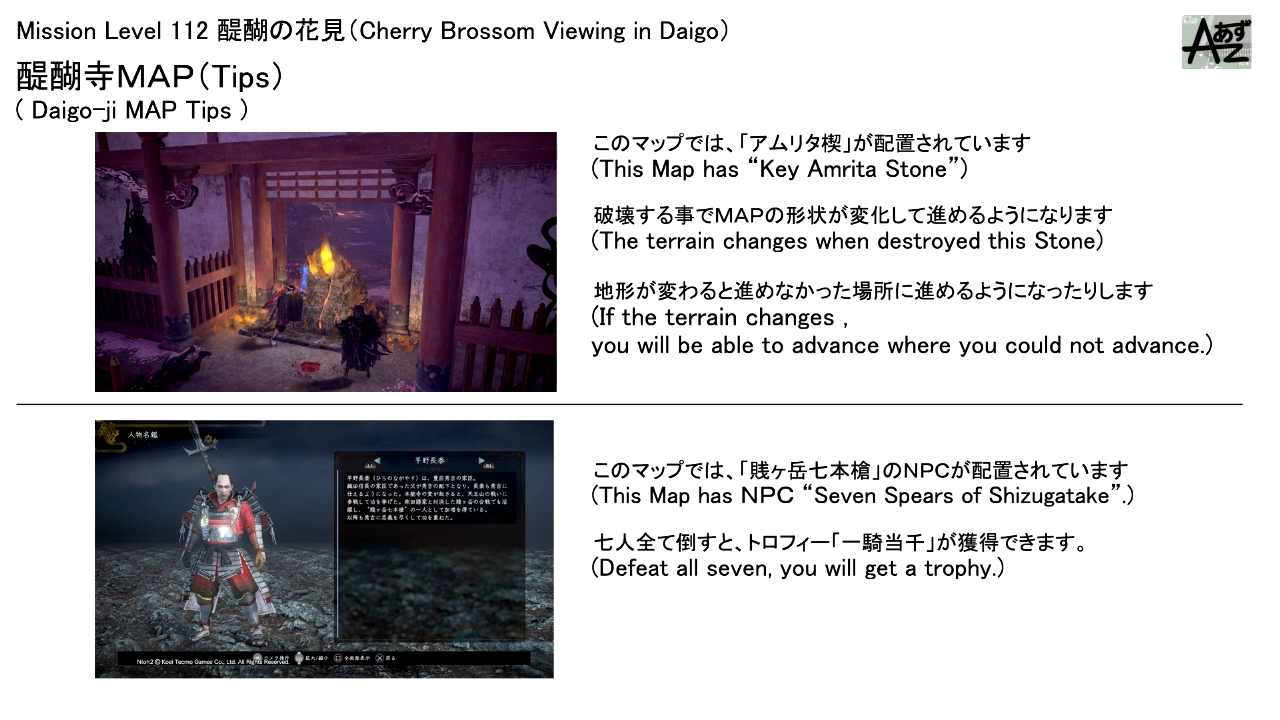
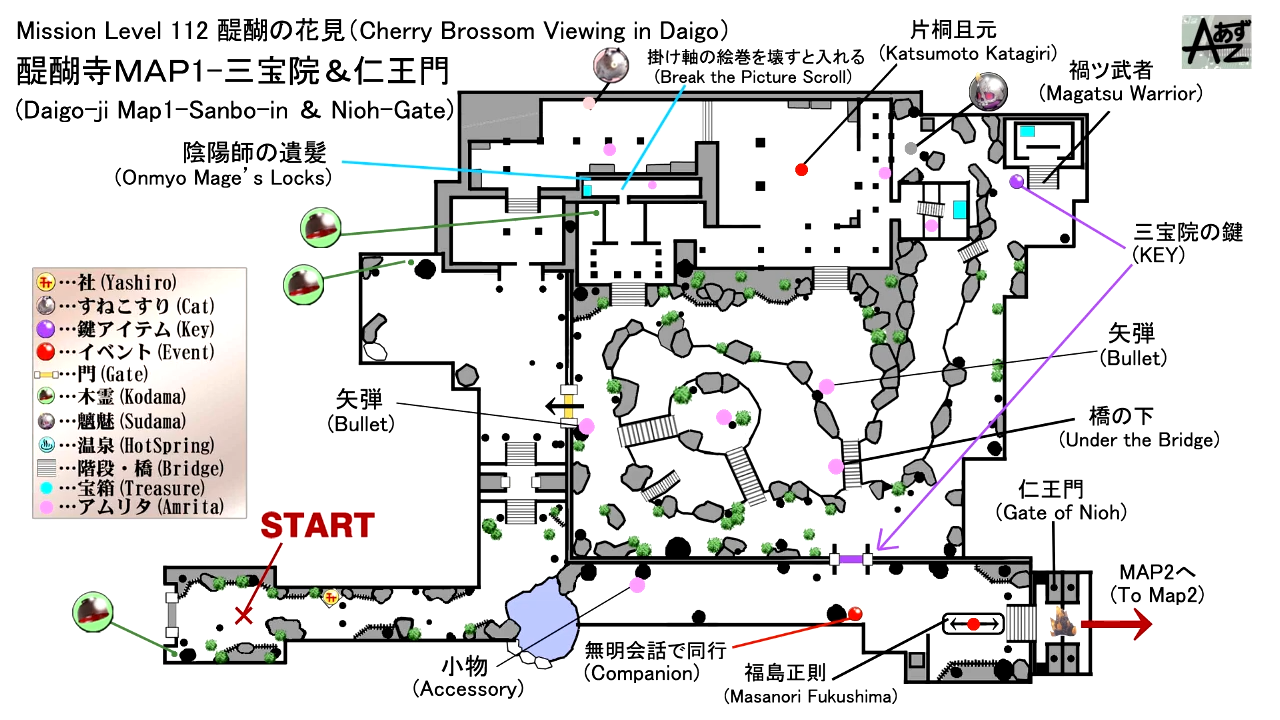
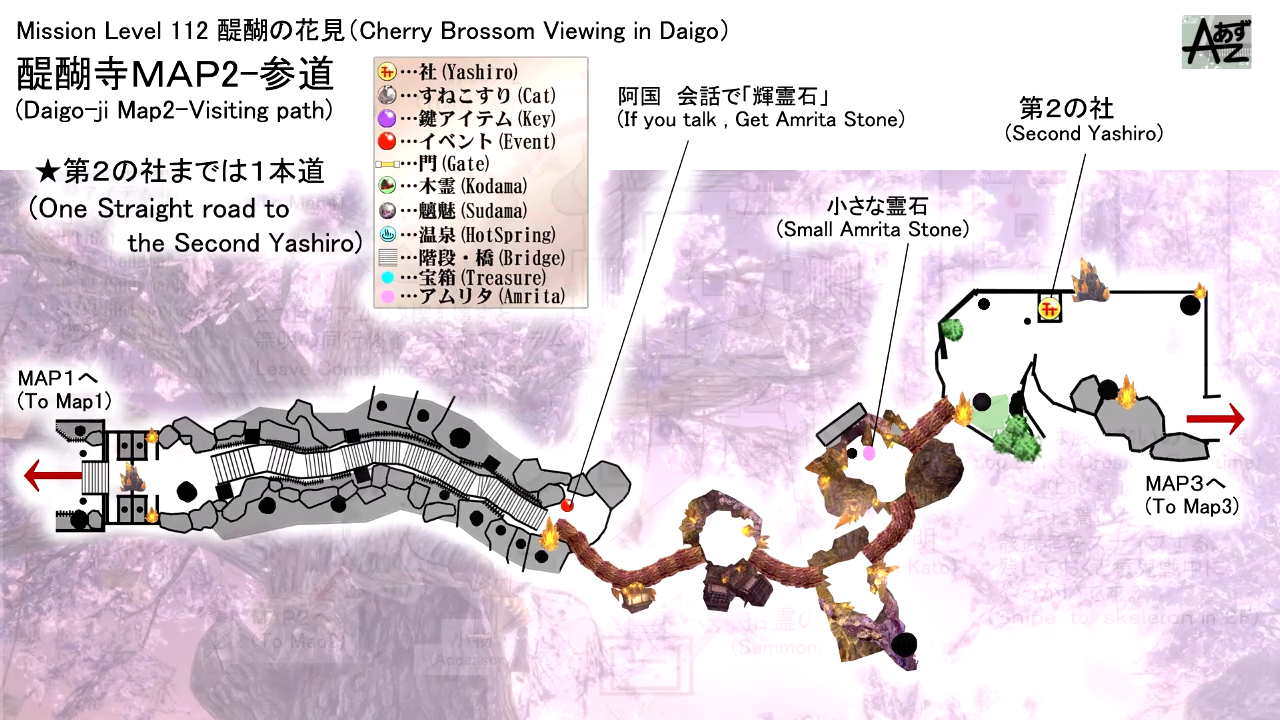
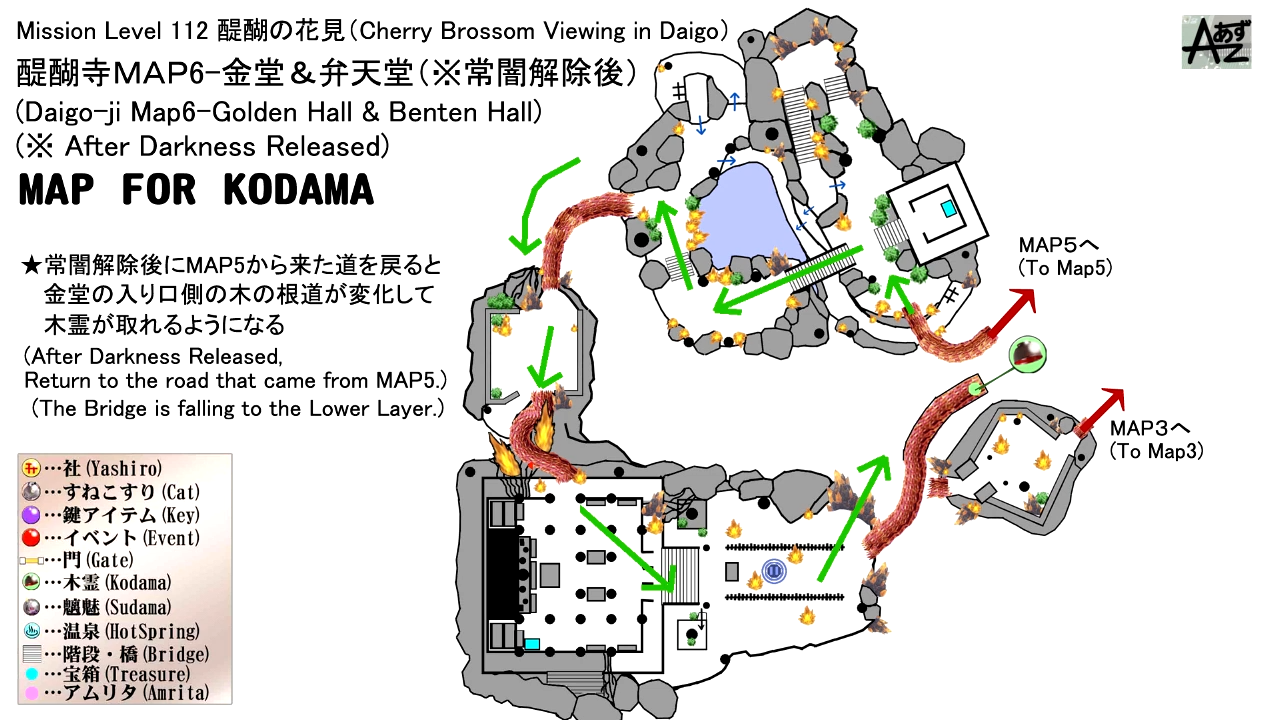
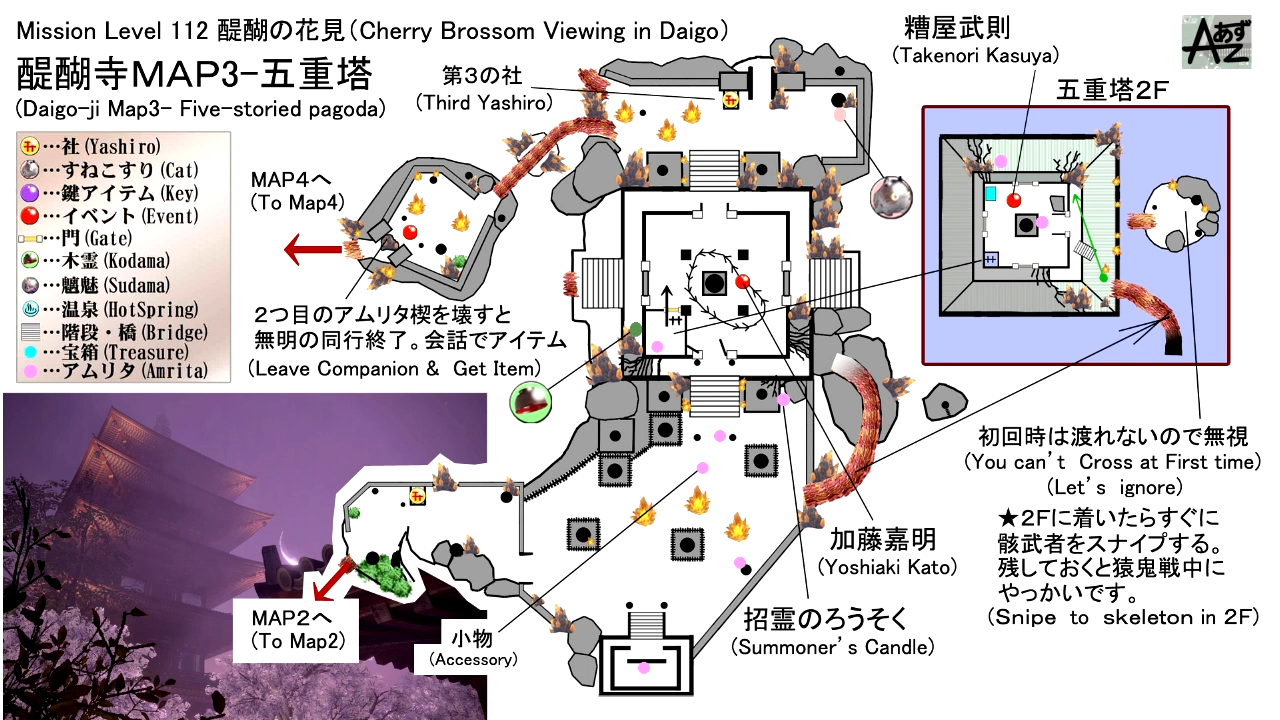
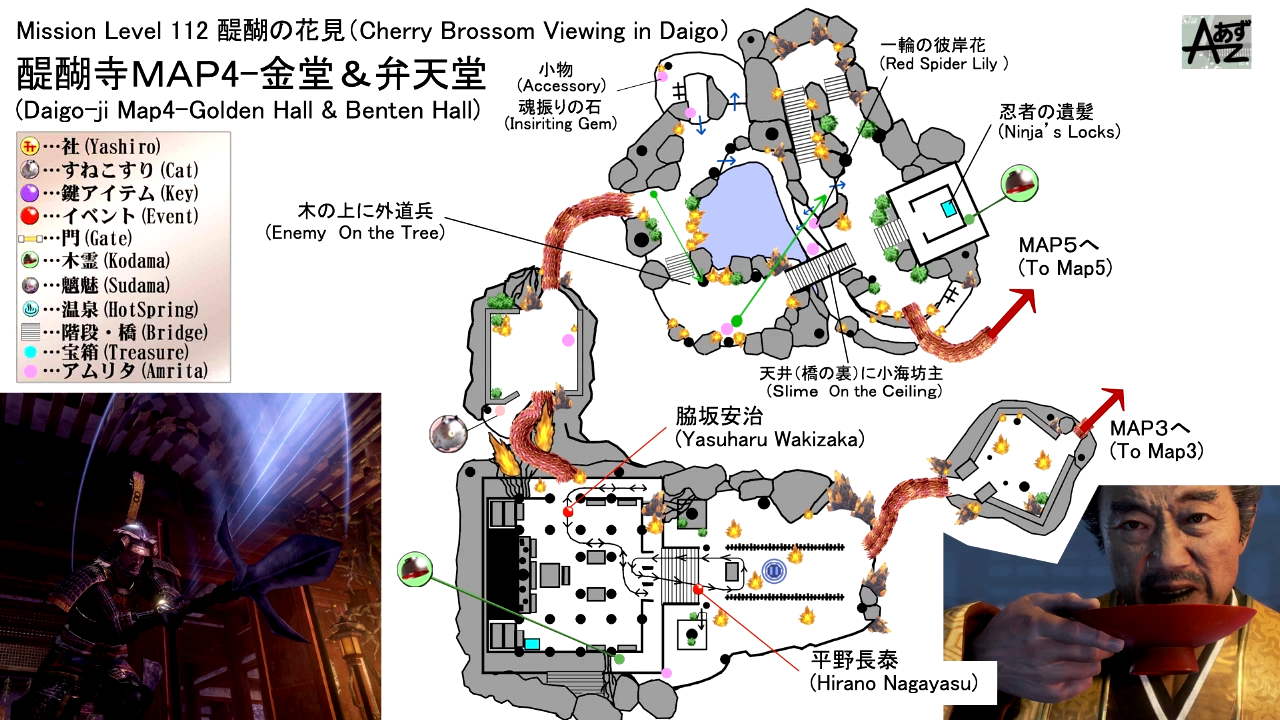
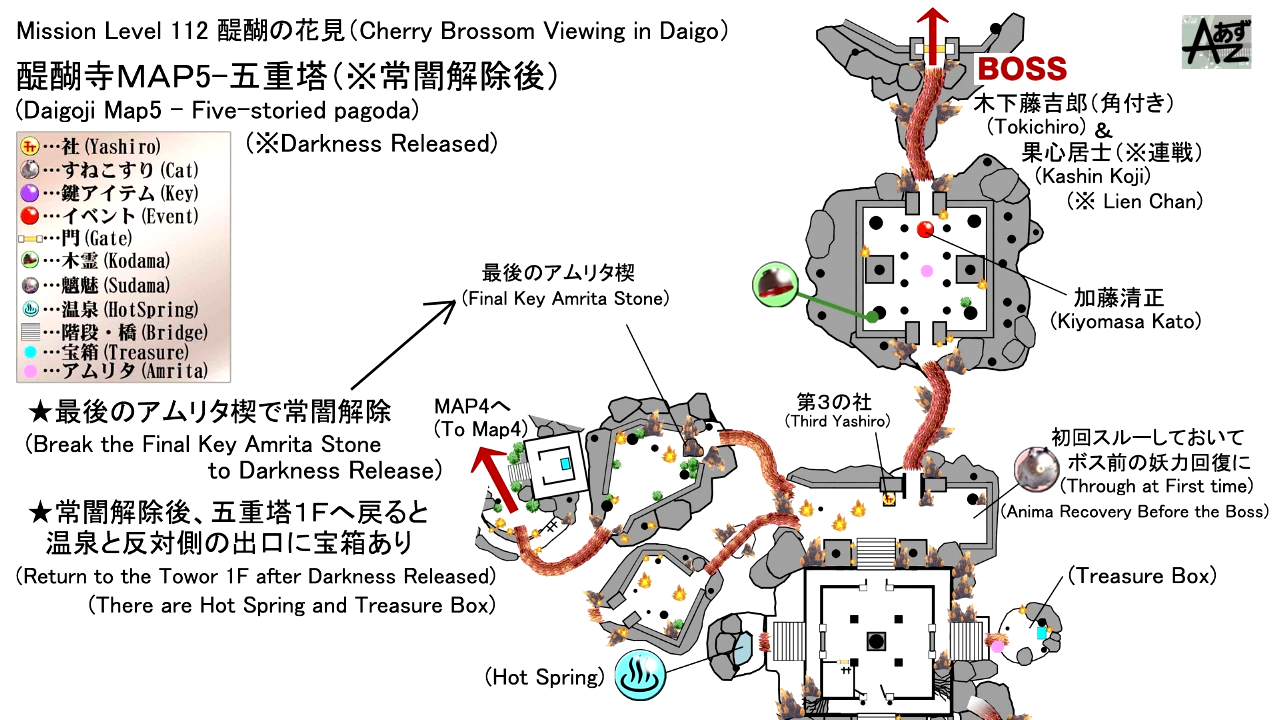
(Credit to あずchannel (Youtube))
Mission Rewards
First Time Completion
- Ichigo Hitofuri & Oyako Toshiro x1
- Child of the Sun's Helmet x1
- Child of the Sun's Cuirass x1
- Child of the Sun's Waistguard x1
- 28600 Gold
- 57576 Amrita
Subsequent Completion
- ??
- 28600 Gold
- 57576 Amrita
NPCs
Bosses
Items
Collectibles
Equipment & Materials
- Random Weapons
- Random Armor Pieces for:
- Veteran Armor
- Heirloom Armor
- Imakomei Armor
- Fuma Ninja Amor
- Saika Clan Armor
- Tosa Governor Armor
- Black Bear Fur Armor
- Onmyo Warrior Armor
- Shrine Maiden's Armor
- Random Items:
- Salt
- Stone
- Elixir
- Kuroraku
- Omamori
- Spirit Stone
- Tamahagane
- Ochoko Cup
- Shrapnel Bomb
- Uchiko Powder
- Inspiriting Gem
- Red Spider Lily
- Lumicite Crystal
- Daion-Jin's Sake
- Divination Board
- Rifle Ammunition
- Lantern Plant Fruit
- Saisetsu-Shin's Sake
- Large Crooked Horn
- Quality Leather Cord
- Quality Leather Platelet
- Guardian Spirit: Yumehami
Soul Cores
Key Items
- Sanbo-In Key
- Smithing Text: Black Bear Fur Helmet
- Smithing Text: Mount Fuji Helmet
- Smithing Text: Linked Ring Helmet
- Smithing Text: Dodanuki Masakuni
- Smithing Text: Mikazuki Munechika
- Smithing Text: Hinomotogo
- Smithing Text: Tiger of Higo's Spear
- Smithing Text: Ichi-no-Tani Kabuto
- Smithing Text: Tiger of Higo's Armor
Enemies
- Enki
- Gozuki
- Toxic Slime
- Rokurokubi
- Magatsu Warrior
- Aberrant Soldier
- Warrior Skeleton
- Spear-wielding Soldier
- Sword-wielding Soldier
- Soldiers of the Seven Spears
Cherry Blossom Viewing in Daigo
Mission Start Text
Enjoying his position as the ruler of the nation, Tokichiro appears to have gathered numerous ladies from the court in the gardens of Daigo Temple for what is set to be the grandest of cherry blossom viewing parties.
We can't let an opportunity such as this slip through our fingers. The party is sure to have plenty of music and dancers, and with all that commotion, you should be able to slip in without notice.
I have faith in you, but you'll need to proceed with the utmost caution.
Mission End Text
Seal away Otakemaru in the innermost recesses of Byodo-In, the sacred ground where ancient evil slumbers. The forgotten grave there marks the final moments of the last soul tasked with this deed. This is the ultimate fate that awaits those who wield the power of Sohayamaru.
Kodama Locations
- First Shrine: Upon arriving at the starting point of the mission, look behind and check behind the tree to find the first Kodama.
- First Shrine: As you enter the castle grounds, you'll encounter the first two enemy soldiers of the mission. Kill the soldiers, then check behind the tree that's on the left side, you'll find the second Kodama behind the tree.
- First Shrine: Check outside and around the corner of the small room that's on the right side of the walkway near the stairs that goes to the garden section. The third Kodama is standing by the corner.
- Third Shrine: It's near the third shrine. Once you exit the temple, by the door, go left and check around the corner. You'll find the fourth Kodama standing next to a crystal.
- Third Shrine: When you reach the temple, check around the corner of the walkway. You'll find the fifth Kodama at the end.
- Third Shrine: The sixth Kodama can be found behind the building where you'll see a yokai mist inside it. The building is past the Aberrant Soldier yokai enemies.
- Third Shrine: For the seventh Kodama, you must first destroy the stone that's within the dark realm. Once that's done, retrace your steps back to the temple and run towards the new root path outside of the temple. You'll find it at the end of the path.
- Third Shrine: Once you've destroyed the stone within the dark realm, head up the root path near the third shrine where you'll encounter the last soldier of the Seven Spears. The last Kodama can be found behind the tree that's on the left side.
Sudama Locations
- First Shrine: The first Sudama can be found on the west side of the shrine where you encounter the Magatsu Warrior within the mist. It's standing by the tree at the end of the path.
Scampuss Locations
- First Shrine: As you enter the building near the first shrine, check the first room on the left where you'll encounter two spear-wielding Soldiers. You'll find the Scampuss on the left side by the two small tables.
- Third Shine: From the third shrine, you'll find the Scampuss sleeping under the tree that's on the right side.
- Third Shrine: Go outside the temple, head down the narrow root path, and at the bottom, walk to the left side, you'll find the Scampuss next to a tree.
Locks Locations
- First Shrine: As you exit the first building. Check the small room on the east side of the walkway where you'll encounter three soldiers. Inside the room, destroy the painting to find a door behind it. Inside the secret backroom, there's a chest on the left side containing a Mujina yokai. Make sure to mimic the correct gesture to avoid fighting it and to obtain the Onmyo Mage's Locks
- Third Shrine: Go west from the shrine over 4 root walkways and their respective islands. The island you are looking for has a bridge to a small building with a chest protected by an Enki hidden in a yokai circle. It is the same building that the sixth Kodama is behind. The chest contains the Ninja's Locks
Spa Locations
- Found on the left side walkway of the temple near the third shrine. You must destroy the rock first that's found within the dark realm so that the bridge made out of roots appears and connects from the temple to the platform where the Spa (Hot Spring) is.
Cherry Blossom Viewing in Daigo Walkthrough
Daigo Castle: First Shrine

The year is March 1598, and players arrive at Daigo Castle in Yamashiro Province. You are tasked to chase after Tockichiro and to end his rule over the nation. Players will be able to find the first shrine by the starting point.

Before you proceed forward, turn around as you arrive at the starting point and look behind the tree. You'll find the first Kodama there.

Once you've grabbed the Kodama, proceed further and head inside the castle grounds where you'll encounter two enemy soldiers, one is patrolling, while the other is standing by the door. Kill the soldiers then check behind the tree that's on the left, you'll find the second Kodama there. After guiding the Kodama, head inside the building.

You'll find many rooms inside, and there will be more soldiers hiding behind the sliding doors that can be destroyed. So proceed with caution to avoid getting ambushed. In the hallway, if you check the first room on the left, you'll encounter two spear-wielding soldiers. Inside the same room, you'll find the first Scampuss on the left side by the two small tables.

As you continue further, you'll find another room and a unique looking enemy soldier that wields a spear. This unique human enemy is one of the seven soldiers that you encounter around the area and must kill. If you want to unlock the trophy: Seven Wonders, you must kill all seven of these unique soldiers. What makes them unique is they wear a full-set armor, they have more HP, stronger than a regular soldier, and they can use ninjutsu to buff and heal themselves. So be cautious when you encounter them.

After you kill the unique soldier, head outside the walkway on the right and you'll see three soldiers. One patrolling back and forth, and two more inside a small room ahead. After killing the soldiers, head inside the small room and destroy the painting that's in the middle of the wall where you'll find a door behind it. Head inside and you'll see a chest on the left side that has a Mujina yokai in it. Make sure you mimic the correct gesture it does to avoid fighting it and to obtain a couple of items it drops, along with 1x Onmyo Mage's Locks.

Once you've acquired the locks, go back outside and check around the corner of the room. You'll find the third Kodama standing by the side. Next, head down the stairs and towards the garden section. There's a large door that you can unlock to open a shortcut back to the first shrine. You now have to work your way around the garden through the soldiers until you reach the yokai mist that's blocking the entrance of a shrine, the yokai within the mist is a Magatsu Warrior, kill the yokai, then loot the body that's against the frame of the shrine's stairs to obtain the Sanbo-In Key - the key unlocks the other door that's also in the garden section.

But before you unlock the door, by the shrine, check the path that's on the left and you'll find the Sudama at the end of it near a tree. Also, there's a chest inside the shrine that was previously blocked by the yokai mist. After clearing the garden section, head towards the locked door and use the key to open it.

On the other side of the door, you'll find Mumyo standing next to a tree. Make sure to speak to her so that she joins your party and accompanies you towards the next section. Obviously, the path you'll need to go to is the one on the left, but check the right side first where you'll see two soldiers standing around a corpse that you can loot - kill the two soldiers, loot the body, then proceed to the opposite path.

You'll encounter the second unique enemy soldier patrolling the area and a normal soldier that's standing by the red torii gate. You'll want to shoot the soldier first that's by the gate to stop him from shooting at you, then focus on killing the unique soldier. After that's done, head through the gate and destroy the large yellow crystal that's blocking the path ahead.

As you head up the steps, you'll find Okuni at the top, next to the narrow path made out of roots and vines. Make sure to speak to her twice to obtain 1x Lumicite Shard. Next, climb to the top of the narrow path and you'll encounter an Aberrant Soldier and a Warrior Skeleton - the second shrine can be found at the top of the narrow path.
Second Shrine

From the second shrine, head forward and into the courtyard section where you'll encounter a couple of enemies here. By the courtyard, there is a Rokurokubi patrolling the section alongside a Gozuki, and an Aberrant Soldier looting a corpse by a tree. There's a shrine on the right side where you'll find another Aberrant Soldier searching a corpse that you can loot that's inside.

Kill all the enemies outside the courtyard section and loot for items, before heading inside the temple that's on the left. Inside the temple, head up the narrow root path where you'll encounter another Aberrant Soldier. Go around the roof of the temple first and you'll encounter an Enki and another Aberrant Soldier next to a corpse that you can loot. After clearing the rooftop, head inside the second floor of the temple and you'll encounter the third unique soldier and also you'll find a small chest that you can open. After clearing the room, climb down the nearby ladder into a room where you'll find a body that you can loot - unlock the door and you'll find yourself on the first floor of the temple where you'll encounter the fourth unique soldier of the Seven Spears accompanied by a normal sword-wielding soldier.

After killing the human enemies, head out the other door and go left. Check around the corner of the temple where you'll find the fourth Kodama standing next to the crystals - once you've grabbed the Kodama, continue forward and you'll find the third shrine for this mission.
Third Shrine

Before you proceed towards the next section, check the right side, near the shrine. You'll find the second Scampuss sleeping under the tree. Once you've grabbed the Scampuss, head up the narrow root path on the left side where you'll encounter two Rokurokubi at the top and an Enki within the mist that's near the gate. After killing the yokai enemies, destroy the rock that's blocking the path and Mumyo will leave the party - make sure to speak to her to obtain 1x Lumicite Crystal.

Continue going up the narrow root path where you'll encounter two spear-wielding soldiers patrolling outside the building at the top, and inside, is the fifth unique soldier of the Seven Spears wearing red armor. If you decided to draw out the enemies outside the temple and killed them, before going inside, check around the corner of the walkway from the left side where you'll find the fifth Kodama. Inside the temple is the sixth unique soldier and you'll also find a large chest on the left side of the room.

After clearing the room, exit the temple from the door that's on the right and go down the narrow root path. At the bottom, walk towards the left side and you'll find the third Scampuss next to a tree. Once you've grabbed the Scampuss, loot the corpse that's on the right side and then continue going down the narrow rooted path where you'll encounter a Warrior Skeleton and a Rokurokubi disguised as a human soldier, try to shoot them from afar instead of fighting them on the narrow path to avoid dying from falling off. Next, continue towards the next section, and as you reach the other end of the path, immediately turn left and you'll see another Rokurokubi below you, standing by the edge of the cliff. Kill it, jump down and you'll find another body that you can loot. Climb up the ladder, loot the other body then jump down from the ledge back from where you started.

Now, continue to the next section where you'll encounter three Aberrant Soldier enemies, cross the small bridge towards the building ahead. Before you go inside towards the yokai mist that's blocking a large chest behind it, go around the back of the walkway and you'll find the sixth Kodama behind the building. After guiding the Kodama back to the shrine, kill the Enki that's within the mist inside the building and open the chest that was behind the fog to obtain 1x Ninja's Locks along with other items - after clearing the building, go back to the front and head up the narrow rooted path that's on the right side of the building.

At the top of the path, you'll enter a large area that is engulfed with the dark realm. Inside the dark realm, you'll encounter 1x Magatsu Warrior and 1x Aberrant Soldier. To dispel the dark realm, you must destroy the large rock that's behind the Aberrant Soldier.

After you clear the dark realm and kill the yokai enemies, don't proceed to the next section first, but instead, go back to the temple where you fought the two unique soldiers of the Seven Spears and head towards the other root path where you'll find the seventh Kodama at the end - once you've guided the Kodama back to the shrine, go back to the area that was previously engulfed with the Dark Realm. The path ahead will lead you back to the third shine. From the shrine, go up the walkway of the temple, and check the left side. You'll see that there's a root path that's now connecting to a platform on the other side where you'll see a yokai mist. The yokai within it is an Enki, and behind it, you'll find a large chest.

Now, check the opposite side of the walkway and you'll see a small root path connecting to another platform on its other end where you'll find the Spa (Hot Spring) for this location. After using the hot spring, go back to the shrine and head up the root path where you'll encounter the last soldier of the Seven Spears.

Once you've killed the last soldier, check behind the tree that's on the left side. You'll find the last Kodama for this mission - if you are ready, continue further until you reach the end and open the door that will lead to the boss of this mission.
Boss Battle: Tokichiro

For this mission, you'll fight against Tokichiro for the second time, in his corrupted yokai form. Tokichiro uses the same moves and elements during your first encounter with him in the main mission: The Two Faces of Hospitality. The only difference now is that he is more aggressive and he can now conjure the dark realm which empowers his attack. If ever he conjures the dark realm, just focus on running around to avoid getting hit by the flame AoE attacks that he does, to learn more about this boss, click here. After you defeat him, you'll obtain his Guardian Spirit: Yumehami - upon gaining control of your character, loot the items dropped by Tokichiro as well as The Art of Combat: Ultimate Sign of the Cross and interact with his body.
An Unexpected Boss Battle: Kashin Koji

Upon interacting with Tokichiro's body, a cutscene will trigger and Kashin Koji will appear. Shortly after the cinematic, the battle against him will start. This boss uses the majority of elemental attacks, so you'll want to watch out for all of his AoE attacks. Despite that, you are in luck, since he has less health and can easily decrease his HP since he isn't wearing any armor. Just don't be greedy with attacking him, and follow-up with your combos after he attacks you. He'll usually have a second or two before he uses another attack.

Once his health bar is empty, he'll drop to the ground. Although it may seem you've defeated him, he will recover with full health and conjure the dark realm. In the second phase of the battle, you will now have to be careful since his attacks are now empowered in the dark realm. Be patient and wait for an opening before you land your attacks, you'll also want to make sure you keep moving around the area to avoid getting caught and hit by his attacks. Defeating him in the second phase will complete this mission - after grabbing the loot, speak to Kashin Koji and another cutscene will trigger. Shortly after, you'll be teleported to the interim where you'll need to speak to your mother, Miyoshino.
Video
[video goes here]
Map
[map goes here]
Trivia & Notes:
Trivia and notes go here
 Anonymous
Mimic chest are randomized and killing them won't affect the drops , please fix your erroneous guide for the onmyo mage lock of hair

 Anonymous
Tokichiro can drop the arrow's bane smithing text in this level. Side note for random armour sets found in game, the One eyed dragon's set is present in this level as random loot.


anybody got the armors that the spears have
1
+10
-1