The Hidden Monsters of Okehazama is a Main Mission in Nioh 2. This mission is recommended for level 21, has a level 4 difficulty, and features both human and yokai enemies. The Hidden Monsters of Okehazama tasks players to defeat the enemy general on the other side of the yokai-infested mountain. Please see Missions for other walkthroughs on other missions.

General Info
- Previous: The Viper's Sanctum
- Next: The Mysterious One Night Castle
- Recommended Lvl: 35
- Mission Lvl. Difficulty: 4
- Bosses: Imagawa Yoshimoto
Video Walkthrough
[video goes here]
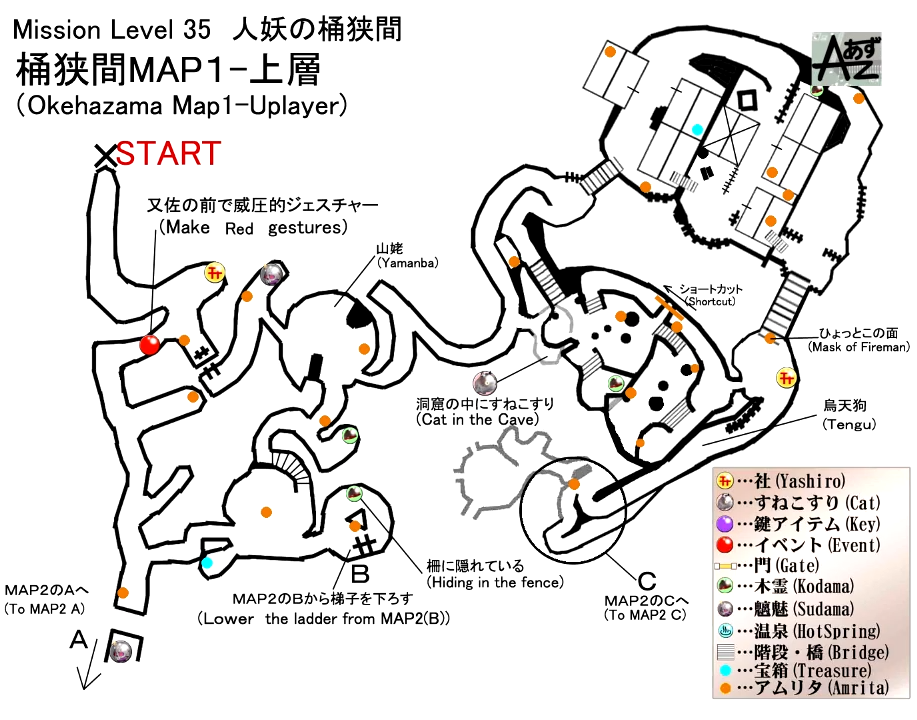
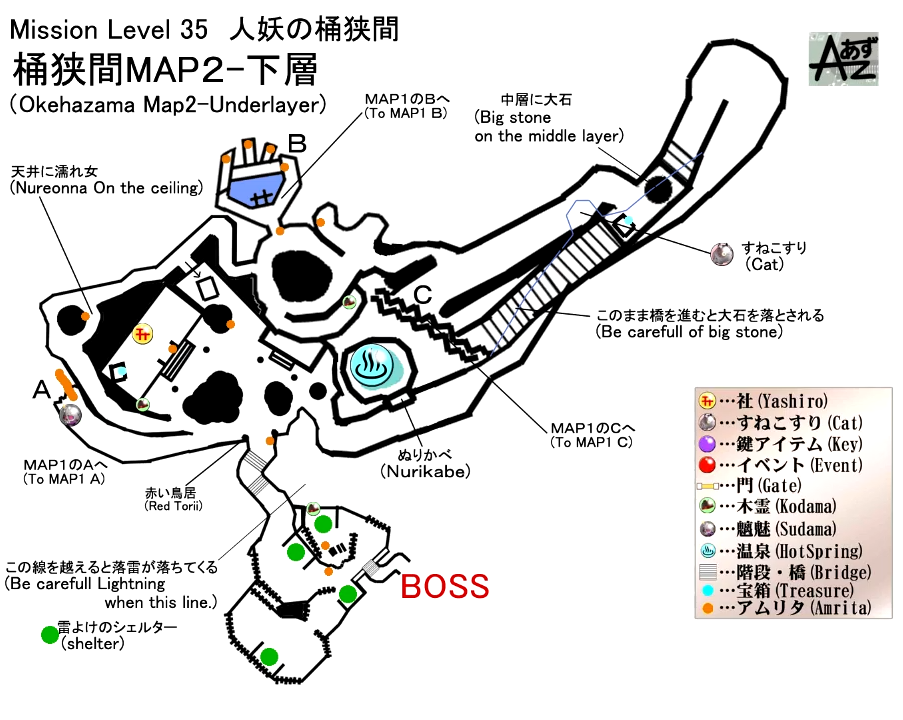
Map


(Credit to あずchannel (Youtube))
Mission Rewards
First Time Completion
- Samurai's Locks x1
- Master Archer's Bow x1
- Master Archer's Cuirass x1
- Master Archer's Waistguard x1
- 7400 Gold
- 2976 Amrita
Subsequent Completion
- ??
- ?? Gold
- ?? Amrita
NPCs
Bosses
Items
Collectibles
Equipment & Materials
- Stone
- Elixir
- Gourd
- Arrow
- Antidote
- Omamori
- Whetstone
- Tengu's Fan
- Sacred Water
- Red Spider Lily
- Daion-Jin's Sake
- Signpost Amulet
- 1x Ninja's Locks
- Small Spirit Stone
- Gunpowder Bomb
- Large Spirit Stone
- Lock of Grey Hair
- Lantern Plant Fruit
- Summoner's Candle
- Quality Leather Cord
- Antiparalyctic Needle
- Karasu Tengu Feather
- 1x Onmyo Mage's Locks
- Glowing Lock of Wet Hair
- Guardian Spirit: Rokugezo
- Smithing Text: Yamanba's Knives
- Smithing Text: Bloodspider Blade
Soul Cores
Key Items
- n/a
Enemies
The Hidden Monsters of Okehazama
Mission Start Text
What a surprise! I wasn't expecting them to take in a bunch of outsiders just like that, without any real clue about our background. I guess they must've been impressed with good ol' Tokichiro.
That aside, things are getting busy around here. It sounds like the enemy is maneuvering a considerable force this way. But I imagine that's not going to stop you from getting out there and earning your keep, right? Me? I have no interest in crossing swords with my fellow man. No, I'll leave that to the rest of you.
Mission End Text
It seems like Lord Nobunaga might even make us samurai for the feat of slaying Yoshimoto!
It just goes to show, even without the right social standing or lineage, if you’re bold enough to get out there and prove yourself you can really go places. I’m warming to this Nobunaga guy more and more.
And that gorgeous younger sister of his, Lady Oichi... I could’ve sworn she made my heart skip a beat or two! We better do what we can to keep them both impressed.
Kodama Locations
- The first Kodama can be found inside the cave near the starting point. It's in the second room of the cave where you encounter an Enki.
- From location 1, head back to the room with the group of Gaki then head up the slope on the right into another path where you'll come across another Enki. You'll find the Kodama past the Enki and straight ahead towards a dead-end, behind some wooden crates.
- The third Kodama can be found outside the cave of locations 1 and 2. Head up to the steep path and towards a small forest area where you come across a Nure-Onna. The Kodama can be found behind some grass.
- From the 2nd shrine, head down the nearby slope and inside the cave. Follow the candles that will take you to a large room containing two Nure-Onna and Gaki yokai. After killing the enemies, head towards the red broken torii gate and head towards the path on the left. You'll find the fourth Kodama at the dead-end.
- The fifth Kodama can be found in the Dark Realm where you encounter a One-eyed Oni which is the source of the Dark Realm that's near location 4. After you dispel the field, walk up to the shrine that's on the center and look at the left side, the Kodama is standing in the bushes.
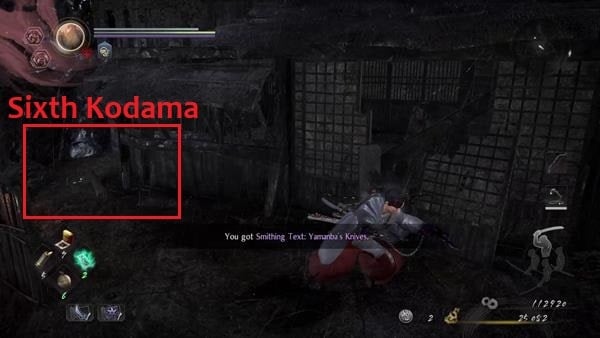
- The sixth Kodama can be found at the corner of a broken house that can be found at the end of a small village that's engulfed with the Dark Realm.
- The last Kodama can be found near the mission's objective. Go around the barricades to your left until you reach a burning tree. The Kodama can be found behind some sacks inside an enclosure that's on the right side.
Sudama Locations
- The first Sudama can be found outside the cave where you face the first Yamanba. From the cave, exit through the left door and turn right. You'll find the Sudama behind some bushes.
- From the Dark Realm where you encounter a One-eyed Oni, there's a path that's surrounded by grass. Follow that path and you'll find the Sudama on the other end.
Scampuss Locations
- The first Scampuss can be found behind some baskets where you encounter the 2nd Yamanba outside the first cave.
- The second Scampuss can be found along the path where the hot spring is, it's behind some boxes on the left side.
Hot Springs Locations
- Near the third shrine from the Dark Realm where you encounter a One-eyed Oni, exit to the west path and you'll encounter troops from the Imagawa clan, the hot spring is behind a Nurikabe yokai that's on the left side next to a soldier that's sitting.
Locks Locations
- The Onmyo Mage's Locks can be found inside a locked chest inside a shrine with a Kodama shrine that's in the middle where you encounter a One-eyed Oni which is the source of the Dark Realm.
- Ninja's Locks can be found inside a large chest at the lower section of a small village that's engulfed with the Dark Realm.
The Hidden Monsters of Okehazama Walkthrough

The year is May 1560 and players arrive at Okehazama in Owari Province. You'll find Tokichiro ahead and the first Kodama shrine. At the right side of the shrine, there's a corpse you can find near the ladder. You won't be able to use the ladder yet, so ignore it for now and approach Maeda Toshiie.

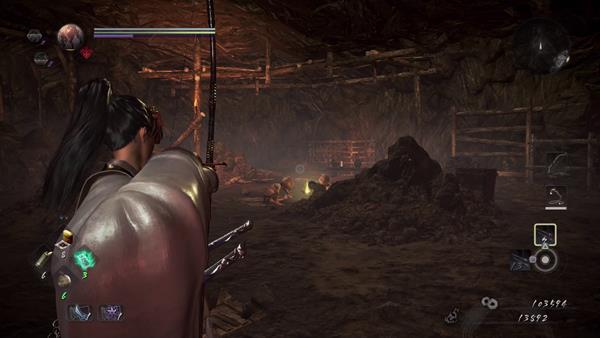
Speak to Maeda Toshiie and he'll tell you that the path ahead is crawling with Yokai and the Imagawa clan's forces. After speaking to him, bring up the gestures menu and use "Taunt" on him. He'll move and you'll be able to proceed further. As you head straight, there's a cave leading to a dead-end to your left where you'll find a corpse that can be looted. Continue going straight until you reach another dead-end where you'll see a broken bridge. There's also a Gaki feeding on a dead body, kill it, then loot the corpse to acquire a memory and a random item - after looting the body, head towards the nearby entrance of the cave.

Once you're in the cave site, you'll see two more Gaki that's feeding in the middle and another hiding behind the rocks near them. Clear the area, then loot the corse that was being eaten to find another memory and random items, there's also a small chest that you can find at the right side of the room - after that's done, go straight into the next room and you'll find an Enki in the middle.

From where the Enki was, check the corner of the wooden barrier that's on the left and you'll find the first Kodama. When that's done, go back to the previous room and head up the slope that's on your right where you'll come across another Enki.

From where the 2nd Enki was, the next path is on the left, but keep going straight first until you reach another dead-end that has some wooden crates. Break it and you'll find the second Kodama behind the crates.

After you've guided back the Kodama, head back then turn right towards the next room of the cave. You'll encounter a new Yokai ahead which is the Yamanba, and you'll see her sharpening her knife. Killing her drops a Lock of Grey Hair.

After killing the Yokai, before going to the path that's on the right, exit the door that's on the left. You'll find a ladder that you can knock down that leads back to the starting point, and on the right side, there's a Sudama at the corner behind the bushes. When you're done, go back inside and head towards the opposite door.

Once you're out the cave, walk towards the steep path and you'll see a small room on your right where you'll encounter the 2nd Yamanba. Kill it, then head inside the dead-end room where you'll find the first Scampuss behind some baskets. After locating the Scampuss, continue going up the steep path where you'll come across a mist that's blocking your path, the Yokai within the mist is an Enki.

After killing the Enki, continue going up first then when you reach a bridge, walk to the edge on the right, you'll see a body below you that's on a plank. Drop onto the plank then loot the body to obtain some Salt and a Large Spirit Stone, go back up to the same spot after looting the body and cross the bridge where you'll encounter a Nure-Onna.

Kill the Nure-Onna, then walk straight until you reach a dead-end, you'll find the third Kodama hiding in the grass. Once you've guided back the Kodama to the shrine, go back and head up the nearby slope where you'll encounter three more Gaki and two more Nure-Onna. In the upper section, you'll find a couple of corpses that can be looted and the second Kodama shrine.

From the shrine, there's a slope you can go down that's behind. You'll come across a Karasu Tengu Yokai that's patrolling the path. Kill it, then go down and turn right where you'll find another entrance to a cave and another Yamanba inside. Once you've killed the Yamanba, follow the candles and head further inside the cave where you'll see a makeshift white torii gate, there's two Nure-Onna and Gaki in the other end.

Once you've cleared the room of yokai, walk up to where the red broken torii gate is and turn left. At the end of the path is a dead-end where you'll find the fourth Kodama. Go back and towards the door where there are wooden floors after you've found the fourth Kodama.
Inner Cave

First, kick down the ladder to open up a shortcut near the starting area. On the right side, there's a feeding Gaki. You can grapple it from behind then follow up with a finisher while it's down, also, loot the corpse after killing the yokai. Go the other end of the room then drop down onto the wooden floor below you, once you approach the glowing corpse, 2x Oni-bi yokai will appear. Once you've killed the Oni-bi, drop down onto the bamboo structures and loot the two nearby corpses. If you notice, at the bottom is the section where you found the first Kodama.

After you've looted the bodies, go back up and towards the red broken torii gate where you'll find a mist that's blocking the path ahead, the Yokai within the mist is a Yamanba. After killing the Yamanba, go straight until you find yourself in a small room that has some candles around it. Look above you, and shoot the Nure-Onna with your ranged weapon to avoid getting grabbed by it.
Inner Cave: Dark Realm

When you've cleared the area, you'll find that the path ahead is engulfed with the Dark Realm. There's a blue Oni-bi, a Gaki, and a One-eyed Oni. The best way to deal with the small yokai is to head inside the dark realm from the backside, instead of the front. From where you fought the Nure-Onna, retrace your steps, and head towards an opening that's on your right. You'll drop down onto the backside of the area where you'll see a well that you can strike to obtain an item.

Just around the corner, the first yokai you'll see is a feeding Gaki. You'll want to kill the Gaki first, then shoot the blue Oni-bi with your rifle, then face the One-eyed Oni. The source of the Dark Realm is the One-eyed Oni, killing it will dispel the field and may drop its soul core, One-eyed Oni Soul Core apart from other random items.

Once you've cleared the dark realm, walk up to the shrine and look to your left, you'll find the fifth Kodama standing in the grass.

Inside the shrine that's in the middle, you'll find the third Kodama shrine, a corpse that you can loot, and a large chest that you can open containing random items and 1x Onmyo Mage's Locks.

When you're done searching the shrine, go back outside, look to your right, and head towards the path that has some plants surrounding the door. At the other end, you'll find the second Sudama and you can knock down the tree to open up a shortcut leading back to the starting point.

Next, go back, ignore the red broken torii gate for now, and exit the path that's on the left side. The path you'll come out of will take you back to the second Kodama shrine. You'll now encounter some troops from the Imagawa clan. Kill them first, and as indicated on the image above, you'll find Nurikabe a yokai camouflaged as a wall that's on the left side. Try to use the "Whistle" gesture to avoid it from attacking you. Behind the yokai, you'll find a hot spring that you can use to obtain temporary HP regen effects. After you've used the hot spring, continue forward and make your way to the top where you'll find yourself back to the 2nd Kodama shrine, you'll need to retrace your steps back until you reach a small village that is engulfed with the Dark Realm.

Also, along the path where the human troops are, there's a corner to your left that has some wooden boxes. Behind it, you'll find the second Scampuss.
Small Village: Dark Realm

If you were able to retrace your steps back to the second Kodama shrine, you should find yourself heading towards a small village that is engulfed by the Dark Realm. Behind the gate of the small village, there's a Yamanba sharpening its knife. The path ahead is a dead-end, so you'll have to walk onto the rooftops and make your way down onto the village proper, make sure you kick the ladder down first before you jump down. The source of the Dark Realm is the Enki that's below you, kill it to dispel the field and to obtain its soul core and some random items. Make sure to check the open houses, the back, and corners of it as well to find corpses that you can loot.

When you're at the village proper after defeating the Enki, go straight until you reach the end where you'll see a broken house, don't go down the slope. Check the left side corner of the house, you'll find the sixth Kodama. After guiding the Kodama back to the shrine, go down the slope and you'll encounter another Gaki and Yamanba.

When you reach the lower level of the village, you'll find two houses. The one that's on the left contains a large chest that you can open where you'll find random items and 1x Ninja's Locks, while the one that's on the right has a dead body that you can loot. Once you've searched both houses, go straight, cross the bridge and you'll retrace your steps back to the second Kodama shrine. What you'll want to do is go back to where the hot springs were and go back inside the cave that has a shrine.

As indicated in the image above, this is where you'll need to go, towards the broken red torii gate where the shrine is inside a cave. When you come out of the cave, you'll encounter a soldier wielding a sword. Also, when you hear the sound of an elephant, make sure to dodge quickly to avoid getting hit by a lightning bolt. Whenever the elephant roars, a bolt of lightning will appear where you are standing. If you are hit, you can get electrocuted and stunned for a few seconds.

Before heading towards the marked objective, go around the barricade to your left until you see a tree that's on fire. Kill the soldier that's under the enclosure and check it. You'll find the last Kodama behind some sacks. After finding the last Kodama, head to the middle part of the section towards the mission's objective.
Boss Battle: Imagawa Yoshimoto

A cutscene will trigger before you face the boss of this main mission, Imagawa Yoshimoto. This boss has the ability to call out its guardian spirit that conjures bolts of lighting on the field. Make sure not to get hit to avoid getting stunned. At the beginning of the battle, he'll use dual swords. He has two burst attacks, one is a charged attack where he calls out his guardian spirit to send out a lightning bolt, and the other is melee attack where he swings his sword three times. You'll want to try and land your Burst Counter attack whenever he uses a burst attack to interrupt him. When he reaches about 40% of his health, he'll switch weapons from his dual swords and a spear. Another tactic that's good is to pressure him by throwing bombs at him - successfully defeating him completes this main mission, a cutscene will then follow and you'll obtain his Guardian Spirit, the Rokugezo.
Video
Map
[map goes here]
Trivia & Notes:
Trivia and notes go here
 Anonymous
To save the hour of running around thanks to the idiot who wrote this article, the kodama in the yokai village is to the left OUTSIDE one of the houses behind some short, breakable baskets and pots on the lower level.


There is a blue-named historical benevolent grave to the right before the boss area. If you summon this NPC and he survives the battle, he has a unique unsummoning animation (seppuku) and an additional voice line.
--Yukisuna
0
+10
-1