The Two Faces of Hospitality is a Main Mission in Nioh 2. This mission is recommended for level 91, has a difficulty level of 5, and features both human and yokai enemies. The Two Faces of Hospitality tasks players with fighting through Tokichiro's army and stopping him. Please see Missions for other walkthroughs on other missions.

General Info
- Previous: Ruin Draws Near
- Next: The High-spirited Demon
- Recommended Lvl: 91
- Mission Lvl. Difficulty: 5
- Bosses: Tokichiro
Video Walkthrough
[video goes here]
Map
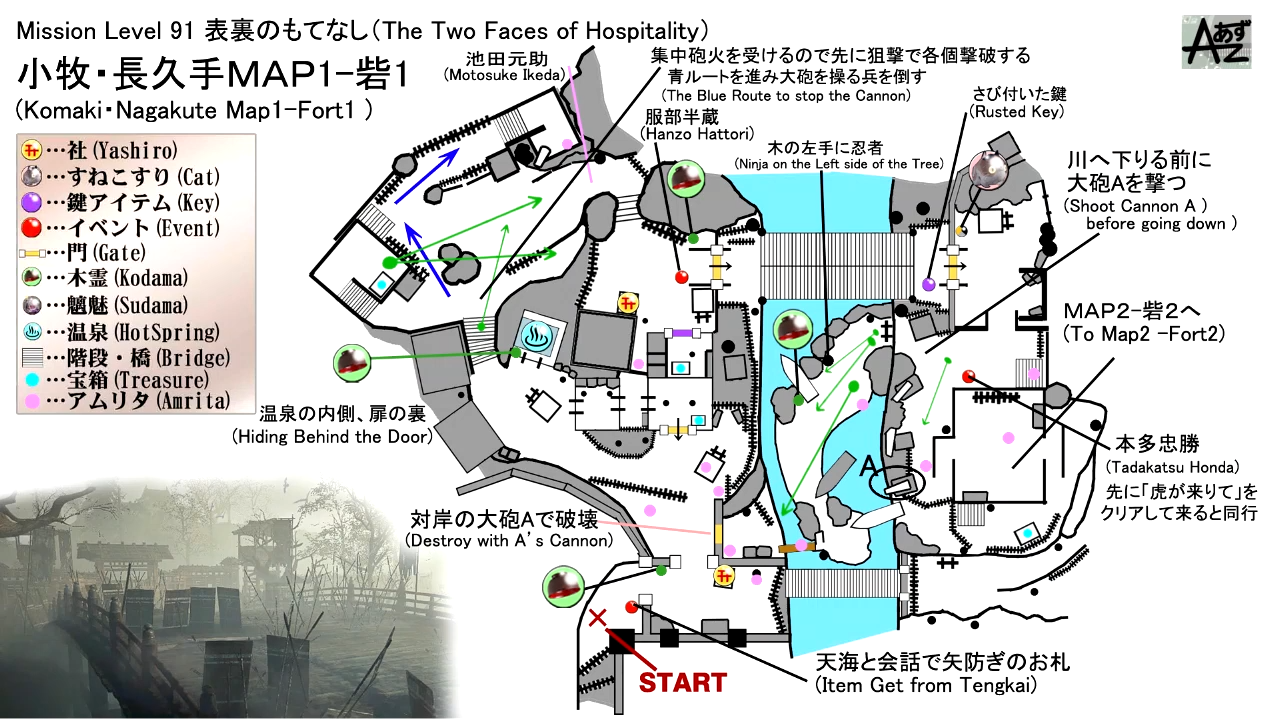
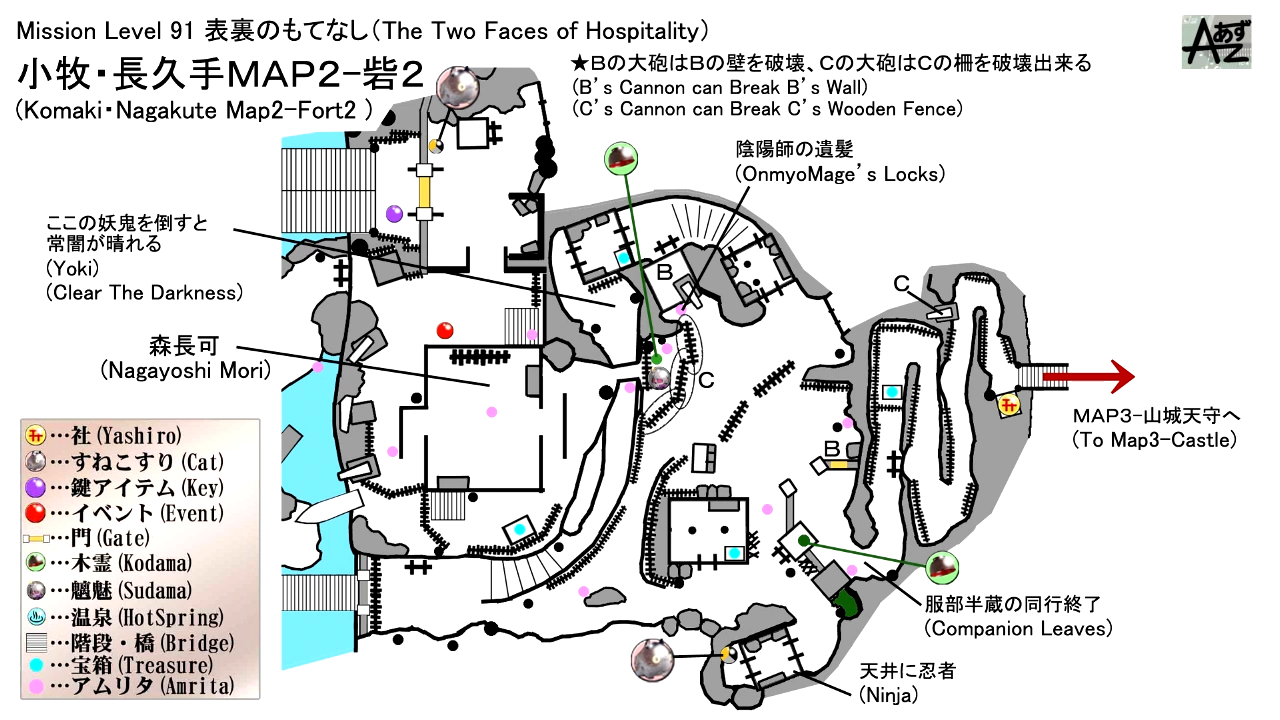
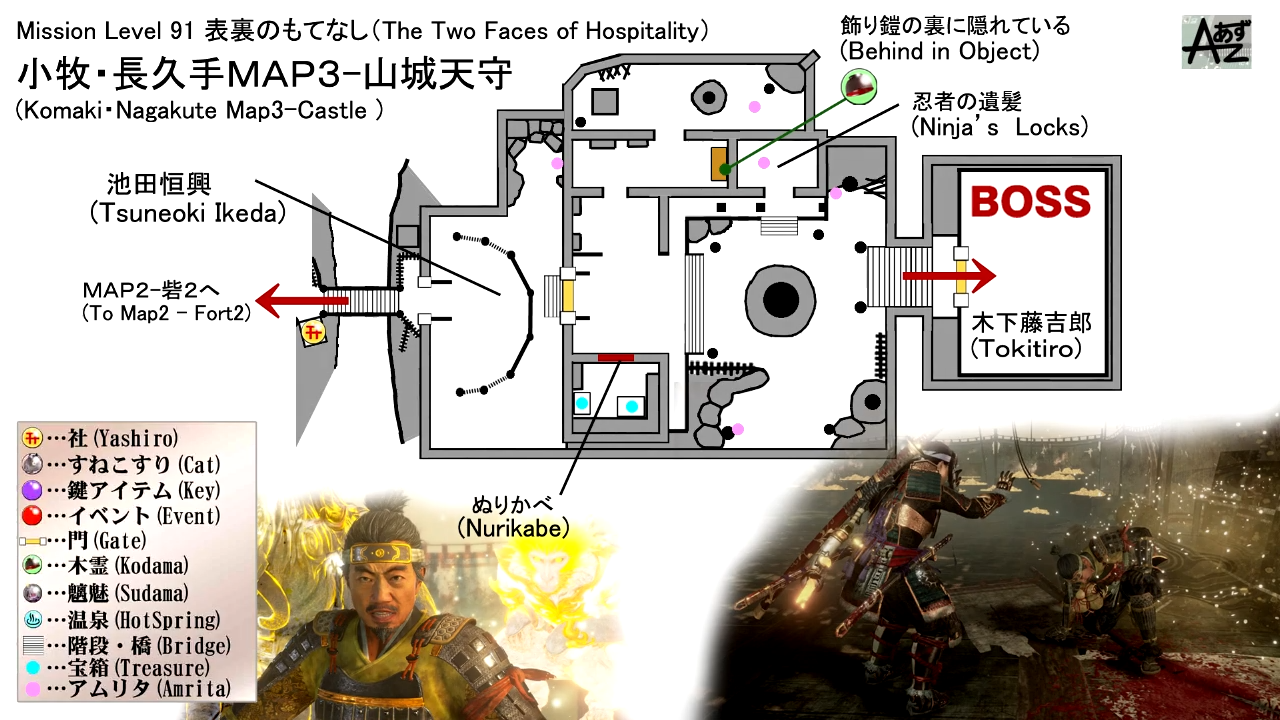
(Credit to あずchannel (Youtube))
Mission Rewards
First Time Completion
- Ogo & Nagamei Masamune x1
- Golden Gourd Plated Headband x1
- Golden Gourd Cuirass x1
- Tokichiro's Gourd x1
- 22600 Gold
- 26680 Amrita
Subsequent Completion
- ??
- ?? Gold
- ?? Amrita
NPCs
- Hattori Hanzo
- Tenkai (Akechi)
- Honda Tadakatsu
Bosses
Items
Collectibles
Equipment & Materials
- Random Weapons
- Random Armor Pieces for:
- Bowl Armor
- Genryu Armor
- Platemail Armor
- Tigerskin Armor
- Merchant Armor
- Conqueror Armor
- Greater Good Armor
- Golden Gourd Armor
- Shrine Maiden's Armor
- Warrior of the West Armor
- Random Items:
- Salt
- Pipe
- Elixir
- Gourd
- Arrow
- Spirit Stone
- Sacred Arrow
- Lumicite Shard
- Shrapnel Bomb
- Uchiko Powder
- Righteous Jasper
- Explosive Rounds
- Gunpowder Bomb
- Lantern Plant Fruit
- Lightning Omamori
- Saisetsu-Shin's Sake
- Highest Quality Lacquer
- Hand Cannon Ammunition
- Smithing Text: Ningen Mukotsu
Soul Cores
Key Items
Enemies
- Yoki
- Mujina
- Nurikabe
- Flying Bolt
- Rokurokubi
- Wheelmonk
- Mitsume Yazura
- Aberrant Soldier
- Warrior Skeleton
- Armored Dog
- Axe-wielding Soldier
- Sword-wielding Soldier
- Kusarigama-wielding Ninja
The Two Faces of Hospitality
Mission Start Text
I am here on my master's orders. At last, our troops are in formation, and the battle with Tokichiro draws near. Lord Ieyasu is glad to have you here and requests that you aid us in the coming battle. However, before we do battle there is a certain someone that I would like you to visit first. I take it you know of the tea ceremony master Sen no Rikyu? He has a sharp mind, and an even sharper tongue, even in the facae of the likes of Tokichiro. I imagine he could be great use to you.
Mission End Text
Magnificent! taking down Tokichiro's stronghold like that, well, no one else could've pulled a feat like that! Ieyasu and Hanzo are going to be most pleased!
The forces on the battlefield are still battling fiercely, unaware of Tokichiro's defeat. Let's head back to the Tokugawa headquarters and give Tenkai the good news!
Kodama Locations
- First Shrine: The first Kodama can be found at the left side corner of the entrance gate near the first shrine/starting point.
- First Shrine: From the second section of the courtyard near the first shrine, go inside the bathhouse on the right where you'll find the Spa (Hot Spring). The second Kodama can be found behind the door of the bathhouse.
- Second Shrine: From the second shrine, look behind and check the wooden pillar. You'll find the third Kodama behind it.
- Second Shrine: From where you meet Honda Tadakatsu, there's a ladder nearby, next to the cannon that goes down under the bridge. Walk forward a bit and you'll see a wooden boat, the fourth Kodama is standing at the side of the boat.
- Second Shrine: After clearing the second dark realm, you'll find yourself in an area where there are houses. There's a gate ahead that's blocked by a yokai mist. And on the right side of the gate, there's a ladder that you can climb to reach the watchtower. The fifth Kodama is in the watchtower.
- Third Shrine: There's a cannon that you can find before reaching the third shrine at the top, about midway the slope. Light the cannon so it can destroy the barricade in the previous area where there are houses. After lighting the cannon, go back down and check the house on the right. You'll find that the barricade is destroyed and you can approach the Kodama.
- Third Shrine: As you enter the courtyard that leads to the boss, check the room on the left where you'll see a Rokurokubi. The kodama can be found inside the room.
Sudama Locations
- Third Shrine: There's a cannon that you can find before reaching the third shrine at the top, about midway the slope. Light the cannon so it can destroy the barricade in the previous area where there are houses. After lighting the cannon, go back down and check the house on the right. You'll find that the barricade is destroyed and you can approach the Sudama.
Scampuss Locations
- Second Shrine: Check the corner on the left side of the gate that's on the other end of the bridge near the second shrine.
- Second Shrine: The second Scampuss can be found outside the back area of the house that's on the east side after crossing and clearing the second dark realm.
Spa Locations
- First Shrine: From the second section of the courtyard near the first shrine, go inside the bathhouse on the right near the watchtower where you'll find the Spa (Hot Spring).
Locks Locations
- Second Shrine: Onmyo Mage's Locks can be looted off a corpse. The body can be found around the corner, outside a house on the west side after crossing and clearing the second dark realm.
- Third Shrine: As you enter the courtyard before the boss. Check the other room on the left side, you'll find a body that you can loot containing the Ninja's Locks.
The Two Faces of Hospitality Walkthrough
Starting Point: First Shrine

The year is October 1584 and players arrive at Komaki-Nagakuta in Owari Province. At the entrance, you'll find Akechi who is now a mere monk and goes by the name of Tenkai. Speak to him and he'll give you 1x Arrowproof Amulet. The first shrine is just ahead of the entrance.

The first Kodama can be found nearby. From the gate, just look to the left. You'll find it at the corner. From the shrine, head towards the courtyard section, and behind the grass on the left, there's a Kusarigama-wielding Ninja there. Kill him and loot the body that's also in the grass. There's also a sword-wielding soldier patrolling ahead and another sitting by the watchtower on the right. After killing the two human enemies, climb up the watchtower to find a body that you can loot. The large door ahead is locked, so you'll have to take the path on the left where you'll encounter two more soldiers near the watchtower and another at the top of it.
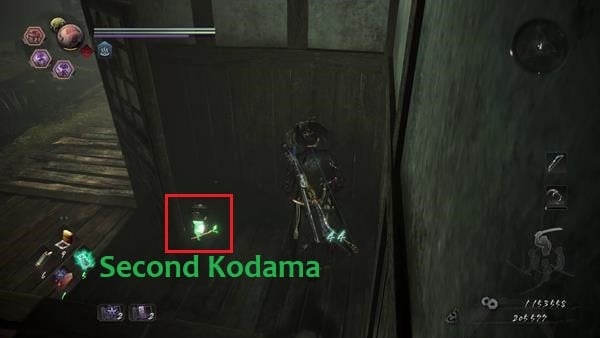
Next, there's a bathhouse on the right side where you'll find the Spa (Hot Spring) for this mission and another soldier that's sitting in it. Kill the soldier and check behind the door of the bathhouse, you'll find the second Kodama there. Once you've grabbed the Kodama, head inside the other house, at the end of it, you'll find a yokai mist blocking the large door that you can unlock and a small chest that you can open. The yokai within it is a Flying Bolt - kill it, grab the items from the chest, open the door, and go back outside and head down the inclined path towards the next area.

You'll find yourself at the inner courtyard where you'll see cannon on the upper left side and two soldiers guarding the area that's on the ground. You can try to shoot the two soldiers from afar with your ranged weapons to kill one of them before they run towards you and reach you. The other soldier, you can draw him away from where the cannon is so that you can focus on killing him without worrying about getting hit by the cannon. After killing the two soldiers, immediately turn left and you'll encounter another sword-wielding soldier, kill him and head up the wooden platform to find a large chest. Continue going left to go around the cannon and you'll find the soldier controlling the cannon on the wooden platform and a body that you can loot. While you're on the wooden platform where the cannon is, ready your bow or rifle and aim across you, you'll see a rifle-wielding soldier that you can shoot. You can light up the cannon to kill the remaining soldiers - after clearing the inner courtyard, head up the incline on the left side where you'll find the second shrine.
A Helping Hand: Second Shrine

By the second shrine, look behind and check behind the wooden pillar. You'll find the third Kodama there.

After grabbing the Kodama, you'll find Hattori Hanzo on the left side. Speak to him and he'll join your party and accompany you. The door on his right side is locked which you'll need to find a key to open it. So for now, make sure to search the section first to loot items before you open the gate that was behind him and into the next area. You'll see a bridge ahead where there is two Aberrant Soldier on it. A large Warrior Skeleton will also spawn in the middle after a short while when you aggro the first two yokai, so make sure you quickly kill the two Aberrant Soldier so that you can focus on the Warrior Skeleton. Just remember that although you have Hanzo with you, he temporarily stops fighting if he takes a lot of damage, and you'll need to assist him so that he can continue helping you fight. After killing the group of Yokai, continue forward. On the other side of the bridge, there will be another group of Yokai that's blocking the path ahead, two Warrior Skeleton, one Rokurokubi, and one Wheelmonk. What you can do is shoot them one by one from afar, this will cause one yokai at a time to run after you, allowing you to pick them off one at a time - you can start off with the Warrior Skeleton.

Now, after killing the last yokai from the group, the dark realm will appear and cover the area. A Yoki and Mitsume Yazura will also appear and attack you. Luckily, you have Hanzo with you, and most likely, one of the Yokai will lock onto him, while the other will focus on you. Successfully killing both yokai will dispel the dark realm and you'll find the Rusty Key that you can loot off a corpse that's at the other side of the bridge - before you open the gate ahead of the bridge, go back to the second shrine and open the locked door using the Rusty Key where you'll find a large chest inside.

After grabbing the items from the large chest, go back to the bridge and open the door that's on the other end. There's a Kappa looting a body ahead. Also, by the entrance, check the left side and you'll find a Scampuss at the corner.

Next, go to the right side and you'll find Honda Tadakatsu. Speak to him and he'll also join your party and accompany you.
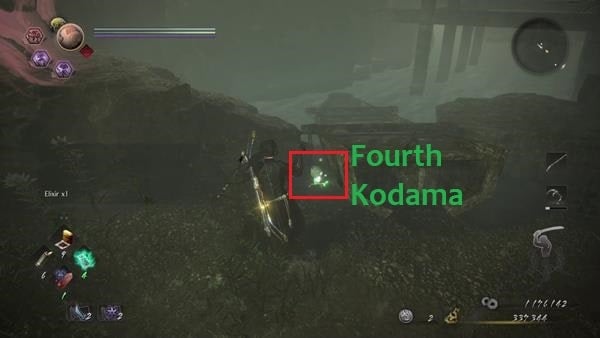
Before you go around the back where Honda was standing, there''s a ladder on the right side near the cannon that goes down under the bridge. Kill the Tonfa-wielding Ninja and Axe-wielding soldier in the area, then walk forward a bit. You'll see a boat, check the corner of it and you'll find the fourth Kodama. Once you've guided it back to the shrine, climb back up the ladder and head towards the narrow path on the right where you'll encounter a couple of soldiers that you'll need to fight. Killing them should be easy since you have Tadakatsu and Hazno with you.

Past the soldiers, you'll enter the next area that has the second Dark Realm. Before going inside, there's a large chest on the right that you can open. Inside the dark realm, there will be a few Warrior Skeleton yokai in it, an Aberrant Soldier, and a Yoki which you'll need to kill to dispel the dark realm. After killing the Yoki, check the nearby house and you'll find a large chest.
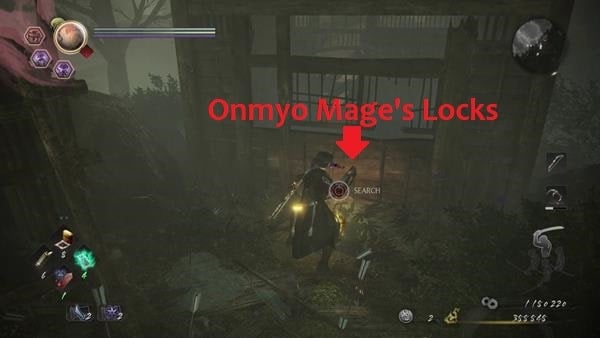
If you exit the house, you'll find yourself in a section that has a couple of houses around. The section is swarming with soldiers and ninjas so be cautious when you're exploring. From the house you just came out, there's a ladder that you can climb to the roof of the house. There's a soldier there, controlling the cannon, you'll want to kill him first to stop him from firing it while you're on the ground. Jump back down and you'll encounter two more soldiers and an armored dog. After killing the enemies, check the corner of the same house, you'll find a body that you can loot that contains 1x Onmyo Mage's Locks.

The next area you'll want to head to is straight towards a large gate that is being blocked by a yokai within a mist. But before that, go search the backside of the house that's on the right, you'll find the second Scampuss outside the back of the house.

Next, before you approach the mist, there's a ladder on the right side of the gate that goes up to the watchtower where you'll find the fifth Kodama. After grabbing the Kodama, jump back down and fight the Yoki that's within the mist.

After killing the Yoki, head further and before you climb up the ladder, Hanzo and Tadakatsu will leave the party. At the top, there's a Wheelmonk within the mist that's on the left. Kill it and open the large chest behind it. At the top of the slope is where you'll find the third shrine for this mission. About midway, before reaching the shrine, you'll see an Aberrant Soldier next to a cannon. Kill it, then light the cannon twice which destroys the barricade wall near the houses.

After using the cannon, head back down and check near the house on the right. You'll see that the barricade wall is destroyed and you'll find the first Sudama along with the sixth Kodama and an item that you can loot from a tombstone - after that's done, head back up and make your way towards the third shrine.
Third Shrine

The area ahead of the third shrine leads to the boss of this mission. But you'll want to make sure that you search the area first to find the last Kodama and Ninja's Locks. As you cross the bridge, you'll see two soldiers. You can shoot them from afar while you're on the bridge before finishing them off. After killing both soldiers, open the door ahead that leads to a courtyard.

By the door, there's a room on the left side where a Rokurokubi is. And on the right, you'll find a Nurikabe wall. Kill it or if you're lucky enough to pacify it with the right gesture to get a free pass. You'll find a large and small chest inside the room behind the Nurikabe. The small chest containing random items and gear, while the large chest has a Mujina in it - remember to mimic the same gesture it does to avoid fighting it and for it to drop some items for you to take.

Next, go inside the room where the Rokurokubi is. You'll find the last Kodama inside the room. If you want to farm for Amrita, there's a door on the left that goes to the backside of the room. The yokai within the mist is a Flying Bolt, there's also a well that you can hit to grab a random item and a body that you can loot.
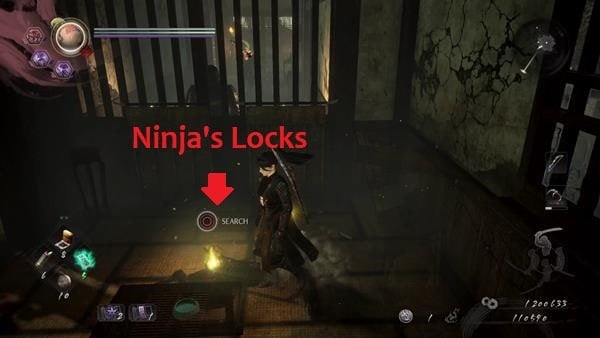
Now, before you open the door that leads to the boss, check the other room that's also on the left side of the courtyard, you'll find a corpse inside that you can loot to find 1x Ninja's Locks - once you've cleared the courtyard, use the nearby shrine if you need to before opening the door ahead of the courtyard that leads to the boss of this mission.
Boss Battle: Tokichiro

A cutscene will first trigger before the battle against Tokichiro starts. To learn more about this boss, click here. Tokichiro wields dual swords and uses the power of the spirit stone that buffs him. Since you're facing a human boss, using the Kusraigama weapon will work in your favor, you can knock him off-balance when you reel him in, while he recovers, you can attack him with a few combos before he gets back up.

He also has control of two guardian spirits, his original guardian spirit which enables him to use fire-based attacks while the other is lighting properties. At the early stages of the fight, he'll use fire-based attacks. He has two kinds of burst attacks, one where he calls out his monkey guardian spirit that jumps around and attacks you while the other where he unleashes a wave of fire from his sword. You can burst counter both, but if ever you are caught off guard, you can run away from the guardian spirit or dodge roll backward to avoid getting hit by the flame projectile. Once he reaches 50% of his health he'll conjure the other guardian spirit and imbue his weapon and attacks with lightning properties. Quickly use Lightningstop Talisman to raise your resistance and defense against electricity.

Now, he'll lay electric traps on the ground which stuns you if you walk on it. And apart from that, his burst attacks will change where he'll spin around the area. Again, at the right timing, you can counter it with your burst counter, then follow up with a few attacks - successfully defeating him will complete this mission.
Video
[video goes here]
Map
[map goes here]
Trivia & Notes:
Trivia and notes go here
 Anonymous
- Beat the 2 Faces of Hospitality 20+ times.
- Get too close to the point of hating a game I otherwise like. -> Can't have that.
- Get a trainer for the game (I only used the max item drop setting as smithing texts apparently count as items), and farm with that some more.
- Get every single smithing text the boss drops.
- No Firefly Blade odachi text that I actually want.
Conclusion: either this is cursed or said boss does NOT actually drop that text in this mission.

Imagine playing this level without Enemy Sensor.
The fog is so thick you cant see for ****.
What a nightmare.
0
+10
-1